Quantcast
Channel: Corey Roth and Friends Blogs
Viewing all 161 articles
Browse latest View live

Getting started with Azure App Service and Easy Tables

$
0
0

Azure App Service makes it easy to build a back-end for a mobile application.  One of my favorite features of it is Easy Tables.  Easy Tables makes it easy to create tables in a SQL Azure database and comes with an SDK for several mobile platforms that make it easy to access it.  You can make calls to it using REST, but there are APIs for Apache Cordova, Xamarin, as well as native development.  Some of the APIs even support offline synchronization.  If you are looking to prove out an idea, Easy Tables makes it well, easy.

There is some great documentation out there for getting started with Easy Tables as well.  However, I ran into a few stumbling points in my early experiences that I thought I would share.  These instructions assume, you have created an Azure App Service app.  If you don’t have one just look for App Services in your Azure portal and click New.  In our case, we are going to be working with a node.js back-end.

Setting up the database connection

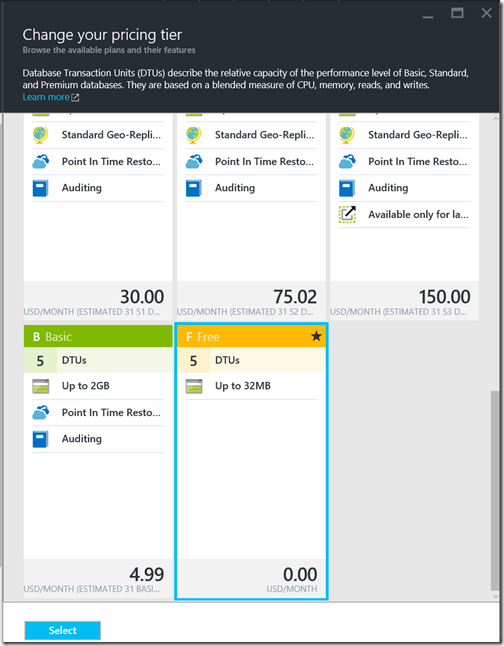
Setting up the database connection should be simple, but unfortunately, it’s not due to issues in the configuration UI.  Before you go to set up the connection, you will need to create a SQL Server to host your database if you don’t have one already.  This isn’t terribly complicated just try to pick a region close to the one hosting your App Service App.  After your database is set up, you need to create the database to host your data.  You can use the free pricing tier too to try things out if you haven’t created a free database in this particular region yet (you only get one per region).

AppServiceSQLFreePricingTier

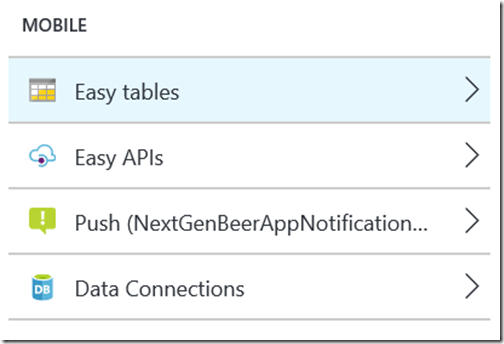
Once you have your database set up, you are ready to configure a connection to from Azure App Service.  Effectively, you are creating a connection string.  To set up the connection, go to your App Service App and click on the Easy Tables link under Mobile.

AppServiceEasyTableMenu

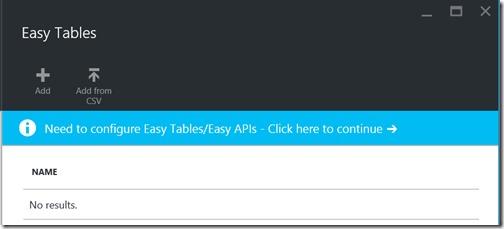
It will then initialize Easy Tables if needed and prompt you to click continue to set it up.

AppServiceEasyTablesPromptToConfigure

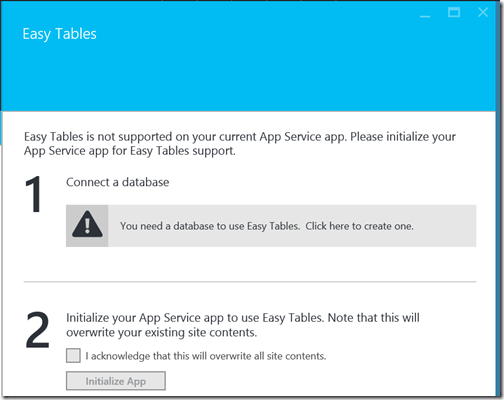
Here is where, it will prompt you to connect to a database.

AppServiceEasyTablesStep1 

After this, it will prompt you to select your existing SQL Server and then database.  The final step is to enter in the username and password you set on your SQL Server and database.  Specify a connection string name (whatever you want) along with the credentials.  Click ok and hope for the best.  I mentioned I had problems with the UI right?  The first time I did this, I couldn’t get it to save my password because it had a semicolon (;) in it.  Remember, how I said it is building a connection string underneath?  Semicolon is a delimiter for connection strings and the UI doesn’t handle that at all.  It just fails.  Hopefully this step works for you.  If it doesn’t there is a way that you can manually set the connection string using Resource Explorer.  That’s more detail than I want to go into today.  If you run into it though, feel free to ping me or leave me a comment and I’ll provide the details.

Once your database connection has been set up, click on the Initialize App button.  This will destroy any files that may already exist on your App Service App so don’t click it if there is something you need there.  Effectively this sets up folders such as /tables and /api as well as some of the basic node.js configuration.  It also creates a test table called TodoItem.

Creating new tables

There are a few ways to create new tables but not all of them have the desired results:

  • Create the appropriate files in the tables folder
  • Create the table through the Azure Portal in the Easy Tables section
  • Manually create the table in SQL Server

I would say the preferred way to create the table is by creating the appropriate files in the tables folder.  The node.js back-end will create new SQL table for any .js file you add to the tables folder (assuming the appropriate supporting files are present).  For example if you create a file named Event.js, you will get a SQL table called Event.  If you create a file named Contact.js, you will get a SQL table called Contact.  You get the idea.  There is a little bit more to it though.  Let’s look at the steps involved. 

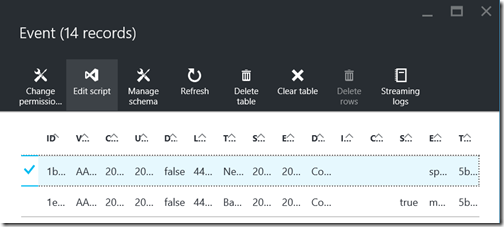
First, you need to be able to edit the files of your node.js App Service app.   You have several ways to do this.  I recommend setting up a local git repository and pushing files up to your App Service App.  You can configure that along with credentials in the Deployment source setting of your App Service App.  You can find more about setting up the node.js back-end and deployment in this article.  However, you can also just edit the files directly from Easy Tables.  If you already have a table created.  Click on the table and then click the Edit script button to edit the files directly in Visual Studio Online.

AppServiceEasyTableEditScript

Here you can edit the files directly and they are saved immediately.  I am going to start by create a table to store event information named Event.  That means we need to create a file named event.js.  Here is what the starting file looks like.

var azureMobileApps = require('azure-mobile-apps');var table = azureMobileApps.table();
module.exports = table;

According to the documentation that is all that is required to get started with a new table.  Now, you might be wondering where are the column names and types?  Technically, they aren’t required.  You see Easy Tables will create new columns on the fly when you make your first insert.  This is great to try things out but not really what you want to do in a production environment.  So I like to specify my own columns.  You can use types such as string, date, boolean, and number.  More complex types aren’t supported by the API.  To create your columns put them in an object and assign to the columns property of table.  Then be sure and set dynamicSchema to false so that it won’t create new columns on the fly.  Set these values before calling module.exports.

table.columns = {"title": "string","start_date": "date","end_date": "date","description": "string","image_url": "string","cost": "string","event_type": "string","send_notification": "boolean"};
table.dynamicSchema = false;

Don’t worry about creating columns for things like and Id, created and modified dates, or even soft delete.  Easy Tables will create those columns for you automatically.

Before Easy Tables goes and creates your back-end table, there are a few more steps.  First, you need a corresponding .json file.  In our case it would be Event.json.  This contains some basic properties such as if soft-delete is enabled and whether certain operations require authentication.  I found no documentation whatsoever that said this file was required.  However, in the TodoItem samples out there on git hub the file was always there.  Here is what it looks like.

{   "softDelete" : true,   "autoIncrement": false,   "read": {     "access": "anonymous"   },   "insert": {     "access": "anonymous"   },   "update": {     "access": "anonymous"   },   "delete": {     "access": "anonymous"   },   "undelete": {     "access": "anonymous"   }}

If you want to authentication to be required, you can change the access for the corresponding operation to “authenticated”.  However, we’ll cover that in a different post.

At this point, you should see an entry for your new table in the Easy Tables section of the Azure portal.  However, the underlying SQL table does not exist yet.  In fact, it doesn’t get created until you make your first API call to it.  That part took me a while to figure out.  Maybe there is a way to automate it getting created but in my experience it doesn’t happen until then.  There is actually a parameter called seed that will let you put sample data into your table, but I have never successfully gotten it to work.

Calling the API using JavaScript

In my example, I am using Apache Cordova.  It’s easy to get started with the Cordova SDK and Azure App Service.  Just add the plugin and create a client object and start querying.  Take a look at this post for more details.  If you are using straight HTML / JavaScript, the code is basically the same as well.  First, create a client object using the URL to your App Service.  You can get this from the Azure Portal.

var client = new WindowsAzure.MobileServiceClient(azureMobileClientUrl);

Now, we can call getTable with the table name to get the event.  Selecting data from the table is easy, just call .read() to get everything.  It has a promise attached so that you can work with your results and errors accordingly.

var table = client.getTable('event');return table.read().then(function (events) {// do something with events}, function (error) {// do somethign with errors});

If you want to filter your data just add a where clause.  Each item you add to the collection will be treated as an “AND” operator.  Note, that it is only simple equal comparisons though.

var table = client.getTable('event');return table.where({ id: myId}).read().then(function (events) {// do something with events}, function (error) {// do somethign with errors});

You can also use .orderBy() to control the order of the data as well.  It can be used in conjunction with the where clause if desired.

var table = client.getTable('event');return table.orderBy('start_date').read().then(function (events) {// do something with events}, function (error) {// do somethign with errors});

Making any of the above calls is enough to get your table created.  You can then go to Server Explorer –> Azure –> SQL Databases and verify that the table was created.  This is a great way to look and see what data is there as well.

Have a look at the SDK reference for inserting and updating data.  You simply need to create an option with the matching column names and specify the values and call .insert() or .update() accordingly.  Remember you don’t need to specify values for the Id or any of the other fields Easy Table creates.  The response you get back will be the inserted or updated data.

var table = client.getTable('event');return table.insert({
	title: 'Event Title',
	description: 'This is an event description',
	start_date: new Date(),
	end_date: new Date(),
	event_type: 'Special Event',
	send_notification: true}).then(function (response) {}, function (error) {});

If you need to delete data, the one thing I ran into is that it only works with the Id field.  If you try to delete based on some other value, you’ll get an error.  If you need to delete based on some other field, you will need to create your own API.  We’ll cover that in another post.

var table = client.getTable('event');
table.del({ id: id }).then(function () {// deleted}, function (error) {// error});

Mobile Apps in Azure App Service is an evolution of Azure Mobile Services.  I often find there is more documentation on that since it’s been around longer.  For example, take a look at this article on working with mobile data as it has a lot more examples.

Summary

Azure App Service Easy Tables make it super easy to get started creating a back-end for your mobile app.  Give them a try and see what you can create.  If you are looking for some samples, be sure and check out the Azure Mobile Apps repository in GitHub.
About to start a major Intranet project? Take a step back and see what’s coming to SharePoint

$
0
0

For years, enterprise have been spending huge amounts of money and time building their Intranet on top of the SharePoint platform.  Intranets take lots of planning and development even to get the most basic of functionality.  Throw in heavy branding and responsive design and you’re looking at a significant investment.  Launching a new Intranet has just been too long of a process with too many technical hurdles, but things are going to improve.

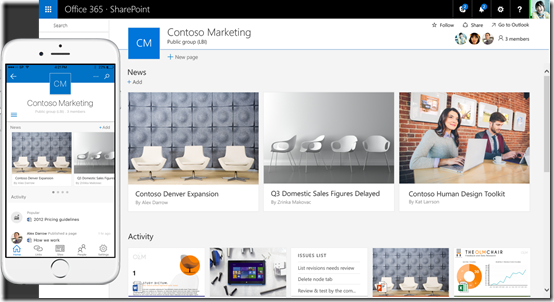
SharePoint team site and mobile app

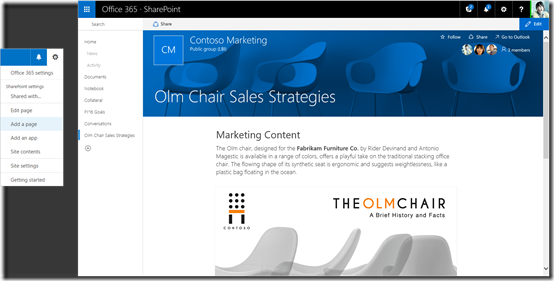
Microsoft has announced a new page publishing experience that will make a lot of publishing scenarios much simpler.  It provides an updated page authoring canvas that allows for simple branding and page layouts while still having some extensibility hooks.  Best of all what you create here is responsive and works seamlessly with the new SharePoint app.  Out-of-the-box you will be able to quickly creates pages without a bunch of up-front configuration first.  Remember what you had to do before?  You know, create content types, page layouts, master pages, workflows, page libraries and more.  Not to mention, Microsoft has been telling you to stop customize master pages for some time now.  You want to go back to that?

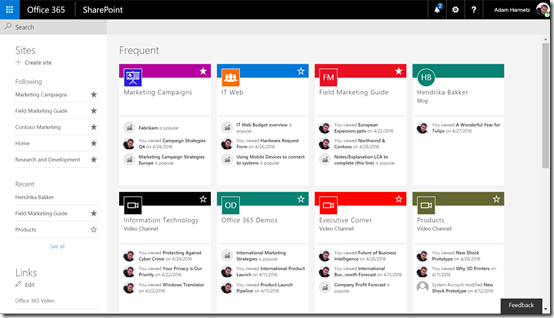
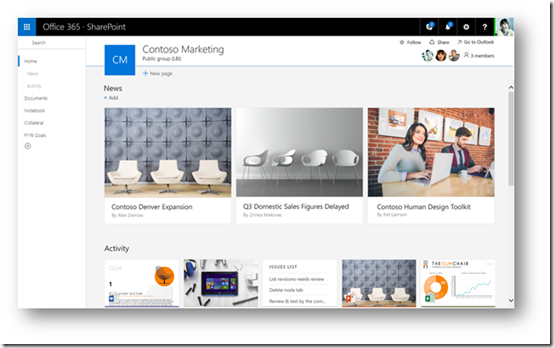
SharePoint becomes a first class citizen in Office 365– a few years ago, you might nave noticed that references to the actual term SharePoint were few and far between in Office 365.  The only real entry point to SharePoint was through the Sites link in the app launcher.  That’s changing.  The link will now say SharePoint in it and so will the navigation in the suite bar.  Clicking on the link will take you to the new entry point or SharePoint Home which pushes sites that you frequent right to the center.  It also tracks sites you are following as well as provides links to other sites.  This should make it easier to find many of the sites you need without an organization having to put a lot of thought into the information architecture.  While it won’t outright replace it.  It’s a great starting point for organizations who have never bothered to really set anything up like that.

SharePoint home page with activity - 100 percent

But my Intranet *MUST* do X or we can’t use it– great!  Keep doing what you are doing and customize the whole thing the way you used to.  However, if your requirements are flexible, the first release may be just what you need.  If you are looking for a simple page authoring canvas with little ramp-up, I think you are going to like it.  This upcoming release, I think will come close to hitting the “80%” mark where it’s good enough to get people publishing content quickly and easily.  If you have advanced needs and you find that you need something more, then you are probably going to have to go back to the conventional publishing model while you wait for new features to come online in future releases.

The Intranet, not just for huge Enterprises any more.  I have worked at a number of consulting companies and there is good money in helping clients build out elaborate Intranets.  Sure a lot of that comes down to the planning and design, but the implementation was just overly complex.  Just as Office 365 has brought features like Team Sites and Exchange into small organizations years ago, the new modern pages experience is making the Intranet broadly available to smaller organizations.  That’s pretty exciting.

SharePoint-the-mobile-and-intelligent-intranet-7-and-8

We are about to start a big Intranet project or are in the middle of one– This is a tricky place to be in and your organization will have to make decisions about timelines.  The new SharePoint Home entry will be here soon but the modern page publishing features are further out in 2016.  Although there is limited information right now.  Try and take a look at your requirements and see if the new Modern pages experience will meet your requirements.  If you don’t think it will, them continue implementing your new Intranet as usual and take another look at it in the future.  If you think it does meet your requirements, then maybe take a step back and see what happens and use this as an opportunity to fully vet out your define phase.  Ultimately, it comes down to your organization’s priorities, requirements, and timelines.

The future of SharePoint is bright.  Today has taught us that Microsoft is continuing to invest in the product as a core.  If you missed any of the announcements, be sure and read through them to find out everything that’s coming.

One key takeaway from SharePoint 2016 General Availability

$
0
0

This morning at the Future of SharePoint event, Microsoft announced the General Availability (GA) of SharePoint Server 2016.  While many customers have transitioned to the cloud with Office 365, on-premises SharePoint is still very real and alive.  As an end user, you might have looked at SharePoint Server 2016 and wondered “Why bother?”.   There really isn’t many new features that the end user is going to get excited about.  Yes, you’ll get a nice new suite bar, but most of the rest of the features the user cares about are linked to hybrid scenarios.

What you should take away from today’s event is that you are not upgrading to SharePoint Server 2016 for what you get today.  You are upgrading for what you get in the future.  Whereas previous versions of SharePoint Server were very much static and didn’t change over the three year release cycle, this version is very different.  This version lays the foundation for new features to be delivered through Feature Packs.  These Feature Packs will bring new features to your on-premises SharePoint farm without having to wait until the next big version.  Microsoft even plans on delivering a set of capabilities specific to the needs of on-premises customers.

Don’t worry, new features won’t just show up overnight like in Office 365.  Instead, as a SharePoint administrator, you’ll be able to have control over which features you enable in your farm.  This will give you time to plan and communicate change accordingly.  For whatever reason you run on-premises SharePoint, this should be an exciting announcement as it means you won’t get left in the cold waiting for the latest killer feature.  Does that mean, every feature from Office 365 is coming down to on-premises? No.  Some features simply aren’t feasible on-premises.  That’s why the hybrid story is so important.  However, it does mean, you’ll get updates on-premises faster than ever before.

Feature Packs will be delivered through the public update channel starting in 2017.  Microsoft will announce more details about the upcoming Feature Packs in the coming months.  To get the new Feature Pack, your company will have to have purchased SharePoint with Software Assurance.  For Enterprise customers, that’s probably most of you.  You’ll notice this is similar to the model that Windows 10 is using and the way it updates as well.

There is an exciting road ahead for SharePoint.  Be sure and read everything about it in case you missed any of it.

Office 365 Groups or Team Sites? No need to have that discussion any more!

$
0
0

Any time Microsoft releases a new feature that has an overlap with a new feature, we see a flurry of fluff in the form of blog posts and even sessions on which feature to use when?  When Office 365 Groups came out, this was no exception.  What has changed?  At the Future of SharePoint event, Microsoft announced that every group in Office 365 will benefit from an associated Team Site.  Every Office 365 Group you create will get a new modern Team Site provisioned that shows a clear linkage to the Group.

image

That’s pretty cool and should help eliminate the confusion on what to use when since you no longer have to make a decision.  Microsoft has also stated that existing Office 365 Groups (as in the ones you have now) will also get a Team Site associated with them as well.  This means whatever you are doing now, it’s ok.  You’ll be in good shape when the new features are rolled out.

The updated Team Site home page provides a quick way to find the most important and relevant content on the site.  Content and news can be pinned to the front page and the Office Graph is baked right in to highlight activity relevant to you.  What’s even better is that you can even access it through the new SharePoint mobile app.

Another exciting change from the new Team Site experience is that they will be provisioned faster.  Whereas, it used to take several minutes to provision a site collection, now it should only be a matter of seconds. 

Between the Office 365 Group, the new team site home page, and existing team sites, we haven’t seen quite how all of this ties together yet.  It will be interested to see where things go.

This isn’t out yet, where should I put content right now?

Ok, so the conversation is not quite dead yet.  For now, if you need features that are only in Team Sites such as workflow or metadata, use a Team Site.  If you don’t care about Metadata and the document library in Office 365 Groups is good enough for you, then use that.  As you can see, Office 365 Groups is really starting to tie everything together.

Ionic 2 debugging on Android with Visual Studio Code

$
0
0

If you’re new to Ionic 2, you might have encountered some issues getting started debugging.  While you can usually debug fairly easily in the browser, when it comes to debugging on the device, there are some extra steps.

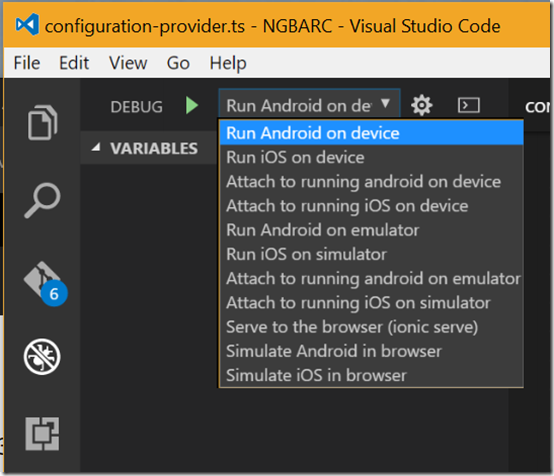
First, install the extension ionic2-vscode. This will give you the options in the debug menu to start the process. 

Ionic2VSCodeDebugMenu

However, before you start that, you need to make a change to package.json so that your breakpoints will be hit.  Change your “build” line to the following:

"build": "ionic-app-scripts build --dev",

The key there is to add the --dev parameter.  Now you can hit the debug button and wait.  It will take a while to startup but once it is running, the app should be on your device and your breakpoints will get hit.

If you have never deployed to your Android device before, you might try running “ionic run android” at the command line first to see if you have any other issues to resolve.

Sitecore and SQL Server on Linux

$
0
0
SQL Plus Linux

So, I had a couple of hours today to play around with something and I had recently seen the news about public availability of the SQL Server on Linux preview... Short version - it seems to work with Sitecore. Of course I would never use this in a real environment (probably not even a development environment), but it is encouraging to see that all of the basic SQL Server features required by Sitecore seem to be working already. I'm kind of excited for this to get to a level that I can trust it for production sites (I really love Linux), so I'll definitely be keeping an eye on it.

Now - if you want to see this for yourself, the quickest way is to just spin up a Linux virtual machine. I downloaded Ubuntu Linux Server version 16.04.1 LTS (the LTS stands for Long Term Support) which is the version recommended by Microsoft. I used VMWare Player on my machine to create the VM and it pretty much fully automated the OS installation. Just be sure to use bridged networking if you want to access your VM from outside of the host machine (with VMware at least, the default is NAT). Your mileage may vary with other virtualization products like HyperV or Virtualbox, but Ubuntu makes installation relatively painless if you follow the on-screen prompts.

Once the VM was up and running and I was logged in to a prompt, I just followed the instructions here https://docs.microsoft.com/en-us/sql/linux/sql-server-linux-setup-ubuntu and... Well, it was that easy. I could connect to SQL Server from a Windows machine using SQL Server Management Studio and the sa credentials I created during installation.

Getting the Sitecore databases attached was actually really easy too. If you've done this in a Windows version of SQL Server, the process is basically the same. You just need to get the .MDF and .LDF files onto the Linux machine. For this, I installed openssh-server (from the prompt on the Ubuntu box, I typed "sudo apt-get install openssh-server") and used the scp command from the Git Bash prompt on my Windows machine (or you could use pscp.exe that comes with Putty if you prefer). There are lots of ways to get files in and out of a Linux server, but this was quick and easy for me given the tools I had at hand. So anyway, I used scp to copy the files into my home directory on the Linux server then moved those files to /var/opt/mssql/data and changed their owner to the mssql user (command was "chown mssql.mssql Sitecore*"). Then in SQL Server Management Studio, I attached the databases as per normal (note that the root of the Linux filesystem is considered C:\ by Management Studio, so my files were in C:\var\opt\mssql\data).

Then I just pointed my Sitecore ConnectionStrings.config at those databases on that server like I normally would and... Everything seemed to work!

The current SQL Server for Linux preview isn't optimized for performance and I'm sure it will be a while before we have some best practices for configuring and deploying it in production environments. And although everything I tried in Sitecore appeared to work fine, there's still a chance some SQL Server feature that doesn't yet work in Linux is required by some bit of Sitecore somewhere. So I wouldn't use this for anything serious, but it was a fun experiment just to see what would happen!

How to: Get a Microsoft Graph Access Token when logging into Azure Active Directory with Azure App Service

$
0
0

If you have used Azure App Service, you will have loved how easy it is to set up authentication to providers such as Azure Active Directory and Facebook.  It lets you get started with a single line of code.  You can literally login with a single line of code like the following:

client.login('aad').then(results => {     // successful login }, error => {     // login error });

This will give you an id_token that you can then turn into a access_token by calling the /.auth/me endpoint with a REST call.  However, that access_token won’t have access to anything even though you configured App Service to use an App that has requested specific permissions.  CGillum from Microsoft pointed me in the right direction with his post to access the Azure AD Graph, but the Microsoft graph required some tweaks.

You start by going to the Azure Resource Explorer.  However, this assumes you have already configured your App Service app to use your particular Azure AD Application that you are creating.  Find your app service app in the hierarchy and then open /config/authsettings and click Edit.  If you haven’t set your clientSecret yet, you can do so now (although I am not 100% sure it’s required).  However, the key parameter is to set additionalLoginParams with the following JSON array. 

["response_type=code id_token",  "resource=https://graph.microsoft.com"]

This tells /.auth/me to give you the proper access_token when you call it.  You can also get a refresh token this way at the same time.  Once you have made the changes click the PUT button to send the changes back to the service.  Your should look something like this.

Screen Shot 2017-01-12 at 9.19.14 AM

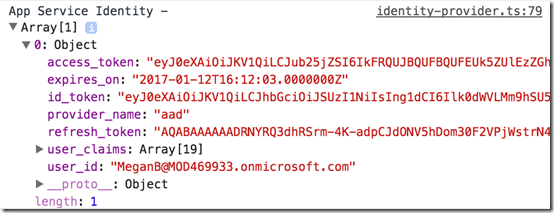
Now, when you login again and call the /.auth/me endpoint, you’ll get additional data including an access token that works with Microsoft Graph.  If you have logged in before with this particular username and app, you will want to sign out and log back in again to make sure the permissions that you specified in your application get granted.  You may need to add the query string parameter prompt=consent on the login page to get it to prompt you for the new graph permissions.  Otherwise, you’ll get an access token that won’t work with the Microsoft Graph.

Screen Shot 2017-01-12 at 9.12.36 AM

As you can see in the screenshot above, the object returned has a lot more information in it than before.  There is nothing particular sensitive in this screenshot either since this is just a demo tenant. 

Running an Ionic 2 PWA using Azure Web Sites

$
0
0

You can host an Ionic 2 Progressive Web App (PWA) pretty easily on Azure Web Sites (App Service).  If you aren’t sure where to get started, take your Ionic 2 project and add the browser platform if you haven’t already.

ionic platform add browser

Now, you can test it locally by running against the browser platform.

ionic run browser

Running it on Azure really is just a matter of copying your files to your Azure Web Site via ftp.  You can get the username and address to connect to from your App Service properties.  Connect to it and be sure you change to the /site/wwwroot folder.  This is where the files from your app will go.  To will upload your files from the platform/browser/www/build folder.  Before you copy your files though I recommend you do a production build with the --prod command.  This will make the size of your JS files considerably smaller.

ionic run browser --prod

Now copy your files to the FTP site and go to the corresponding URL in your browser.  Your app should be working there. 

There are a few mime types that you need to configure so that the Ionic fonts and any other files get served by IIS properly.  You do this in by creating a web.config.

<?xml version="1.0"?><configuration>  <system.webServer>    <staticContent>      <mimeMap fileExtension=".json" mimeType="application/json" />      <mimeMap fileExtension=".eot" mimeType="application/vnd.ms-fontobject" />      <mimeMap fileExtension=".ttf" mimeType="application/octet-stream" />      <mimeMap fileExtension=".svg" mimeType="image/svg+xml" />      <mimeMap fileExtension=".woff" mimeType="application/font-woff" />      <mimeMap fileExtension=".woff2" mimeType="application/font-woff2" />    </staticContent>  </system.webServer></configuration>

If you are working with DeepLinker, you may consider using a path-based location strategy instead of the standard hash based.  This effectively removes the hash (#) symbols from all of your URLs.  However, additional configuration will be required.  That’s because IIS hosting your site in Azure will give you a 404 error when you go any of the routes you have defined.  You need to redirect your routes to index.html to work. I have found that the routes in the web.config listed below pretty well.  If you are using query strings you might run into issues with these routes though so you may need to do some additional configuration.

<?xml version="1.0"?><configuration>  <system.webServer>    <staticContent>      <mimeMap fileExtension=".json" mimeType="application/json" />      <mimeMap fileExtension=".eot" mimeType="application/vnd.ms-fontobject" />      <mimeMap fileExtension=".ttf" mimeType="application/octet-stream" />      <mimeMap fileExtension=".svg" mimeType="image/svg+xml" />      <mimeMap fileExtension=".woff" mimeType="application/font-woff" />      <mimeMap fileExtension=".woff2" mimeType="application/font-woff2" />    </staticContent>    <rewrite>      <rules>        <clear />        <rule name="AngularJS Routes" stopProcessing="true">          <match url=".*" />          <conditions logicalGrouping="MatchAll">            <add input="{REQUEST_FILENAME}" matchType="IsFile" negate="true" />            <add input="{REQUEST_FILENAME}" matchType="IsDirectory" negate="true" />            <add input="{REQUEST_URI}" pattern="^/(api)" negate="true" />          </conditions>          <action type="Rewrite" url="index.html" />        </rule>      </rules>    </rewrite>  </system.webServer></configuration>

Running your PWA in Azure works a little bit differently, but once you have it configured, it’s a good solution.  If you run into any issues, turn on diagnostic logging in Azure and watch the log streaming to see what is happening.  Be on the lookout for scripts and CSS files returning a copy of index.html instead of what they are supposed to.  You can easily verify this from the developer tools of any browser.


How to: Fix Something went wrong error in Outlook Customer Manager

$
0
0

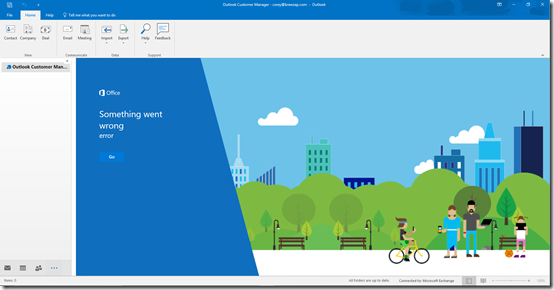
I actually use Outlook Customer Manager (OCM) quite a bit to keep track of my leads for my product BrewZap, a custom mobile app platform for breweries.  Unfortunately, it’s not uncommon to run into an error when launching it that says “Something went wrong”. 

Screen Shot 2017-09-18 at 7.23.03 PM

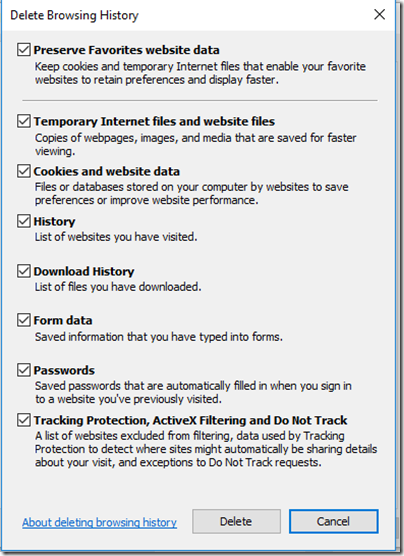
The problem is that sometimes this error will even occur after you close an d restart Outlook.  If that happens to you, then open up Internet Explorer (yes IE), and go to Internet Options.  Then click on Delete under Browsing History.  Check all of the boxes and then restart Outlook.

Screen Shot 2017-09-18 at 7.27.05 PM

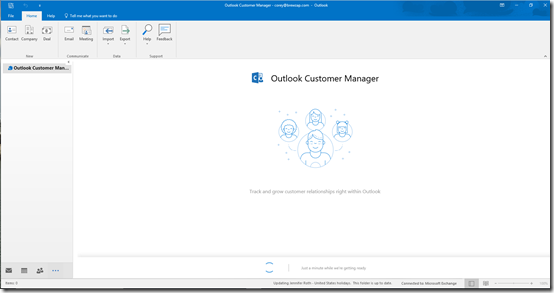
If all goes well, Outlook Customer Manager will start again and you can use it.again.

Screen Shot 2017-09-18 at 7.28.10 PM

Ionic app with Cordova Firebase plugin terminates on startup with Xcode 9 and iOS 11

$
0
0

If you are trying out your Ionic / Cordova apps on iOS 11 with Xcode 9, you might run into an issue where the app terminates immediately.  After examining the logs, you will see that the plugin cordova-plugin-firebase is terminating the app because it cannot find the GoogleService-Info.plist file (even though it is there).   You’ll see an error like the following in your logs.

The GOOGLE_APP_ID either in the plist file 'GoogleService-Info.plist' or the one set in the customized options is invalid. If you are using the plist file, use the iOS version of bundle identifier to download the file, and do not manually edit the GOOGLE_APP_ID. You may change your app's bundle identifier to '(null)'. Or you can download a new configuration file that matches your bundle identifier from https://console.firebase.google.com/ and replace the current one.

*** Terminating app due to uncaught exception 'com.firebase.core', reason: 'Configuration fails. It may be caused by an invalid GOOGLE_APP_ID in GoogleService-Info.plist or set in the customized options.'

If this happens to you, check your version of the plugin.  On one machine, I had 0.2.4 and on the other I had 0.2.1.  It worked on 0.2.4 so removing the plugin and re-adding it fixed it for me on the affected machine.

Six considerations for running a multi-tenant mobile app using Azure App Service

$
0
0

With the launch of HappenZap, I now have two multi-tenant mobile app platforms running on Azure App Service.  When it comes to the backend services for mobile apps, Azure App Service really isn’t used that much though.  In fact, in the 2017 Ionic Developer Survey, Azure only accounted for 10% of the users using it as a server side platform (behind Heroku, Digital Ocean, and Amazon ECS).  For authentication, it ranked even lower at only 2.9% of the survey results.  For Push Notifications, it wasn’t even on the list.  However, for both my platforms, I have chosen to use it and have been doing so successfully.

Why did I go with Azure App Service?  When I was getting started with mobile development, I found Azure as an option pretty quickly.  Having a lot of experience around the Microsoft stack, I found that App Service was something I could get going with.  Maybe this was partly due to my lack of experience with mobile, but I chose to go this route and I am pretty happy with a lot of it.  Most mobile developers I have ran into don’t even consider Azure App Service as an option, but I think it’s worth a look.

Let’s look at some of the different aspects.

Database

Azure App Service offers Easy Tables and they are in fact easy.  They are awesome for prototyping because you don’t even have to define a schema (although I always do in my apps).  In fact, you can basically just insert anything and if the column doesn’t exist in your table, it will create it for you.  it automatically creates an id column, a createdAt, modifiedAt, version number, and deleted fields for you as well.  It supports a soft-delete capability that you can easily turn on as well.  From a developer stand point, it’s easy to get started with a simple API around your database tables using node.js.

From a cost perspective, this is where you want to plan.  Even the cheapest Azure SQL database costs you $5.  For a service I am charging $40 a month for, having a separate database for each customer is not cost effective.  As a result, I put all of my customers in the same database and every table is segmented by a tenant_id column.  This works, but that means you have to write a level of security into your API.  We’ll talk more about authorization in a bit, but this means you have to validate that the user making the API call has permission to make queries into that tenant.

Azure Web Apps / Mobile Apps

Whether you create a new “Mobile App” or “Web App”, it’s basically the same thing with a different icon in the Azure Portal.  When thinking multi-tenant, your goal is to create one of these that can serve all of your clients.  If each client has to have their own Web App, you will quickly exceed the memory capacity of your App Service plan.  There are reasons why you might consider having more than one though as you will see when you read on.

Authentication

Authentication in mobile apps with Azure App Service is easy due to the large number of SDKs available including Cordova, Xamarin, and native iOS and Android.  App Service supports authenticating against Azure Active Directory, Facebook, Google, Microsoft, and Twitter.  If you want to authenticate against Microsoft consumer or AAD, App Service is a great option because Firebase doesn’t support it.  You can authenticate against one or all of the providers too.  Logging a user in as simple as calling azureMobileClient.login(‘providername’).  On mobile apps, it will open the InAppBrowser and sign the user in.  This works great for interactive logins but auto-login with the token is a bit of a different story.  I’ll post in the near future about how to do that as it is not well documented.

The way authentication works is that your mobile client makes a call into the App Service back in which in effect proxies the request over to the appropriate provider.  The nice thing about this is that, any subsequent API calls you make automatically pass the user’s token and the API can respond accordingly if the user is not authenticated or their token has expired.  If you don’t need authentication on a particular type of API call, you can allow anonymous users to access it.  For example, anonymous users might get read access, but authenticated users can insert / update / delete.

The issue you run into with authentication on app service is that all users have to request the same scope / permissions.  For example, you may want end users to have just basic profile access to Facebook, but you want administrators to be able to manage pages.  The permissions you request are set in the Azure Portal and are essentially fixed.  That means all users have to request the same permissions.  That’s no good.  One way to work around this is to call the authentication provider directly.  For example, I’ve done this with AAD to request a scope that included admin consent credentials such as Group.Read.All.  Another way to work around this is to have multiple Azure Mobile Apps configured with different permissions.  This really doesn’t scale all that well either, but could be an option for simple scenarios.  It does create a bit of overhead though since you have to push code to each one and your client side code has to know which endpoint to call.

Authorization

Azure takes care of the Authentication for you, but authorization is still up to you.  There are not a lot of complex examples out there for this, so I’ll probably write something up soon.  Your API will receive the user’s context and therefore you can get there access token and username if needed.  For authentication, I simply implement a users table which has the user’s unique id, role, and tenant id.  I first make sure that the user is in that tenant id.  Then I make sure the user has the right role for whatever operation I am performing.  It’s fairly simple, but it works.

Save Cash with Caching

You pay for every bit of data egress from Azure whether that is your API or SQL.  It can really add up too as your volume grows.  Be sure and take advantage of caching wherever you can. Cache frequent database calls at the API layer.  Cache data that doesn’t change frequently on the mobile app.  Only get data when you need it.

Push Notifications

Azure Mobile Apps supports push notifications with Google, Apple, Amazon, and a few others.  It’s pretty simple to set up and their are methods built into the node.js SDK that make it easy to set up.  However, there are a few limitations.  First, App Service doesn’t support the newer key based model used by APNS so that means you need a certificate (for both development and production) for every tenant.  The next issue is that you can only install one key per instance of an Azure Mobile App.  That means you would have to have a separate Azure Mobile App per tenant.  That doesn’t scale well at all.  I used this approach for a while but I switched over to Firebase Cloud Messaging and now I can use a single tenant.

Summary

Azure App Service is a cost effective way to run multi-tenant mobile applications.  There are factors that you have to consider, but I do think its a viable choice for hosting your mobile app’s backend. 

Ignite 2017 Readiness Checklist

$
0
0


I started doing SharePoint Conference readiness checklists back at SPC11 and I wanted to update it for Ignite 2017.   This list may look similar to previous lists, but I have made lots of updates and additions.

What to pack:

  • Chargers / Power Supplies – I remember when I went to PDC05 (wow I am getting old), I forgot my laptop charger.  I was quite bummed.  Don’t forget the chargers to your laptop, Surface, phones, table, etc. I have gotten a few of these new emergency phone chargers at conferences lately and they are very handy here. Keep in mind your average day can be 16 – 18 hours plus and you don’t want to be left in the dark and miss that big gathering because your phone died.   Besides, you can’t summon a Lyft if your phone is dead.   Don’t forget chargers for any accessories like Fitbits, Apple Watches as well.
  • Backup power – If any vendors are giving out backup power supplies, grab them!  You know the portable chargers that you can take with you.  We have several of them and they are a life saver.
  • Tablet / Laptop – You’ll want some kind of computer whether that’s a tablet, laptop, hybrid of whatever.  You want something with a keyboard.  This makes it easier to send e-mail or post tweets.  Besides, the more you are on this device, the less you have to rely on your phone and use its power. You also can use these to fill out session evaluations.  There are usually incentives for filling out evaluations so I try to complete each evaluation right before the end of the session so I don’t forget.  
  • Cash – There are a lot of free events but you might go do something before or after the conference and I am not a fan of running tabs at busy restaurants and bars.   Don’t take it all with you every night.  Leave some in the hotel safe.
  • Snacks and Water– After a long night, you will want something to eat.  At the minimum, you might want something to eat in the morning.  The hotels will likely have stuff in your room, but it will cost you dearly.   Stock up whenever you see them available.   Hydrate!
  • Business Cards– Even if you are not in sales, bring twice as many as you think you will need.  You will go through them faster than you think.   It’s amazing how many people forget these at a conference.  Don’t be one of those people!
  • Bail Money – The Houston SharePoint Users Group has a running joke about always keeping a stash of bail money around when attending a #SharePint.  You never know what is going to happen.  If you’re following @SPCPartyPatrol to all of the parties you might certainly need it.
  • Headset– If you think you are going to have to take any calls during the week, don’t forget your Bluetooth or wired headset.  This will make it easier to do your calls for sure.
  • VPN Tokens - If your work network requires a VPN token or Smart Badge you might want to bring it if you think you might need to use it.  Otherwise, you might conveniently forget it, to ensure you can focus on the conference. :)

Before you go:

  • Arrive early– Come in early and have some fun in Orlando, before you get into the conference grind.  Many of us will be arriving Friday or Saturday.  I tend to arrive on Saturdays while most of the foreign nationals I know, tend to arrive Friday or earlier.
  • Don’t leave early– Normally I say this, but they have extended the conference by a day.  Come Friday, I’ll be ready to be on the first plane out of Orlando.
  • Set your schedule on MyIgnite - This will make your Ignite organizers happy when it comes to capacity planning.  You aren’t required to go to that session you schedule, but it will help you pick from the 10+ sessions going on at any given time slot.  Go to MyMignite and set your schedule now.   Not sure about a session, watch the teaser video on YouTube.
  • Create your Bio on MyIgnite  – Whether you are an end user or a rock star, take a few minutes to write about yourself.  Include where you work if you want along with what you typically do with the Microsoft stack and what you want to get out of the conference.  Upload a picture of yourself to make things more personal.  Be sure and set the privacy settings as desired.  Set your MyIgnite bio now.  Be sure and edit your profile on Yammer too.
  • Connect on MyIgnite - If you go to the Communities tab, you can search for other attendees. 
  • Get on Tech Community - The conversations have already begun about Ignite on Tech Community.  This is a great way to find out what other people are doing, network with others, and talk with people with similar issues.  Most importantly, you can have a conversation about the sessions while they are occurring. 
  • Create a #msignite Search in Twitter – Twitter hasn't gone away by any means, so keep an eye on the activity of the #msignite hash tag.  However, this year, I think Yammer is where you are going to find the most info and conversations.  Twitter will still be good to find out about sessions, events, and it will generally give you an idea of what is happening at the conference.  Be sure and include the #msignite hash tag on anything you post and help get this conference trending!
  • Follow @MS_Ignite on Twitter – @ms_ignite is the official twitter account for Ignite.  This account often posts useful stuff about the conference.  I’ve also used it to ask questions or provide general feedback and I’ve had very good luck getting a response.  Keep in mind this twitter account is effectively manned by one person though.
  • Download the Ignite Mobile App – Whether you use iOS, Android, or you are one of the last few Windows Phone users, be sure and download the Microsoft Ignite App before you go.  Download it now while you still have good Internet!
  • Reach out to your local User Group – Find out what your local User Group is doing while at Ignite.  Many of them are having meetings or socials. 
  • RSVP for Parties – Unfortunately, if you haven’t RSVPed for parties by now, you’re probably out of luck.  However, being persistent can get you in.  Talk to the vendors in the exhibit halls hosting the parties.  Sometimes you can just show up and talk your way in.  Be sure and follow @SPCPartyPatrol to find out where the parties are too!
  • Arrange for Ground Transportation  - Don’t forget to arrange for ground transportation.  You really don’t need a car in Orlando, but you do need a way to get there.  Taking a taxi or Lyft usually isn’t too expensive and there are plenty of shuttle options as well.  This may be less of a concern on arrival but more for your departure.
  • Leave space in your bag– Between the conference materials and the vendors you are going to end up with a heap of product information, trinkets, and T-shirts.  Make sure you have room in your bag to bring them home.  Otherwise you’ll be hand carrying them on the plane or leaving things behind.
  • Update your devices - Now is a great time to make sure your devices are up to date with the latest security patches.  Make sure they are charged too!  If you have an iPhone and you haven’t updated to iOS 11 yet, do it now!  Don’t be one of those people downloading 2 GB worth of updates on the conference WiFi.
  • Set your out-of-office - You're at this conference for a variety of reasons, you need to focus.  Try to stay out of Outlook and let people know that you will be slow to respond.  If you need to stay connected, I recommend picking one time of day, such as in the morning before sessions, to catch-up on what's happening back at home.

What to do at the conference:

  • What happens in Orlando, will not stay in Orlando– Nerds have gadgets and they like to take pictures.  Do something stupid and you can rest assure it will be on twitter or Instagram within seconds.
  • Ask questions  - Don’t be afraid to walk up to the mic and ask a question.  That’s what you’re here for.  If you don’t want to ask it in front of everybody, wait in line and talk to the speaker at the podium just be mindful that the speaker has to clear out in a hurry.  Don’t be afraid to approach speakers outside the room either.  Most of them are friendly and are easily engaged using beer and cocktails. :)  It's not uncommon to find them at the official SharePint bar.
  • Make friends– You may run into lots of people you know, but many people aren’t active on twitter and aren’t familiar with the SharePoint community at all.  Find a friend if you didn’t come to the conference with any one.  It’s much more fun to go do all of the activities in a group rather than by yourself.  If you have coworkers there, feel free to hang out with them, but don't feel that you are obligated to.
  • Go to the evening events - I can't stress this enough.  Try to avoid team dinners that overlap with the events.  Get them rescheduled or skip them!  The evening events are where the real connections are made, friends are found, contracts are signed, and new jobs are discovered.  If you just go to the conference and nothing else, you are missing out on half the experience.
  • Remember to eat - This one sounds obvious but it’s not.  You may be going to lots of parties with nothing but light appetizers.  This does not give you a good base to work upon before embarking on a night of massive consumption. Pace yourself!
  • Don’t worry about writing everything down – Remember the slides and content will be on Yammer before the session.  Don’t stress out because you weren’t able to write down a URL or code snippet on a slide.   You can also take pictures of slides as well.
  • Visit the Exhibit Hall– The exhibit hall is a lot of fun.  Besides all of the SWAG and drawings, you are likely to find out about evening events that way. Make a point of going there every day.  I spend a good majority of my time there during the conference.  You'll never know who you run into.
  • Attend the sessions – Don’t skip out on the morning sessions.  If I have to get up early, so do you. :)
  • Attend the Hands on Labs– If you haven’t had a chance to get your hands on the latest technology, get down to the HOL and check it out.  This is a great way to experience the product without having to take the time to install it.   It opens at 9:00 am on most days (after the keynote on Monday).
  • Take a test– Go roll the dice and find some time to take a test.
  • Don’t underestimate travel times– It’s a long bus ride to the convention center.  It can be between 15 and 30 minutes if not more.  Even within the convention center, there are long walks between sessions.  Plan accordingly.
  • Set your alarm before you go out for the night - Before you go out for the night, set your morning alarm on your phone.  You may not remember when you get back to your room.
  • Arrive early to sessions – Many sessions will fill up and entrance will be denied, especially futures sessions.  Don’t get left out by showing up late.
  • Don't be afraid to leave a session - If you decide in the middle of the session, that this one isn't for you, don't be afraid to quietly step out and go see something else.  A few speakers might call you out for it, but most won't. :)
  • Learn hash tags for the sessions you are attending– Every session you are attending has an associated hash tag that you can follow. 
  • Don’t wear your badge outside of the convention center – Nothing says you don’t have any game like walking out of the convention center with your badge on.  Take it off as you exit the area.  Don't lose it though as it may cost you a lot to replace it.
  • Don’t forget your badge (and lanyard) at the attendee party – You’ll need your badge everywhere you go.  Bring it and the lanyard if they aren’t doing wristbands.
  • Keep your phone charged– The battery life on LTE phones is horrible and even worse when you are tweeting non-stop all day.  Keep an eye on your phone’s battery life and charge up throughout the day. 
  • Don’t be afraid to leave for lunch– I’m not a huge fan of conference food and it rarely gets along with my diet.  Usually by the second or third day I am grabbing anyone I can find and going off-site.  Find me at the conference and you can join me.
  • Fill out your evaluations– These really are important to the speakers.  Let them know they did a good job and take the time to leave actual text comments in them.
  • Establish rendez-vous points – Establish meeting spots in advance with your group and set a time to meet. 
  • Go to the attendee party – Go to the attendee party.  If you are expecting to meet people there, meet them before you leave the hotel.  If you don’t walk in with the people you want to see, you will likely not see them that night. 
  • Hydrate - Drink lots of water throughout the day.  This is especially important if you have had a lot of late nights.
  • Silence your phone during sessions, turn it on as loud as possible everywhere else - Don't be "that guy" who has your phone ringing in the middle of a session.  That's guaranteed embarrassment. When you're not in sessions, turn the volume up on it as you probably won't hear it go off otherwise when you get a message.

That’s my list.  I’m sure there are other things to remember.  Do you have anything else to add?  Leave a comment.  This probably goes without saying, but if you are not on Yammer and Twitter, now is the time to join.  It’s the best way to keep up with what’s happening at the conference.

Follow me on twitter: @coreyroth.

Why Microsoft’s Investment in Quantum Computing Matters

$
0
0

Updated: 10/2/2017

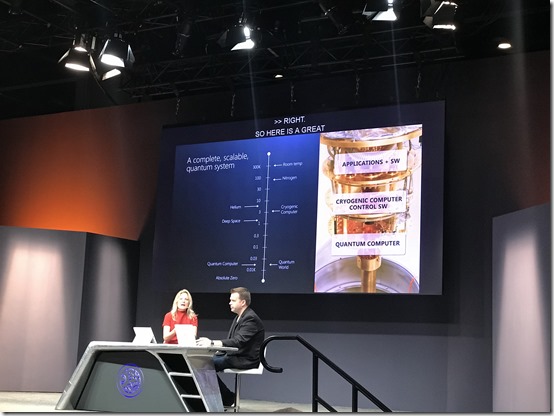
When the Ignite keynote shifted to the topic of quantum computing, my inner geek came out.  As they brought out on stage some of the smartest minds Microsoft has to offer, some of the audience glazed over.  Many people come to Ignite to find out what they can use to do their jobs better in the next few months.  However, with quantum computing, some of the reality of what we see is a litter farther out but not as far as you might think.  Not all of us will use quantum computing.  In reality, most of us will never use it directly. After all, your phone is likely never to be powered by a quantum computer.  Especially since it has to be cooled to 0.01 K.  That’s –459 F or –271 C.   You’ll be affected by this technology though. 

20170925_180232659_iOS

If you look at the major technological advancements of the human races over the years, you think of things like electricity, semi-conductors, nuclear fission, and space travel.  When we figure out how to make a sustainable, scalable, quantum computer, that will be something that goes on that list.  It’s significance is somewhere up there with things like nuclear fusion and travel to Mars.  Maybe you don’t agree with me there, but it is a significant achievement none-the-less.

What is Quantum Computing?

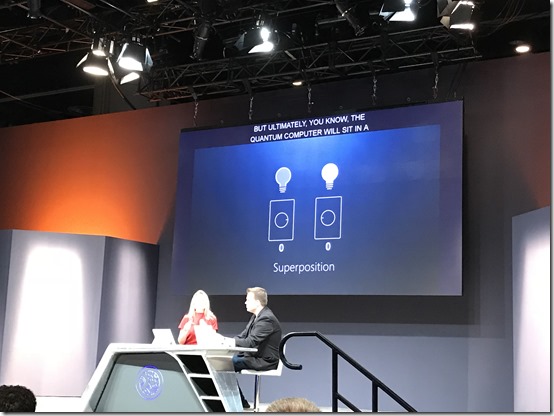
Like many attendees at Ignite, I have a degree in computer science, but I would hardly call myself a computer scientist.  I reserve that term for the professors and PHDs that are doing real research to advance the field.  As you know, traditional computing uses bits which can have a value of 0 or 1.  Quantum computing uses qubits (or quantum bits).  A qubit can have a value of 0 or 1, but it can also have a value of 0 and 1 simultaneously though a phenomenon called superposition. 

20170925_175503370_iOS

While I don’t fully understand why this allows us to make computations faster, it effectively lets us compute more with less by being able to check multiple states at once. 

What can Quantum Computing do?

Quantum computing is really good at finding a needle in a haystack.  A lot of this is centered around the concept of quantum parallelism which allows a quantum computer to do multiple calculations simultaneously and examine the results.  You might have heard that quantum computing will have an effect on traditional cryptography.  This is partially true because many algorithms are based upon the calculation of two prime numbers together to generate a key.  Since quantum computing can do many of these calculations simultaneously, it can effectively brute force an attack on a key to decrypt the information.  However, only some algorithms are susceptible to this and there are new algorithms and key sizes that can work around this so don’t get too worried about using your credit card number online just yet. 

20170928_134600081_iOS

Outside of cryptography, quantum computing will have benefits for chemistry, health care, material science, and more.  While you personally may not be using a quantum computer, you will realize its benefits indirectly through the advances it makes possible.  From Microsoft’s Quantum Computing site, “Quantum computing could solve problems that would take today's computers eons in the time it takes to grab a cup of coffee.” 

A new approach

Microsoft’s approach is based on topological quantum computing.  With this approach they are seeing some early success with better error rates.  Error rates are common in early quantum computing because of the concept of quantum decoherence, one of the main obstacles of making a quantum computer.  Microsoft is also focused on building a scalable (think Azure) end-to-end solution.  Microsoft is working on the hardware, software, and tools that will work together to hopefully one-day make a usable solution.

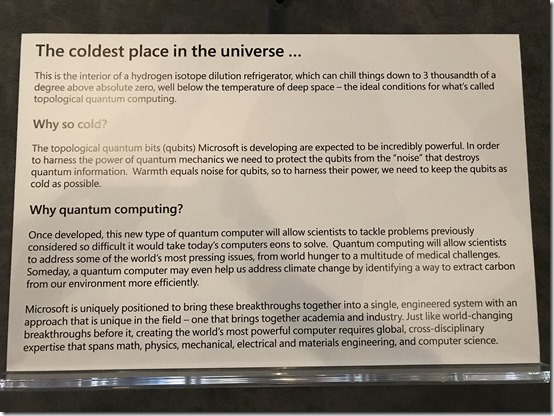
20170928_144916550_iOS

Shown above, the plaque outside of the hydrogen isotope dilution refrigerator.  Explains the reason why quantum computing requires such extremely cold temperatures as well as some of the issues that quantum computing might solve.

Microsoft isn’t the first to the table in quantum computing and they admit that.  Google, IBM, and many universities have already been working on quantum computing for some time.  This isn’t really a space race though.  I think this is something that benefits from more companies and teams working on it.  With that Microsoft is bringing their own approach.

Quantum Computer Simulator

With qubits, you really can do more with less.  To give you an idea of scale.  Where as typically do operations 64 bits at a time, today’s quantum computers only 5 and 16 qubits.  Microsoft has said that the simulators that you can run on your Windows PC will let you emulate up to around 30 qubits and you will be able to get around 40 qubits if you push the workload to Azure.  That might not seem like much but each time you add a qubit, you double the computational power.  For example 30 qubits, would be 2^30 while 31 qubits would be 2^31.  Microsoft wants to get to the point where they have computers with hundreds or even thousands of qubits.

Quantum Computing in Azure?

That’s what Microsoft want to do.  Just like you can buy a D series or M series virtual machine.  Microsoft wants to do this at scale so it would just be an add-on to its virtual machine offerings.  Whereas getting access to the power of today’s super computers isn’t really feasible for most of us, for businesses that need quantum computing power, you’ll be able to effectively lease time on one without having to invest in having one on-premises.

20170925_175952697_iOS

A programming language built for Quantum Computing

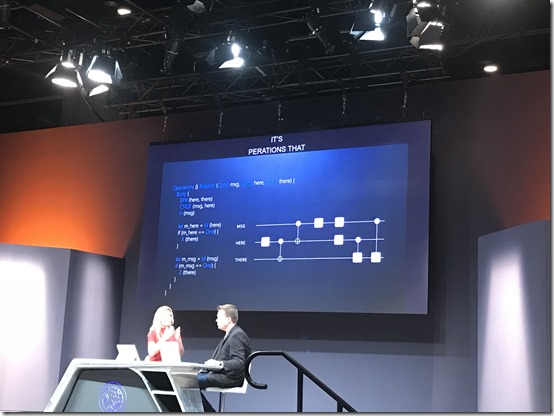
I never imagined people writing programs for a quantum computer using Visual Studio, but that’s exactly what is coming.  At Ignite, they demoed the “Hello World” of quantum computing.  It doesn’t simply display text on the screen.  It actually transmits data from one qubit to another.  At least that's how I understood it.  The syntax reminds me of assembly language programming more than something like C#.  You’ll be able to run these examples on the simulator as well as others when they release the tooling later.

20170925_180728904_iOS

Conclusion

If you have ever watched Big Bang Theory and you start reading up on quantum computing, you’ll start seeing some familiar names and concepts from the show.  Schrodinger’s Cat, Schor’s Algorithm, and Dr. Feynman.  The writers of that show actually do a pretty good job at making sure the show is scientifically accurate.  If you want to learn more about quantum computing, check out Microsoft’s site.  You can also read more on Wikipedia.

Quantum computing isn’t going to help you sell more widgets today, but it will have an impact on your life sometime in the future.  Again I am no expert on this topic, so if you are a scientist and think I got something wrong, don’t flame me, kindly correct me in the comments and I’ll make updates.

How to: Use PowerShell to customize the theme of a SharePoint Modern Site

$
0
0

At Microsoft Ignite, they announced new capabilities for working with themes on modern sites.  Although, the new theme picker they have shown has not rolled out, you can still make use of the new theming capabilities right now.

Here is what the old theme picker looks like.  When we are done, we’ll have our own themes in there and the stock themes will be gone.  No longer will your users pick some awful theme for your sites!

Screen Shot 2017-10-17 at 2.58.01 PM

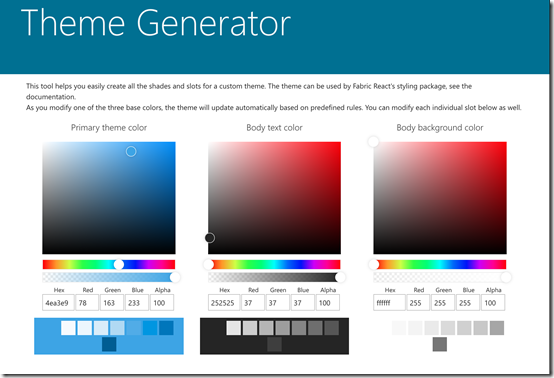
The easiest way to build your new theme is to go to the Theme Generator page on the Office Fabric site.  Here you can set a color and it will automatically choose a palette for you.  You can override the colors in the palette based upon your own company’s brand standard.  Just pick a Primary theme color or enter in the hex or RGB codes.

Screen Shot 2017-10-17 at 3.04.36 PM

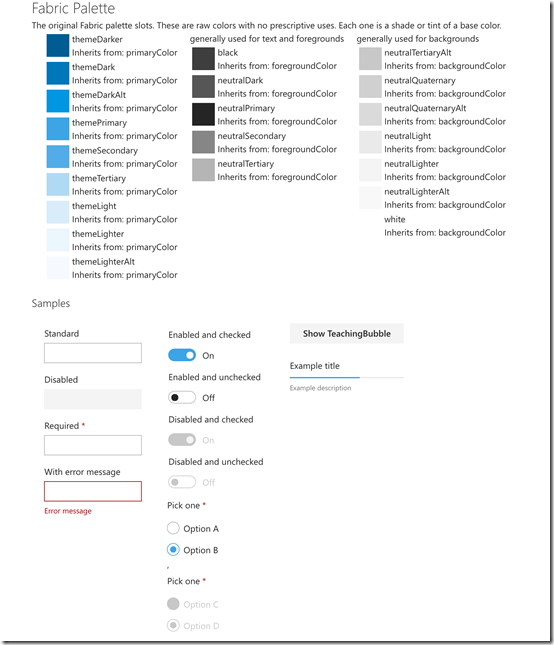
When you scroll down, you will find the code you need, but scroll even further and you will see a preview of what the Fabric Palette looks like.

Screen Shot 2017-10-17 at 3.06.35 PM

Once you are happy, we’ll cut and paste the theme definition into our PowerShell script.  However, before we do that, we have to install the SharePoint Online Management Shell (if you don’t have it already) and connect to SharePoint Online.  You’ll need version 16.0.6906.1200 or newer.  If you haven’t updated in a while, download it again.

One you have it installed, you need to connect to SharePoint Online.  You’ll need to use an account with the SharePoint administrator or Global Administrator roles.  The process involves specifying the URL for your SharePoint Online tenant and the credentials.

$adminUPN="admin@mydomain.onmicrosoft.com"

$orgName="mydomain"

$userCredential = Get-Credential -UserName $adminUPN -Message "Type the password."

Connect-SPOService -Url https://$orgName-admin.sharepoint.com -Credential $userCredential

If you have trouble connecting, you can find more details on Microsoft Docs.  If you use multi-factor authentication, leave off the credential parameter and it will prompt you with an OAuth login prompt.  I’ll usually save this snipped in a PowerShell script so I don’t have to look it up every time.

Now that you are connected, we can add a theme. Create a new PowerShell script using PowerShell ISE, Visual Studio Code, or whatever editor you like.  Add the following to the script.

function HashToDictionary {
   Param ([Hashtable]$ht)
   $dictionary = New-Object "System.Collections.Generic.Dictionary``2[System.String,System.String]"
   foreach ($entry in $ht.GetEnumerator()) {
     $dictionary.Add($entry.Name, $entry.Value)
   }
   return $dictionary
}

$themepallette = HashToDictionary(

)

Add-SPOTheme -Name "New Company Theme" -Palette $themepallette -IsInverted $false -Overwrite

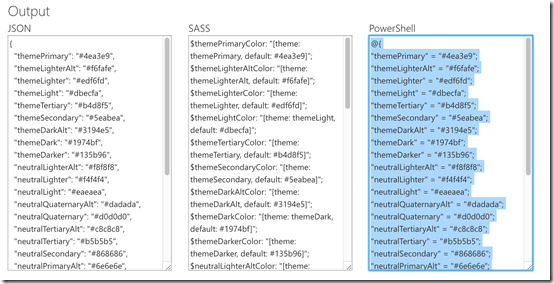
PowerShell expects the theme in the format of a dictionary object.  That is what the helper method HashToDictionary does.  Now we paste in our color palette from the Theme Generator into the call to the HashToDictionary method.  Be sure to incldue the @ symbol.  Here is what the palette looks like on the theme generator.

Screen Shot 2017-10-17 at 3.27.10 PM

Cut and paste that into the script.  The completed script will now look like the following:

function HashToDictionary {
   Param ([Hashtable]$ht)
   $dictionary = New-Object "System.Collections.Generic.Dictionary``2[System.String,System.String]"
   foreach ($entry in $ht.GetEnumerator()) {
     $dictionary.Add($entry.Name, $entry.Value)
   }
   return $dictionary
}

$themepallette = HashToDictionary(
@{
"themePrimary" = "#4ea3e9";
"themeLighterAlt" = "#f6fafe";
"themeLighter" = "#edf6fd";
"themeLight" = "#dbecfa";
"themeTertiary" = "#b4d8f5";
"themeSecondary" = "#5eabea";
"themeDarkAlt" = "#3194e5";
"themeDark" = "#1974bf";
"themeDarker" = "#135b96";
"neutralLighterAlt" = "#f8f8f8";
"neutralLighter" = "#f4f4f4";
"neutralLight" = "#eaeaea";
"neutralQuaternaryAlt" = "#dadada";
"neutralQuaternary" = "#d0d0d0";
"neutralTertiaryAlt" = "#c8c8c8";
"neutralTertiary" = "#b5b5b5";
"neutralSecondary" = "#868686";
"neutralPrimaryAlt" = "#6e6e6e";
"neutralPrimary" = "#252525";
"neutralDark" = "#565656";
"black" = "#3e3e3e";
"white" = "#ffffff";
"primaryBackground" = "#ffffff";
"primaryText" = "#252525";
"bodyBackground" = "#ffffff";
"bodyText" = "#252525";
"disabledBackground" = "#f4f4f4";
"disabledText" = "#c8c8c8";
}
)

Add-SPOTheme -Name "New Company Theme" -Palette $themepallette -IsInverted $false -Overwrite

The Add-SPOTheme Cmdlet has a few parameters.  Name should be fairly self explanatory.  Set IsInverted to true if you are using an inverted theme (ie high contract / black background).  Add the Overwrite to allow you to update the theme after it has been created.  Run the PowerShell script to see your new theme.  Running it will not yield any output if it is successful.

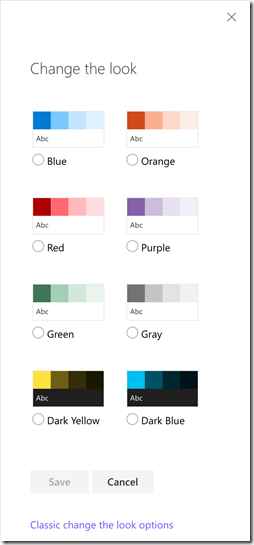
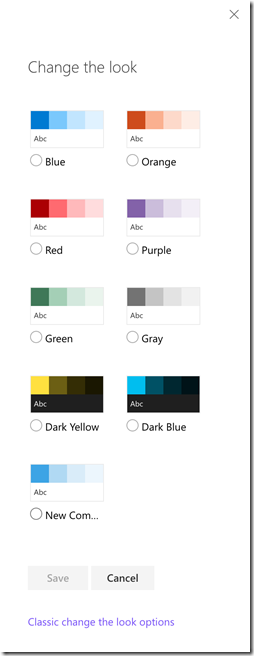
Refresh your SharePoint site and click on Change the Look underneath the Cog Wheel.  You should see your new theme.

Screen Shot 2017-10-17 at 3.32.49 PM

Select the theme to apply it to preview it on your site.

Screen Shot 2017-10-17 at 3.34.41 PM

Pretty simple right?  Now, if you want to remove the out-of-the-box themes.  That’s easy too.  Go back to PowerShell and issue the following command.

Set-HideDefaultThemes $true

Refresh your site and you will see that the out-of-the-box themes are now gone.

Screen Shot 2017-10-17 at 3.37.09 PM

That’s all there is to it.  There are a few more commands if you want to inspect what themes are installed or you want to remove one.  You can read more about them on Microsoft Docs.  Give it a try today!

What you need to know about the SharePoint Migration Tool

$
0
0

In case you missed it at Ignite, Microsoft announced the new SharePoint Migration Tool that lets you move files to SharePoint or OneDrive in Office 365.  I’ve noticed every time this tool comes up there is a lot of confusion and the conversation often ends up in the weeds.  I am hoping this post clears things up a bit.

What does the tool move?

Files and only files.  What about list items and workflows?  Not supported and likely never will be.  If you want to move that kind of stuff, go find a migration tool vendor.

What destinations are supported?

The only supported destination is SharePoint Online and OneDrive in Office 365.  Want to move between SharePoint 2010 and SharePoint 2016?  Great!  Go find a migration tool vendor.  This tool is not for you.

What sources does it support?

It supports moving files only from SharePoint 2013 and file shares.  That is it.  Still running SharePoint 2010?  Sorry. You’re out of luck.

How does it work?

It more or less uses the same migration API that all of the other ISVs use by uploading your content into Azure BLOB storage and then bulk migrating your files.

Is it secure?

You can decide for yourself, but here is the gist of it.  It’s probably more secure than handing over your credentials to a migration tool that doesn’t use OAuth (I’m looking at you Sharegate).  Your data is encrypted and uploaded to a dedicated Azure storage account.  The tool does this for you and the key is only valid for three days.  The Azure blob will be kept for 30 to 90 days and then it is deleted.  The files are encrypted at rest with AES 256 and are stored in the same region.  If you don’t want to use the storage account the tool creates itself, you can specify your own account and key but you will be responsible for cleaning it up.  You can read more on the How it works page. 

Will it migrate my permissions?

It will migrate basic Read and Write permissions to SharePoint Online if you have Directory Synchronization configured (which you should).

Does it support bulk migration?

Yes, you can configure bulk migration settings using a CSV file.

Does it support incremental migration?

Yes, it will migrate only the changes if you set the Enable incremental migration setting when you first run the job.
What if my migration job is interrupted?  Does it support resume?

Yes, the migration tool will resume any job that has been running for at least 5 minutes.
I don’t want to migrate everything.  Are there any filters?

Yes, there are a variety of filters such as dates, extensions, hidden files, etc.

How fast is the migration?

This is largely a factor on the size of your files.  Basically having more smaller files is slower than having more larger files even if the total volume is the same.  For large files, Microsoft quotes the average customer experience at 2 TB / day.  For smaller files, the experience is more like 250 GB / day.  That’s a big difference I know and every migration is different.  If you are planning a large migration, I recommend you do several tests to get a feel for how fast your migration will be. You can read more about maximizing migration speed. 

Will the SharePoint Migration Tool ever support feature X?

I wouldn’t hold my breathe. 

But Sharegate supports feature X!

Great.  Use Sharegate!  It’s a great tool which has also been in development for a lot longer than this one.  That comes with a price of course compared to the free tool from Microsoft but it’s a very reasonable one.

What is the SharePoint Migration Tool good for then?

It should excel at file share to OneDrive migration.  If you have been looking to get off file shares for a while this might be your free ticket.  While this tool isn’t perfect for every migration scenario (and isn’t meant to be), it does have its niches.  If you have some files in SharePoint or on a file share that you want to quickly get to SharePoint Online, this isn’t a bad option.


How to: Hide fields in SharePoint list forms using PowerApps

$
0
0

I’ve been building forms for a number of business processes lately using PowerApps and some of my tenants recently received the ability to customize forms in SharePoint lists using PowerApps.  One common scenario is that you might want to show or hide different fields depending on whether the user is creating a new item or editing an existing one.  I tried a number of approaches while experimenting with the visible field.  It wasn’t quite obvious to me at first, so after watching the following video that Chris Webb sent me a link for, I figured it out.

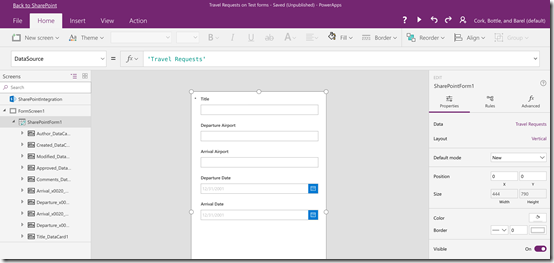
For our scenario, we have a simple travel request form. The requester will fill out fields on where they are going.  The approver will edit the form and fill in comments and mark it as approved.  The requester shouldn’t see these fields.  In this example, we could actually use Approval Flows and what not, but for this example we are keeping it simple.  Let’s start by looking at our default form.

Screen Shot 2017-11-16 at 10.25.25 AM

Start by selecting the field you want to hide and then click on the Visible property. 

Screen Shot 2017-11-16 at 10.26.42 AM

Now, set the value equal to the following formula.

If(SharePointForm1.Mode = FormMode.New, false, true)

Screen Shot 2017-11-16 at 10.29.06 AM

This hides the field when the form is in new item mode and shows it for view and edit.  You can customize this to your needs for other views as well.  You can preview what the form looks like in different modes now by clicking on SharePointForm1 and then changing the Default mode property between New and Edit.  For example, here is what my New form looks like now.

Screen Shot 2017-11-16 at 10.33.43 AM

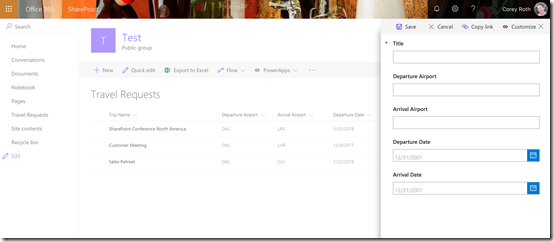
Save and Publish your form and then you can try it from within SharePoint.  Now, when I click on the New button, the other fields are hidden.

Screen Shot 2017-11-16 at 10.35.46 AM

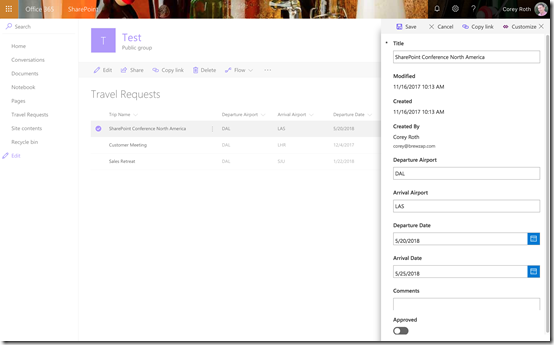
When I edit an existing item, we see the fields that we hid on the new form.

Screen Shot 2017-11-16 at 10.37.19 AM

Like many things in PowerApps, hiding fields is pretty simple once you know the right formula.  It took me a bit to figure this out because I think I was approaching this more from my developer background.  When I start to think about the old Excel formulas I used to use, it actually makes a lot of sense.

How to: delete a SharePoint List Form customized with PowerApps

$
0
0

Building SharePoint List Forms with PowerApps is starting to roll out.  As you customize your forms, you may get to a point where you want to delete one of them.  When you customize a SharePoint List Form in this manner, the PowerApp itself doesn’t show up in your list of apps so you might be wondering how to delete the form itself.  It’s not too had, once you know where to look.

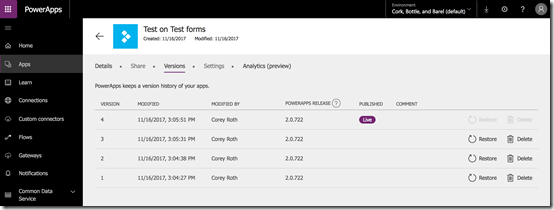
Before you go an delete your form, keep in mind that you can roll back to any previously saved version using the version history.  Just click on File, Save, and then See All Versions.

Screen Shot 2017-11-16 at 3.13.18 PM

Just click the Restore button if you need to go back a version.  If you have the PowerApp open in an editor in another browser tab, you’ll need to close that first.

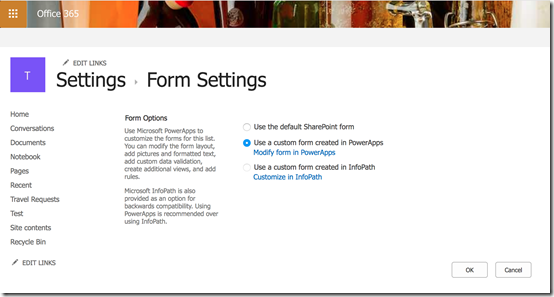
If you really need to do delete the PowerApp though, you can do that from the List Settings on the SharePoint list itself.  Click on the Form Settings link.  This is where you used to go to turn on and off InfoPath back in the day.  First, select Use the default SharePoint form.

Screen Shot 2017-11-16 at 3.16.12 PM

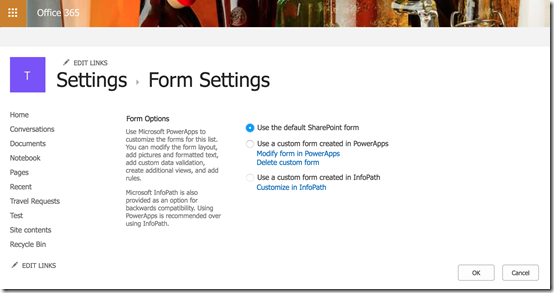
Next, select Delete the custom form.

Screen Shot 2017-11-16 at 3.16.25 PM

Click OK on the confirmation and the custom PowerApps form for your SharePoint list will be gone.  You can now choose PowerApps–> Customize forms again to start over with a new form in PowerApps.

How to start learning about Quantum Computing

$
0
0

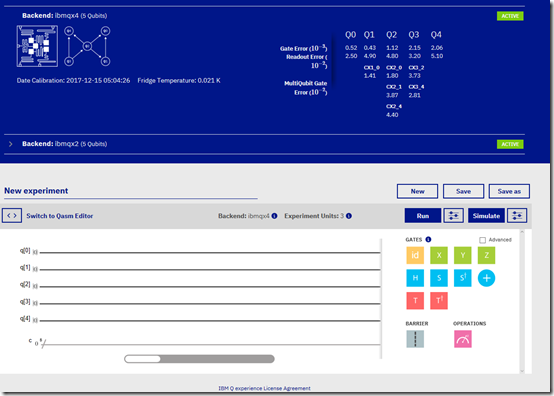
Quantum Computing is becoming quite the hot topic lately.  With research being done by Google, IBM, Microsoft, universities, and a number of other players, it’s looking this is really going to happen.  In fact, Google may just be weeks away from announcing the Quantum Supremacy milestone.  If you aren’t familiar with the concept of Quantum Supremacy yet, it’s basically the point where a quantum computer can complete a computation in a short time where a classical computer can’t complete it at all.  This is a big deal.  While there are some simple quantum computers out there right now (you can try out IBM’s via the Q Experience), this will be a big deal.

Now, quantum computing isn't for everyone.  I'm pretty sure it's not even for myself, but I am interested in the technology so I am intrigued to learn more.  The point of this post isn't to teach you all of the details about quantum computing (because I am far from qualified to do that).  It's to teach you some of the basic concepts you should go learn about and point you to resources on where to learn more.  For my current limited quantum computing knowledge, I have learned from resources from Wikipedia, IBM, and Microsoft.  Google has some resources too, but I think most of them assume you already have a PHD in Physics or Computer Science.  I found that some of the resources do a better job at explaining concepts than others.  Since this is a complex topic, you can learn something from reading each of them.  I will warn you, that this stuff is complicated.  It's got to be if quantum computing is going to be as revolutionary as predicted.  With a Computer Science degree, I learned about a lot of these concepts while at University, but I have long forgotten these things.  Let's face it, you don't use things like Linear Algebra much when you are creating an Intranet in Office 365.

What follows below is some of the key areas of quantum computing that I think you will want to learn more about.  There's a lot to learn about quantum computing, but this should give you some good building blocks.

What is Quantum Computing?

The promise of quantum computing is that they will be able to solve computational problems in minutes or hours versus years on classical computer.  It all starts with qubits and how they interact with each other.   To understand more, start by reading an Introduction in the Beginner's Guide of the IBM Q Experience.  Then go read Microsoft's take on it.  They also have a short video about it.  Finally, if you want to go deep, read up on Wikipedia.

Who are the players?

IBM, Google, and Microsoft have all been in the media a lot lately with announcements.  If we were to compare this to the space race, IBM has someone in orbit, Google is about to plant a flag on the moon, and Microsoft just decided what type of rocket fuel to use.  I think Microsoft picked a compelling type of rocket fuel though, topological quantum computing.  They have a world-class team working on it too.  D-Wave Systems was the first company to have a commercially viable quantum device but it's limited to specific scenarios.  This is not to discount the teams of university researchers that these companies have partnered with throughout the world as well. 

One company you may notice that is sitting on buckets of cash but is remarkably missing is Apple.  Apple has not announced any research in quantum computing at this point.  There are a lot of theories on this, but since Apple can't make a quantum computer "pretty" and overcharge for it, I don't think it's ever going to happen.

Greek Letters

If it's been a while since you've looked at the Greek Alphabet, you better go do so now.  Due to the amount of linear algebra involved, there are Greek letters everywhere, and while you might remember Alpha or Beta, remembering Psi, Phi, and Theta might be a bit harder.  When you are reading through the documentation, pull up the article on Greek Letters on Wikipedia and keep it handy as a reference.

Linear Algebra

To understand the world of quantum computing, you need to understand several linear algebra concepts.  Specifically, you need to understand the concept of vectors and matrices.  You'll want to understand their notation and the operations on them.  For example, you'll need to understand how to add and multiply matrices together and the tensor product.  The Vectors and Matrices article in Microsoft's quantum computing concepts section is quite good.  The following section on Eigenvalues and Eigenvectors is important as well.  They also recommend the book Linear Algebra (additional materials) Third Edition by Jim Hefferon (available for free at the links).  If you've never studied linear algebra (or it's been a while), it might be worth reviewing that book as you get into things.

Qubits

Whereas bits are the basic object of classical computing, qubits are the fundamental object of information in the quantum computing world.  However, they are significantly complex.  Like a bit, they can have a value of 0 or 1, but both at once through a process called superposition.   We can visually represent a single qubit with something called a Bloch Sphere.  This sphere has a radius of one with an X, Y, and Z axis.  This may not make sense yet, but it actually helps us later when we are trying to understand how gates transform a qubit later.  IBM has a pretty good description of Qubits and the Bloch Sphere.  However, it made more sense to me, when I read through Microsoft's description.

Column vectors are the basis of representing qubits.  When we perform operations on the qubit, we are effectively transforming those vectors (or matrices when there are multiple qubits).  However, column vector notation can be a bit cumbersome at times.  That's where Dirac notation comes in.  In the Q Experience getting started guide, they talked about the 0 and 1 states being represented as |0> and |1>, but I didn't really pick up why there.  Microsoft has a page on Dirac Notation that explains it quite well.   When you start representing multiple qubits in Dirac notation, they will look something like |01> or |00>.  However, it wasn't clear to me until I read the IBM documentation that the qubits should be read from right to left.  That means the qubit on the right is the first qubit.

Operations / Gates

In a classical computer, there are only four functions (AND, OR, NOT, NAND) that map bits.  In quantum computing, there are an infinite number of possible transformations on a single qubit.  However, in reality, there are only a few that you deal with in these early examples.  The gates are all named after mathematicians and theoretical physicists that have long past.  Remember, we have known about quantum computing for some time.  We just didn't know how to get there.  When looking at the gates it may be easier to think of what the gate does when represented on the Bloch Sphere.  There are gates known as the X, Y, and Z gates.  They correspond to operations on the accesses of the sphere.  For example, the X gate is thought of as a "bit-flip" where it is effectively flipping 0s and 1s in the matrix representation of the qubit.  The Q Experience Beginner's Guide explains this gate fairly well.  Throughout their guide, you can also click on a link to open the composer where you can actually try out these operations on a simulator and even their working quantum computers.  The Y and Z gates do similar operations around their axis.  If you want to get more into the math behind all of these operations, the Microsoft page has quite a bit of detail.

To put our qubits in a state of superposition, you use the Hadamard gate, often labeled as an H gate.  To learn about the H gate, check out the Creating Superposition page on the Q Experience first.  You'll use this gate a lot as you're starting to experiment.

Entanglement

When using the Controlled NOT (CNOT) gate, we can put multiple qubits into an entangled stage.  What happens here is that when two qubits are entangled, when you measure one qubit it affects the other.  This concept is a bit harder to grasp, so I've got a number of references.  First, look at Microsoft's page on Multiple Qubits  You can  read a bit more from IBM.  However, once I tried it out in a simulator (step 6), I think it made the most sense.

Experimenting with the IBM Q Experience

The best way to understand some of this is to try some experiments.  I started with using the IBM Q Experience.  It's been out for some time so I looked at it before Microsoft's Quantum Development Kit Preview came out this week.  The Q Experience has a Composer, where you can visually drag and drop your gates onto qubits to run an experiment.  There, it will show you which quantum computers are available and interesting facts should as what temperature the dilution refrigerator is running at.

QExperienceQuantumComposer

You can drag and drop gates anywhere you like and then choose to Run or Simulate your results.  This provides a visual representation of the underlying code going into the quantum computer.  You can click on Switch to QASM Editor and you will see the code.  If it looks like classical assembly language to you, that's because it's very similar.  Remember, we're just dealing with qubits and gates here.

You can sign up for an account with the Q Experience and it will give you a fixed number of executions each day on an actual quantum computer.  IBM current has 5 qubit and 16 qubit quantum computers in the Q Experience.  Right now, it looks like the 16 qubit machine is offline because it's not showing any longer.  Sometimes the Run button won't be available at all though.  This all depends on the availability of the quantum computers as they take them down for maintenance regularly. 

Just launching the composer is a bit daunting though.  Instead it's easier to start with existing experiments throughout the Beginner's Guide.  For example, on the CNOT page, you can run a variety of pre-configured examples in the Composer.  This is a great way to learn quickly and actually try your results on a real quantum computer. 

Experimenting with the Microsoft Quantum Development Kit Preview

This week, Microsoft released the Quantum Development Kit Preview.  Microsoft doesn't have a quantum computer yet, but they have quite the development stack already.  Using your own computer (and later Azure), you can simulate a quantum computer in Visual Studio 2017.  Installation isn't too hard but you need to do it on actual hardware (not a VM).  I think some Virtual Machine hosts do support the necessary CPU features if enabled though.  Let's be clear though, simulating a quantum computer is CPU intensive and can be slow depending on the complexity of your algorithm. 

I'll be posting a detailed walk through of the development kit pretty soon so I won't go into a lot of detail here today.  Once you have the kit installed, go through the Quickstart.  It walks you through a program from the ground up.  To date, this has helped me learn some of the most about quantum computing yet.

When will quantum machines be commercially available?

We are starting to see a number of successful prototypes in the works now.  From last I read, IBM is targeting 2021 and Microsoft says around "five years", so 2022.  I suspect Google may be closer than that.  That may seem pretty far off but it's really not in the scheme of things.  The field of quantum computing actually started in the 1980s and it has taken us this long just to get where we are. 

Why should you care?

Quantum computing isn't for everyone.  That's true.  However, once we enter a post-quantum computing era (and we will), the benefits will eventually affect you.  I'm picturing a Y2K style gold-rush caused by quantum computing in the next ten years.  I'll be writing more on this later though.  I absolutely believe in quantum computing and while I'll never be capable of contributing directly to the research, I think I can help evangelize it.

I also recommend watching this keynote from the Microsoft Quantum team at Future Decoded.  It has some great visual representations of quantum computing as well as what industries it may make an impact in.

Summary

When it comes to quantum computing, there is a lot to learn.  You are not going to learn it all in a day.  When you are reading about quantum computing, it's easy to get lost.  That's ok though.  I've read several of these pages multiple times, and I pick up a little more each time.  I'll keep this post updated as I find other good resources.

Finally my usual disclaimer.  I'm far from an expert in the field of quantum computing.  If I got something wrong here, kindly correct me in the comments as opposed to trolling me.

Thoughts on the post-quantum computing era

$
0
0

With IBM, Google, and Microsoft pouring funding into the research of quantum computing, it's really starting to look like we are going to see the benefits in the next 5 - 10 years.  Google may be just weeks from announcing they reached the quantum supremacy milestone and IBM may not be far behind either.  Today, I wanted to share my thoughts on how quantum computing may affect cryptography as we know it.

Effects on cryptography

When we talk about the basic cryptography used for things like TLS when you access your bank's website, the premise behind securing your data is surprisingly simple.  The certificate uses a public key which is really just a large number that's the result of multiplying two prime numbers together.  This key has a size typically between 256 bits and 2048 bits.  It's quite a large number.  To find the two factors via brute force, in today's classical computers, it would take a billion years to solve (give or take a year or two).  In computational complexity theory, they refer to these problems as intractable.  They just can't be solved with the computers we have today. 

However, once we have quantum computers, by the nature of entanglement and superposition, it can brute force all of the possibilities using an algorithm such as Shor's algorithm in a couple of minutes.  Quantum Computers will ultimately break RSA encryption as we know it.  It will take a significant number of qubits though before this can happen.  The largest number factored to date is 56163, far smaller than a number that is 256 digits long.  This means your bank login is safe from quantum computing for a little bit longer.

Prediction - the media will cause mass hysteria about quantum computers and cryptography

Here is what I think is going to happen.  Some journalist looking for the next click-bait is going to stumble upon this following an upcoming advancement in the field of quantum computing.  With half the facts the journalist, will write an article with a headline such as "Quantum Computers are breaking into your bank account right now."  This will cause other media outlets to spread the word and amplify the message and people will go into a 1999 Y2K style frenzy.  Consumers will freak out.  Some will stop using the Internet for a while. 

The thing is there are already smart people thinking about this and working on algorithms for Post-quantum cryptography.  That doesn't mean a system for post-quantum cryptography will be available at the same time we get a quantum computer that can break RSA.  We might, but I doubt it.  Assuming post-quantum cryptography for the we is still certificate based, vendors will have to start creating those certificates.  Then the web platforms like Apache and IIS will have to support it (not to mention the OS itself).  Then the browsers will have to be updated as well.  That's a lot of moving parts.

Companies will be scrambling to figure out what to do.  I am predicting another gold rush for consulting firms (like Y2K) to help companies come up with a post-quantum strategy.  Keep in mind it's not just the ecommerce site we are securing.  It's the servers, the network communication, the connections to the cloud, etc.  Some new people are going to get rich off of this.

I think the hysteria will happen whether it is warranted or not.  Even when we start seeing quantum computers, not everyone is going to have access to them at the scale required to break the RSA.  Even with Microsoft and IBM putting quantum compute in the cloud, most people will only have access to a small number of qubits.  To get enough quantum computer power, it's absolutely going to cost you.  That's not to say that some researcher with early access to quantum hardware couldn't "turn to the dark side and cause some mischief."  It sounds like the making of a science fiction film, right?

Effects on cryptocurrency

Now I am hoping the bubble of cryptocurrencies like Bitcoin pops long before we reach post-quantum computing.  I think it's going to be around for a while though.  We may be out of Bitcoins by then but one of the other networks will rise up to take its place.  I don't think a lot of thought has gone into the effects of quantum computing on cryptocurrencies yet, but I think the threat is real.  Cryptocurrencies like Bitcoin are based on SHA-256.  New blocks of bitcoins are generated basically by brute force by trying to mine a nonce to go along with the hash value.   This sounds like something a quantum computer could do quite well.  If someone were able to mine say all the remaining blocks in a cryptocurrency in a few days instead of years, that could be bad for the cryptocurrency economy. 

This is all speculation of course, but I wouldn't be surprised if some we hear a story of some PHD university researcher who took off with a ton of cryptocurrency and disappeared off the grid in Fiji.  Sounds like another science fiction film, right?  Maybe I need to go into screenwriting.  The implications are easy to exaggerate I know.  It doesn't take much to spook and investor though.  One new story goes viral, and a bubble could pop.

Conclusion

I think a lot of what happens in post-quantum computing and cryptography will happen to some degree.  However, you will have to be able to discern perception and reality.  Keep an eye on the state of the industry so you know what's going on.  Then make smart informed decisions instead of knee-jerk reactions.

If you want to start learning more about quantum computing, check out my guide on How to start learning about Quantum Computing.

Create an Office AddIn with Ionic Framework

$
0
0

If you want to build an Office AddIn for Word, Excel, or PowerPoint, all you really need to know is a little HTML and JavaScript.  Since Ionic Framework is built with HTML and JavaScript, it actually makes a great fit for hosting an Office AddIn.  In fact, task pane apps have a very similar shape to your mobile phone (long and narrow) so the UX elements that Ionic provides work pretty well there.  Here's an example of my Word AddIn, BrewZap menus.  It creates paper menus for subscribing breweries using the menus they manage directly from their mobile app on the BrewZap platform.

Screen Shot 2018-01-16 at 12.19.37 PM

Getting started with the manfiest

An Office AddIn is essentially just a manifest XML file that tells Office the location of your web application.  You'll want to start with one of the existing manifest examples otherwise you may be missing components required to get your AddIn published in the Office Store.  You will need to provide a link to your web application as well as icons in the size of 12x12, 32x32, and 80x80.  Look through the example manifests and you should have what you need to get started.  I recommend creating two manifests: one for debugging locally and one for production use.  When you debug locally, you can simply run ionic serve and load the AddIn from the AddIns menu in Word (or whatever app you are targeting).

Creating your Ionic app

Create an Ionic app using ionic start and selecting the appropriate options.  I used the tab template and it works pretty well.  Once you project is created, you can start adding your code.  First, we add the reference to the office.js library to your index.html.  The Office Store requires you serve it from the CDN.

<script src="https://appsforoffice.microsoft.com/lib/1/hosted/office.js" type="text/javascript"></script>

Depending on what you are doing, you may actually have to load jQuery as well.  I know that seems odd in an Ionic app.  Once you have your scripts registered, you are ready to start writing some content into your Word document.  The Word AddIn example has some easy snippets you can leverage

function insertHtml() {
     Word.run(function (context) {

        // Create a proxy object for the document.
         var thisDocument = context.document;

        // Queue a command to get the current selection.
         // Create a proxy range object for the selection.
         var range = thisDocument.getSelection();

        // Queue a command to replace the selected text.
         range.insertText('"<b>Hello World!</b>."\n', Word.InsertLocation.replace);

        // Synchronize the document state by executing the queued commands,
         // and return a promise to indicate task completion.
         return context.sync().then(function () {
             console.log('Added html.');
         });
     })
         .catch(function (error) {
             console.log('Error: ' + JSON.stringify(error));
             if (error instanceof OfficeExtension.Error) {
                 console.log('Debug info: ' + JSON.stringify(error.debugInfo));
             }
         });
}

I find the easiest way to apply formatting in your word document is to use HTML.  Word will interpret it appropriately and format your content.

Testing your app

You can develop Office AddIns in Windows, OS X, an iPad, or in the browser with Word Online.  The same API works for all hosts of your application.  However, you need to pay attention to which API you use because some are supported in different versions of the Office client (2013 vs. 2016).  You need to test them your AddIn on all platforms to verify that it works correctly.  Windows of all platforms gave me the most trouble because Internet Explorer gets used as the backend for Office AddIns.  I also had some issue with the formatting on some inputs and they didn't render correctly in Word 2016.

Deploying your app

You'll need to deploy the code for your app somewhere so that you can publish your app to the store.  This entails adding the browser platform to cordova and then doing a production build.  You can read my steps on how to run an Ionic PWA using Azure Web Sites for more details.  If you aren't hosting in Azure, the steps are pretty familiar still.  To do your final build for production, you will run the following command.

ionic cordova build browser --prod --release

You'll then copy the contents of your platform/browser/www/build folder to your production server.  Now update your manifest to point to that new server location and you're ready to go.  Once you validate it works, you can begin the Office Store submission process to get your app in the store.

Here is what my app looks like after it has inserted a table listing the beer menu at a restaurant.

Screen Shot 2018-01-16 at 12.30.24 PM

Sorry for the lack of code formatting today.  I don't have a working solution to post code effectively currently.  Once I scrub some of the code, I'll post a repo with the complete solution as well.

Viewing all 161 articles
Browse latest View live