Quantcast
Channel: Corey Roth and Friends Blogs
Viewing all 161 articles
Browse latest View live

First look at Windows 10 Technical Preview on the Surface Pro 3

$
0
0

With the new of the release of Windows 10 Technical Preview, I was quick to download it and try it out.  Despite all of the warning about only using this on a secondary PC, I went ahead and installed it any way on my favorite device the Surface Pro 3.  I have a long standing history of installing beta operating systems on computers I shouldn’t, so why should this one be any different. :)  The nice thing about Windows 10 installer is that it will let you install on existing Windows 8.1 installations.  You can even do other things in the background while it is installing (although it tells you not too).  I let it install over lunch and things are looking good so far.  Here are some of the highlights and answers to questions you might have.

Do I have to reinstall everything?

No.  You are able to upgrade from Windows 8.1 Pro to Windows 10 Enterprise without any issues (at least I didn’t have any).  You will have the option to keep files, apps, and settings.  This means you aren’t doing a clean install.  All of your applications and files will still be there when you have upgraded.

How long does it take?

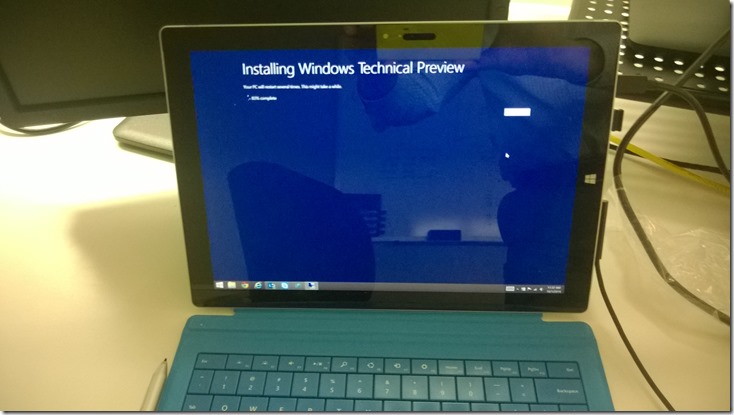
The installation takes about half an hour.  The installer looks similar to the Windows 8.1 installer. 

Windows10Install1

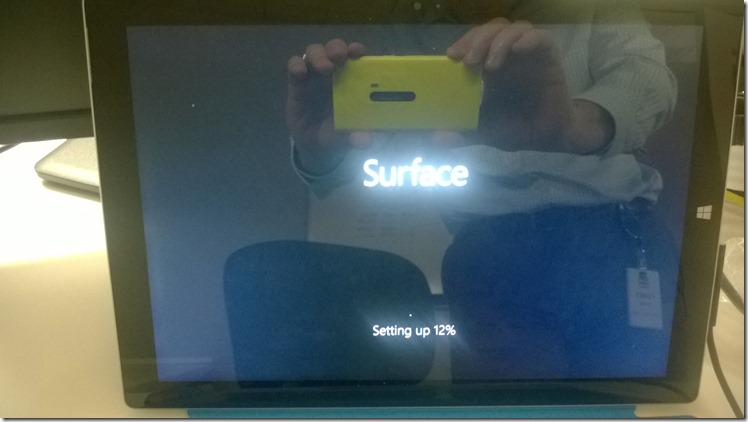
You will reboot a few times during the process.

Windows10Install2

After the install you will need to choose a Wireless network and type in the password for your account.  Once you get booted up, everything should look similar and all of your programs will still be there.

Getting started

Microsoft has included a link on the desktop to the Windows Preview web site which has a series of links to help get you started.  I recommend taking a look as it has some useful information about the new features.

Windows10GettingStartedLink

Does everything still work?

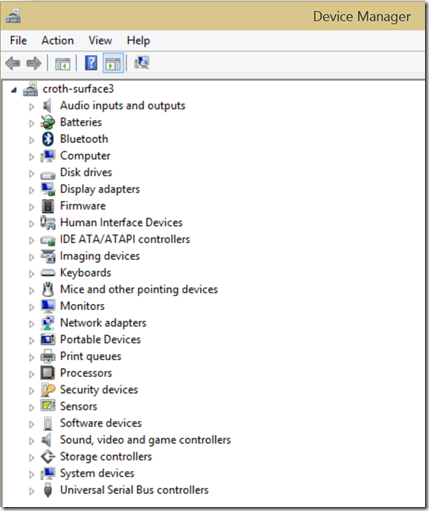
It appears to.  All of my devices are installed correctly in the device manager. 

Windows10SurfaceDeviceManager

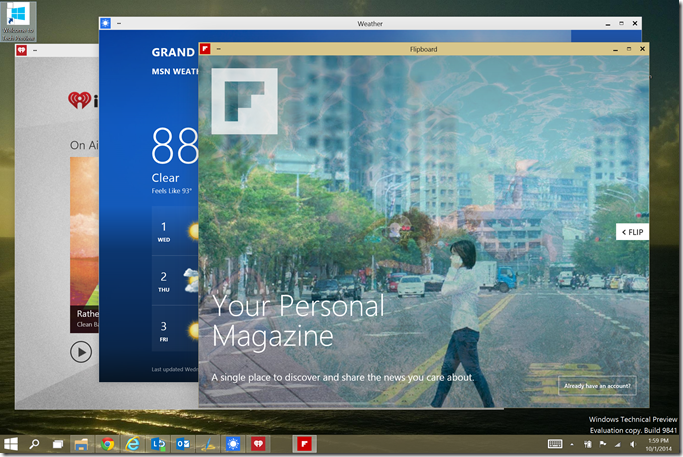
I tried a number of programs including desktop programs like Office and Windows Store apps such as Mail and Flipboard. 

Windows10WithApps

Everything seems to run just fine.  Touch input still works and so does the Surface Pen.

The new Start Menu

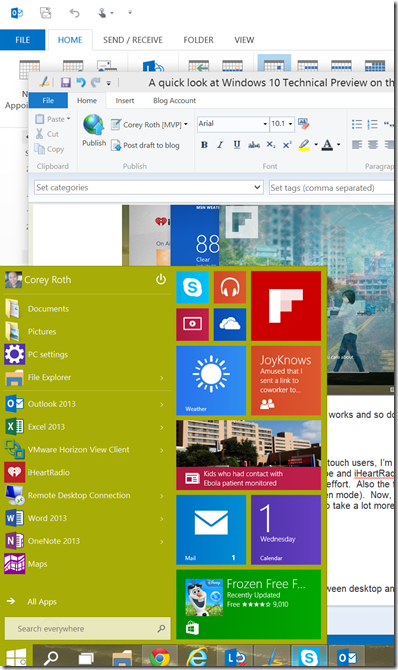
I’m not sure what to think of the new start menu. 

Windows10StartMenu

It’s goal is to combine the best of both worlds between desktop and touch.  It combines a traditional desktop start menu with tiles from the start screen.  I find it works great for desktop, but in touch it doesn’t really make sense.  Some of the icons are hard to touch.  It’s not terrible but I think it can be better.  You’ll even notice that the Power button is easy to find.

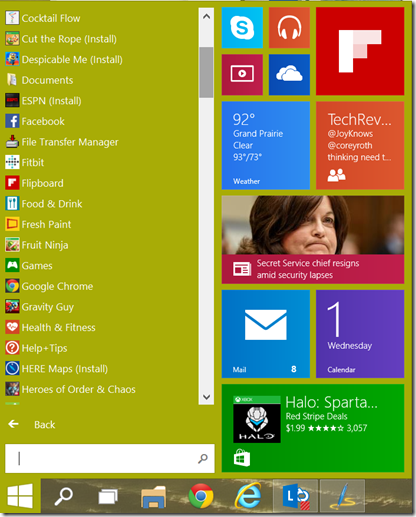
Clicking on the All Apps button shows you a list of all installed applications that reminds me very much of the Windows XP start menu.

StartMenuApps

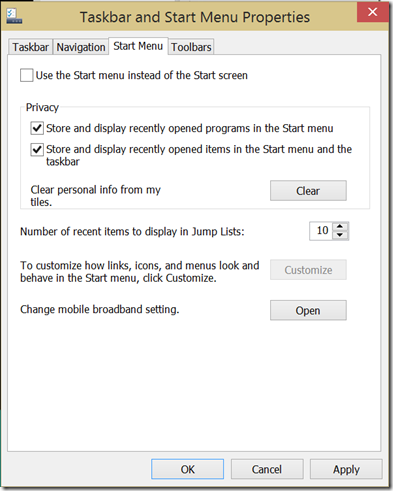
If you were one of the few that liked the Start Screen, you can turn it back on.  In the Start Menu, type Navigation Properties and click on the Start Menu tab.

Windows10ReenableStartScreen

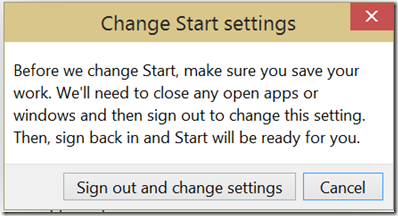
Once you select this, you will be prompted to close all applications and logout. 

Windows10ChangeStartSettings

When you log back in, the start menu will be back.  It looks exactly like it did in Windows 8.1.

Taskbar Changes

The taskbar has a few new icons next to the familiar Windows icon. 

Windows10TaskbarNewIcons

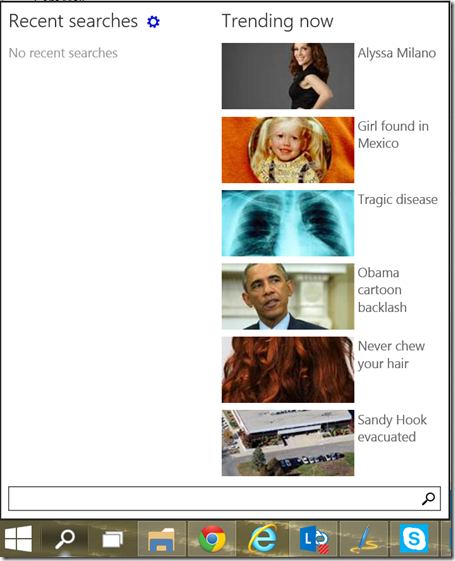
The first icon allows you to search.  Clicking it will show you a list of trending searches.

Windows10SearchButton

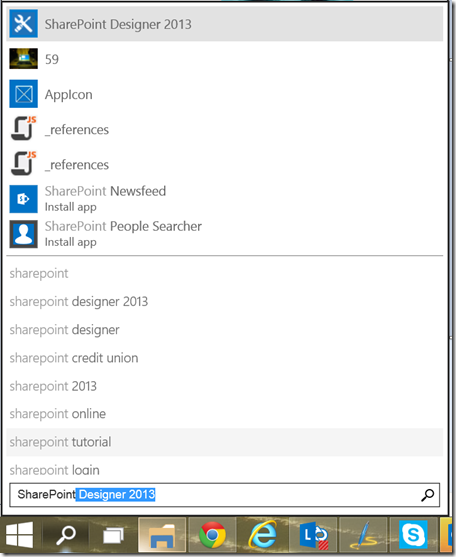
It doesn’t just search the Internet though.  It will show you your own apps and matching documents in addition to results from the Internet.

Windows10SearchLocal

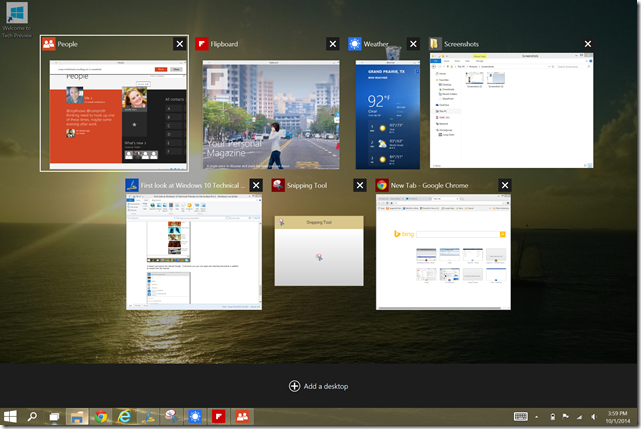
The next icon is your app switcher.  It will show you all of the applications you have open whether they are desktop apps or Windows store apps.  You can flip between applications here or even close them.  It comes up by pressing Alt+Tab or Windows+Tab as well. 

Windows10TaskSwitcher

The app switcher also gives you the ability to add an additional virtual desktop.  A lot of operating systems have had this for while so this is a welcome addition to Windows.  This gives you the ability to have different sets of apps running on each desktop.  This can be nice to keep things less cluttered.

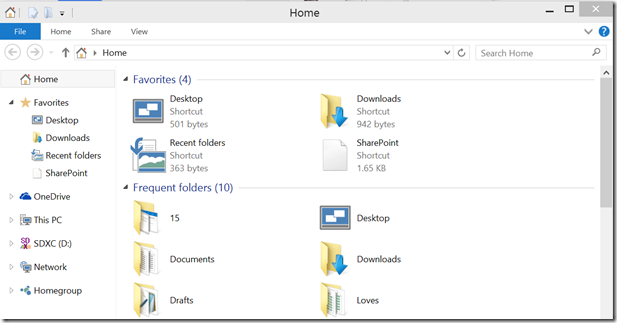
Finally the last icon is our new Windows Explorer.  You’ll notice a new section called Frequent Folders and Frequent Files.  This will help you jump quickly to files that you have worked with recently.

ExplorerRecentFiles

Windows Store Apps in Windows Mode

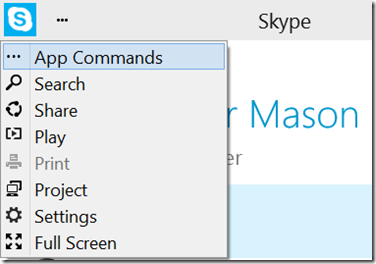
This makes a lot of sense for desktop users.  For touch users, I’m not so sure.  Everything resizes just fine.  However, I miss being able to dock apps like Skype and iHeartRadio to a nice narrow bar at the side of the screen.  You can still do it, but it takes a lot more effort.  Also the familiar “Swipe-down” motion appears to be gone (even when the app is running in full screen mode).  Now, you have to click on the elipsis (…) in the taskbar and choose App Commands.  It seems to take a lot more effort since that menu appears to be geared towards desktop users.

Windows10AppCommandMenu

Can I still run Windows Store apps in full screen mode?

Yes, by clicking the Full Screen menu item in the menu above.  However, I found that none of the gestures work when the apps is running in full screen such as swiping down.  For example, you can’t swipe down and drag to dock the window to the side of the screen.  Swiping in from the left side while in full screen mode now brings up the app switcher.

What has remained the same?

Surprisingly a lot.  Microsoft has pointed out that none of the new consumer features are in this preview.  This release is focused on the Enterprise.  Lots of things remain the same including the Settings screen, logging in, the charms menu, and the issues with DPI scaling and multi-monitors.  That means your Lync window is still going to be massive when you drag it onto your second screen.

How stable is it?

It’s hard to tell yet.  I have put my computer to sleep with the power button once or twice and I have found that the device has rebooted.  Maybe it’s just installing updates, I don’t know.  It’s too soon to tell.

One new feature is the Preview Builds in Update and Recovery in PC Settings.  Here you can configure how your PC looks for new builds of the Technical Preview.

Should you install it?

Only if you are willing to accept the risks of installing a beta operations system.  Just because it worked for me (so far), doesn’t mean you won’t have issues.  Microsoft recommends installing on a secondary device.  Be sure and save a copy of your recovery drive before you install it.  This will let you revert back to your previous operating system should you have issues.

If you have any feedback for the Windows product team, just open your start menu and type Windows Feedback.  This will launch an app that allows you to report issues.  In fact it feels a lot like user voice in a lot of ways.  I think this is a great way to express your thoughts about the new operating system.

So far Windows 10 Technical Preview runs fairly well on the Surface Pro 3.  In fact you really won’t notice that many changes using it aside from the start menu and the Windows Store apps running in windowed mode.  I’ll post updates as I use it for and let you know of any issues.


Querying Office Delve Boards with JavaScript and REST

$
0
0

The new functionality of Office Delve, Boards, just came out recently.  As a developer, you might be thinking how can I access this data in my own applications.  This post will help you get started.  These queries use the new Graph Query Language (GQL) syntax of Office Graph.  As the GQL reference link points out you should be warned that these APIs are highly subject to change and should not be used in production applications.  The queries we are using today were determined by examining the REST API calls from the pages inside Delve.  They may work now, but they may not work in the future.

Querying the boards a user is following

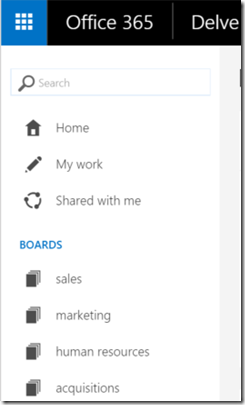
First, we want to determine which boards a user is following.  We want to return the same data that we see in the left navigation of Delve.

DelveBoardList

It appears Delve makes use of a new “protocol handler” like technology that has it’s own URL syntax.  These URLs look like TAG://PUBLIC.  To get the list of boards a user is following, we issue the following query:

TAG://PUBLIC/?NAME=*

However, we also have to include some Properties in our REST query to get the data we need.  In particular interest is the new GQL action number 1050 that you use on the me actor.  Here is what the entire REST query looks like.   I recommend limiting the SelectProperties that you returnThe important ones are Title, Path, and DocId.

https://<tenant>.sharepoint.com/_api/search/query?QueryText='Path:"TAG://PUBLIC/?NAME=*"'&Properties='IncludeExternalContent:true,GraphQuery:actor(me\,action\:1050),GraphRankingModel:action\:1050\,weight\:1\,edgeFunc\:time\,mergeFunc\:max'&SelectProperties='Title,Path,DocId'

Try typing it in the browser of your tenant. 

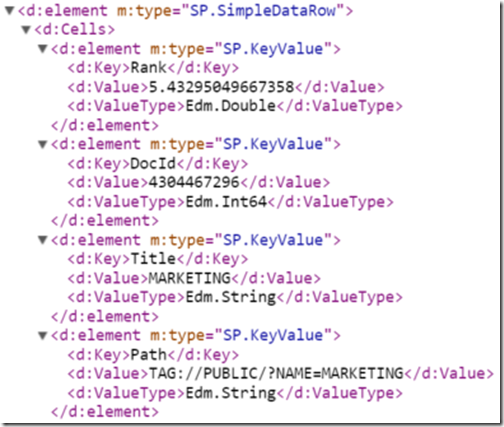
DelveBoardFollowedXml

Looking at the individual results, you’ll see the name of the board, it’s path and the DocId.   The Title contains the name of the board in all caps.  The Path we can use to query items that have been tagged. The DocId actually refers to an ActorId that we’ll use later.

Querying the items tagged to a board

When you visit a board’s page in Delve, it actually issues two queries to get the items that have been tagged to the board.  First, it issues a query using the path we saw above.  It does this to get the ActorId which is stored in the DocId property.  It then uses that ActorId in a second query to get the actual items that have been tagged to the board.  If you already know the ActorId, you can obviously skip the first step to retrieve it.

To get the ActorId, we issue a query using the path on the TAG URL with the name in all caps following the NAME parameter.  This is just like what we saw in the results above.  Here is what the REST query looks like.  We are only interested in the DocId property so we specify that in the SelectProperties.

https://<tenant>.sharepoint.com/_api/search/query?QueryText='Path="TAG://PUBLIC/?NAME=<board name>"'&Properties='IncludeExternalContent:true'&SelectProperties='DocId'

Now let’s write some JavaScript code to retrieve this value.  In my example, we’re going to retrieve the ActorId for the Marketing board in a SharePoint-hosted app.  Make sure you request the Search permission in your AppManifest.xml.  I have URL encoded the URL.  This just uses a simple call with $.ajax.  I’ve left out the use of deferreds to keep it simple. 

$(document).ready(function () {
    var queryUrl = _spPageContextInfo.webAbsoluteUrl + '/_api/search/query?' +

        'QueryText=%27Path%3D"TAG%3A%2F%2FPUBLIC%2F%3FNAME%3DMARKETING"%27&Properties=%27IncludeExternalContent:true%27&SelectProperties=%27DocId%27';


    $.ajax({ url: queryUrl, method: "GET", headers: { "Accept": "application/json; odata=verbose" }, success: onQuerySuccess, error: onQueryError });


});

In our onQuerySuccess function, we will retrieve the value of the ActorId.  Remember it is stored in the DocId managed property.  The data of search results is buried in multiple objects, so you have to go through quite a bit to get to it.  For more information on querying search with JavaScript and REST, see this code sample on MSDN Code.

function onQuerySuccess(data) {
    var results = data.d.query.PrimaryQueryResult.RelevantResults.Table.Rows.results;


    var actorId;

    $.each(results[0].Cells.results, function () {
        if (this.Key == 'DocId')
            actorId = this.Value;

    });


    $("#actorId").html(actorId);

}

Now, that we have the ActorId, we can issue the query to get the item associated with the board.  In the simplest form, you issue a query with QueryText of * (everything).  You then issue a GraphQuery using the ActorId and the undocumented ActionId of 1045.  However, if you want the query to match exactly what is on the Board page, you need a few additional exclusions.  These exclusions specifically remove content hidden from Delve as well as only show specific file extensions.  Here is what the REST URL looks like.

https://<tenant>.sharepoint.com/_api/search/query?QueryText='* AND ((NOT HideFromDelve:True) AND (FileExtension:doc OR FileExtension:docx OR FileExtension:ppt OR FileExtension:pptx OR FileExtension:xls OR FileExtension:xlsx OR FileExtension:pdf OR ContentTypeId:0x010100F3754F12A9B6490D9622A01FE9D8F012*))'&Properties='GraphQuery:actor(<actorId>\,action\:1045),GraphRankingModel:action\:1045\,weight\:1\,edgeFunc\:time\,mergeFunc\:max,IncludeExternalContent:true'

When it comes to the JavaScript, we simply replace out the ActorId  Again we encode the URL.

var boardQueryUrl = _spPageContextInfo.webAbsoluteUrl + '/_api/search/query?' +

    "QueryText='* AND ((NOT HideFromDelve:True) AND " +

    "(FileExtension:doc OR FileExtension:docx OR FileExtension:ppt OR FileExtension:pptx OR FileExtension:xls OR FileExtension:xlsx OR FileExtension:pdf OR ContentTypeId:0x010100F3754F12A9B6490D9622A01FE9D8F012*))'" +

    "&Properties='GraphQuery:actor(" + actorId + "%5C%2Caction%5C%3A1045),GraphRankingModel%3Aaction%5C%3A1045%5C%2Cweight%5C%3A1%5C%2CedgeFunc%5C%3Atime%5C%2CmergeFunc%5C%3Amax,IncludeExternalContent:true'";


$.ajax({ url: boardQueryUrl, method: "GET", headers: { "Accept": "application/json; odata=verbose" }, success: onQuerySuccess2, error: onQueryError });

Now, in our success function, I simply return the results as a table by iterating through all of the rows and cells of the results.  The first loop prints out the column names and the second one writes out each row.

function onQuerySuccess2(data) {

    var results = data.d.query.PrimaryQueryResult.RelevantResults.Table.Rows.results;


    $("#results").append('<table>');


    $("#results").append('<tr>');

    $.each(results[0].Cells.results, function () {

        $("#results").append('<th>' + this.Key + '</th>');

    });

    $("#results").append('</tr>');


    $.each(results, function () {

        $("#results").append('<tr>');

        $.each(this.Cells.results, function () {

            $("#results").append('<td>' + this.Value + '</td>');

        });

        $("#results").append('</tr>');

    });


    $("#results").append('</table>');

}

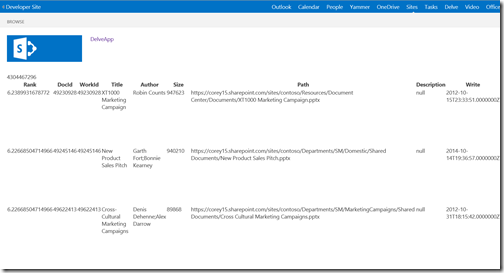
Here’s what my results look like in my SharePoint-hosted app.

DelveBoardResults

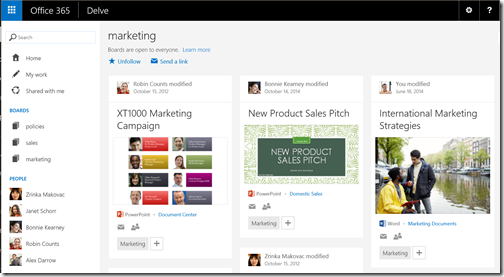
Comparing it to the original page in Delve for the boards, you will notice the results are the same.

DelveBoardMarketing

If you are interested in developing with Boards in Office Delve, I hope you have found this post helpful.  This information hasn’t really been documented so it’s highly subject to change.  Try it out and let me know what you come up with.

Follow me on twitter: @coreyroth

Configuring Information Rights Management (IRM) on a document library in Office 365

$
0
0

Last year, I wrote a post on how to get started using Information Rights Management in Office 365.  That post covered what you need to get started as well as how to enable IRM at an individual file level.  This post is a follow-up to that one and covers how to configure IRM on a document library.

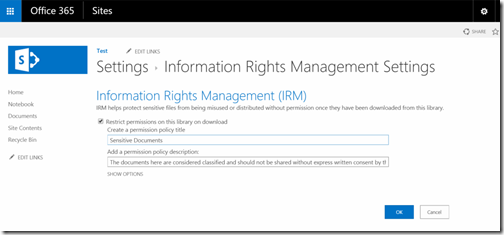
If you haven’t enabled Rights Management in your Office 365 subscription, you’ll need to do that first.  My previous post can walk you through the steps.  You’ll find Rights Management under Service Settings now on the administration site.  Once IRM is configured on you subscription, go to the document library and view the Library Settings.  From there, click the Information Rights Management link.  When you configure IRM for the first time on a library, it will prompt you for a policy name and description.  This message here will be visible to users when viewing the document.

IRMDocumentLibraryConfigureDefault

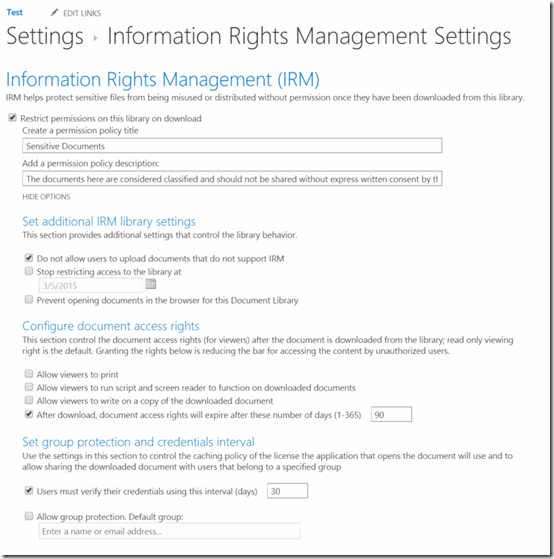
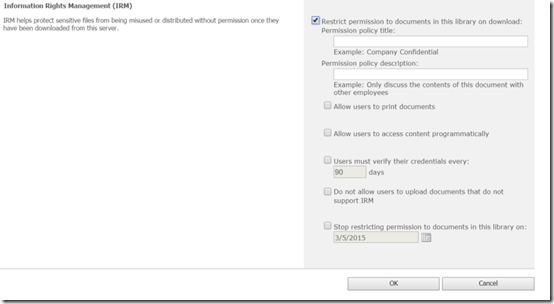
Click the SHOW OPTIONS link to view the settings we can configure on the document library.

IRMDocumentLibraryAdvancedSettings

You have quite a bit of flexibility to configure what users can do to your files from here.  However, you don’t quite have the level of granularity on permissions that you do when configuring Rights Management from within Office.  In the first section, you can prevent users from allowing documents that don’t support IRM.  For example, if you upload an XML file (at least I am pretty sure you can’t do IRM on that), the file upload will be blocked. 

You can also turn IRM after a period of time.  This setting is good if you know that the documents are only sensitive for a period of time.  For example, maybe an acquisition is occurring on a certain date and then the documents are no longer sensitive.

You can also prevent users from viewing the documents in the browser.  You may have various reasons for why you would want to do this.  It’s not enabled by default, but you can turn it on.  When you do have it enabled, the Document Preview panel will not show in the document library and clicking on the document opens it directly in Office.

IRMDocumentLibraryOWADisabled

If you do allow your users to view documents in the browser, they will get an error message when using the document preview functionality.  However, they can still view the document in the browser using Office Online (formerly Office Web Apps) when clicking on the OPEN link.

IRMDocumentLibraryPreviewDenied

In the Configure document access rights section you can prevent users from printing the document.  This simply disables the print dialog inside Office.  Users could still find ways to get around this if they tried hard enough.  Remember that the settings in this section affect viewers and not users with full control permissions.

You can also set how long the user’s rights are valid before they expire on the document.  This setting is important.  If a user downloads the document and copies it to a flash drive, he or she will be prompted once to get rights to the document.  Now, if the user left the company but still had the file they won’t be able to open it once the rights expire.  You just need to pick the number of days before the license expires.  The higher the value, the less often the user has to login to get rights again.  However, if the value is too small, you may annoy the user by prompting them more often to get rights.

In the set group protection and credentials settings, you can specify how often users must verify their credentials.  You can also specify a security group where users are allowed to share the documents with other members of the group.  This is completely different from the security settings on the document library.  For example, a user might not have access to the document library, but they received a file from it on a flash drive.  If the user is in the security group you specify here, he or she will be able to open the file.

Once you have configured, IRM on your document library you can test it.  Clicking on the document will show it in Office Online.  The message you configured for the policy at the top.

IRMDocumentLibraryOfficeOnlineWithMessage

When you click on OPEN IN WORD, we’ll see the document with additional settings in the tool tip.  Since I have full control of the document library, I have permissions to edit the rights management policy from within Word using the Change Settings button.

IRMDocumentLibraryWordMessage

To really verify functionality, we will want to login with another user account.  In my example, I logged in with a user that has Viewer permissions.

IRMDocumentLibraryWordMessageViewOnly

Clicking View Permissions, I can see what permissions the user has exactly.  It also tells you when your permissions expire.

IRMDocumentLibraryWordPermissionsView

When you look at the back stage in Office, you’ll see that many of the links are disabled such as Print

IRMDocumentLibraryBackStagePermissionsDenied

If your expiration date is getting near, you’ll see a message inside Office notifying you.

IRMDocumentLibraryExpiration

The settings for Information Rights Management have matured quite a bit since SharePoint 2010.  You have a lot more control of what you can specify as defaults in your document library.

IRMDocumentLibrary2010Mode

Information Rights Management is a great feature in Office 365 and easy to set up.  I find it is still highly under utilized by most organizations.

A quick look at Universal Office Apps for Windows 10 (Touch)

$
0
0

Since the release of Windows 8, we have all ben wondering when we would see a touch-optimized Office experience.  We saw apps delivered to both iOS and Android first, but still nothing for Windows other than Office 2013 for desktop.  All of that changes today as Microsoft has release previews of Word, Excel, and PowerPoint as Universal Apps for Windows 10.  If you are not familiar with the term Universal app yet, this is a single app that can run on Windows 10 desktops, tablets, and phones.  Support for Xbox One has even been pledged but there hasn’t been any updates on that in quite some time.  These look just like existing apps for Windows 8.1 formerly known as Metro, Windows Store, and now Modern Applications in Windows 10.

You’ll need to be running the latest public build (9926) of Windows 10 to try these preview out.  The original blog post had links to Word, Excel, and PowerPoint.  However, they have been removed for the moment.  However, I still have the links to Word and Excel handy.  These links only worked for me in Internet Explorer.  If you try them on a Windows 8.1 computer, you won’t see the “Get” button nor will you be redirected to the Windows Store to download the app.  The blog posts says you can do a search from the new Windows Store (Beta) app, but I haven’t had it work yet.  This is typical though when a new app is released to the store.

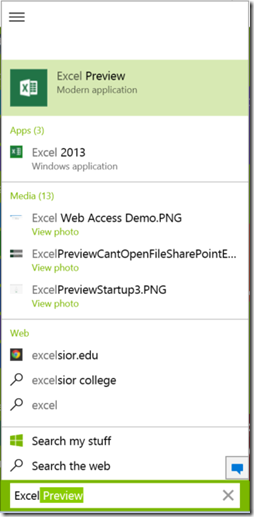
After you have installed the apps, launch them from your start menu or by asking Cortana.  We’ll start with Excel Preview.  Notice, Excel Preview listed as a Modern Application where Excel 2013 is a DesktopApplication.

W10b9926SearchExcel

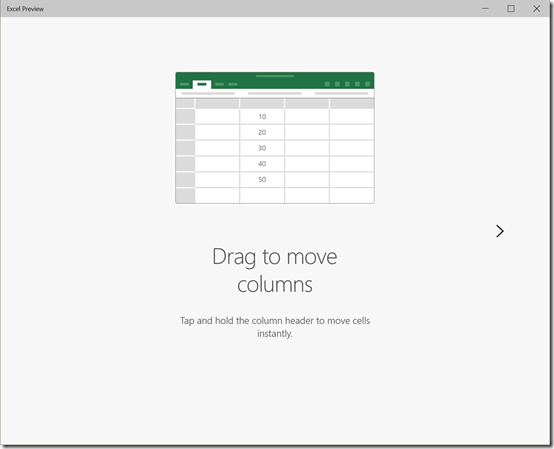
When each Office Preview app starts, it will show you a quick three-step tutorial on how to get started specifically highlighting touch features.  Here, you learn how to move columns by touch.

ExcelPreviewStartup1

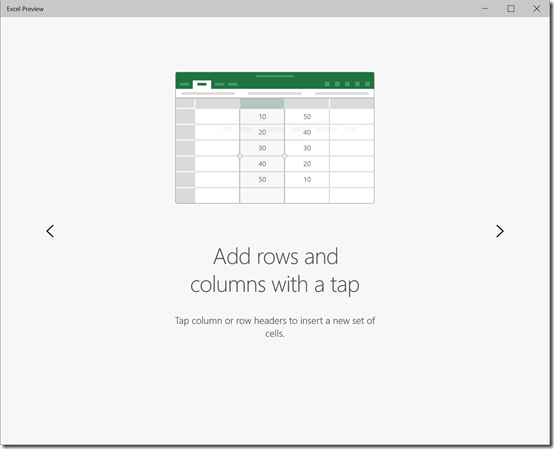
You can add rows and columns with a tap.

ExcelPreviewStartup2

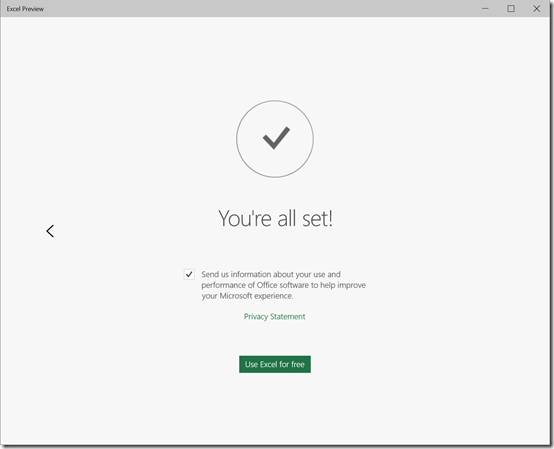
Here, you have the option to join the customer experience improvement program.

ExcelPreviewStartup3

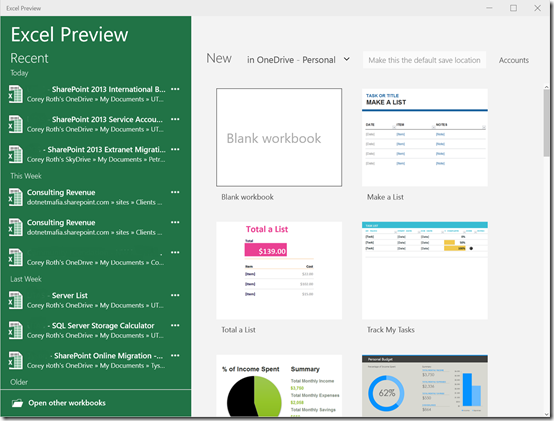
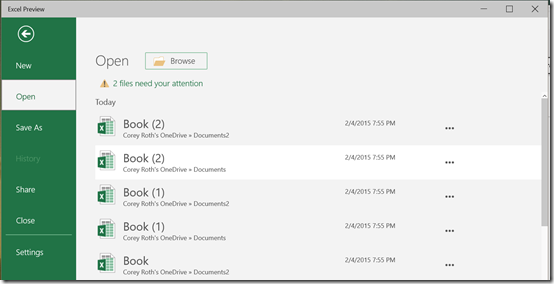
Once you start the app, you’ll see a familiar screen with templates that you can use to get started.  It will automatically pull in your recent files that you have used on OneDrive.

ExcelPreviewOpenFile

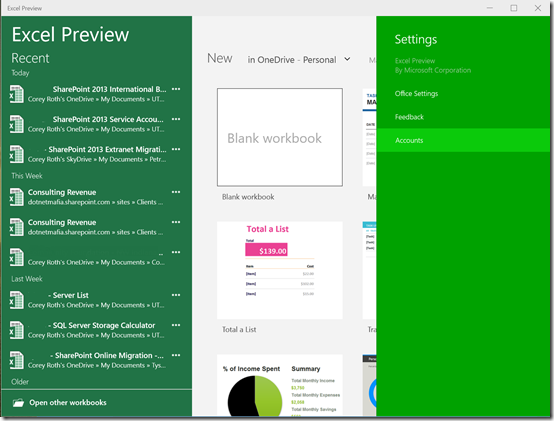
Be sure and click on the Accounts button to add your Office 365 account if you have one.  Unfortunately, you have to do this in each app separately.

ExcelPreviewAddAccount

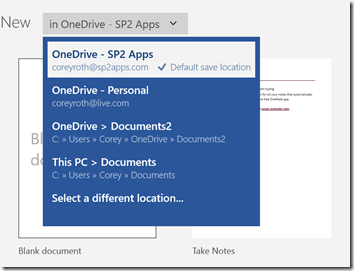
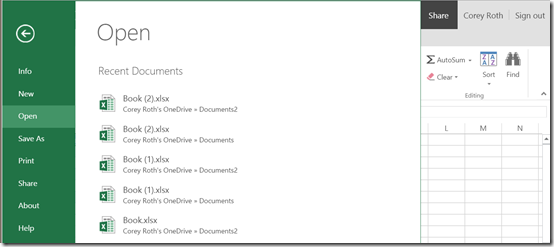
You’ll then be able to see a list of all your apps across OneDrive for Personal and Business use like you see in this example from Word Preview

WordOpenLocations

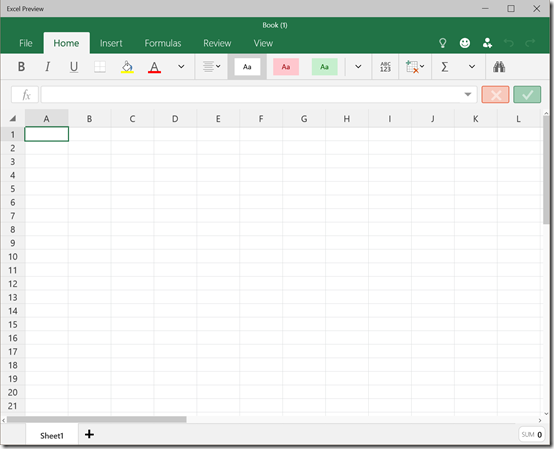
If we create a new document, we’ll see a new touch friendly Excel.  The buttons and icons are spaced a part to make them each to touch with your finger.

ExcelPreviewNewDocument

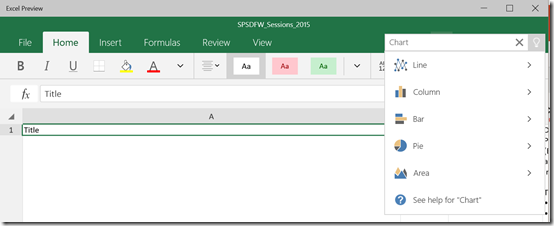
One feature I really like is the light bulb icon.  Clicking this will allow you to search for functionality that you can’t find in the ribbon.  For example, if I wanted to insert a chart, it gives me the options right there by typing the word “Chart”.

ExcelPreviewLightbulb

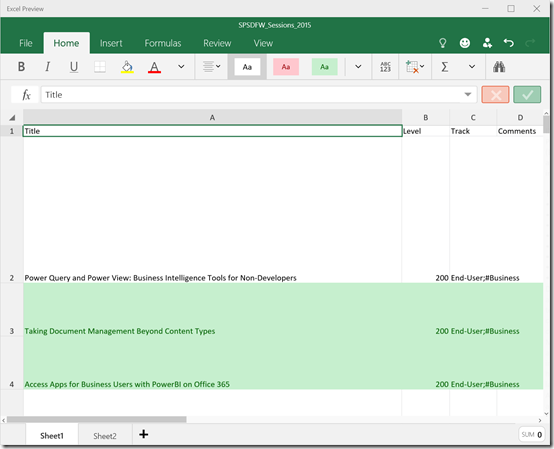
Excel should be able to open many of your existing spreadsheets as well.  Although, I found that Excel Preview crashes quite a bit more than the other Office Preview apps.  Some of my spreadsheets it just refused to open.  That’s to be expected though.  Excel spreadsheets can get complicated quickly and this is a preview product.

ExcelPreviewDocument

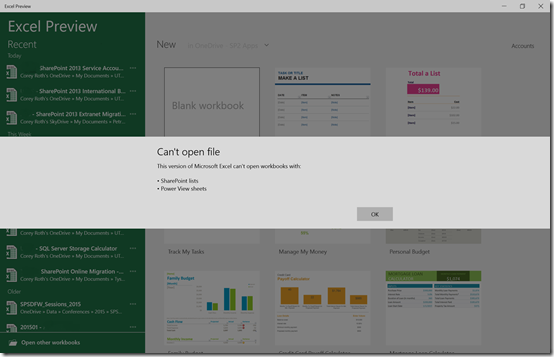
Some spreadsheets are out-right not supported.  If you are pulling data from a SharePoint list or using PowerView, it will display an error message telling you why.  I’m not surprised this doesn’t work but maybe it will some day in the future.

ExcelPreviewCantOpenFileSharePointError

For desktop users of Office 2013, the biggest change you will have to adjust to is that you can only have one file open at a time.  Now before you start bashing Universal apps on Windows 10, keep in mind that the Office apps on iOS and Android have this same restriction.

I’ve been pretty excited to see the launch of Office for Windows 10.  We’ll cover Word Preview and PowerPoint Preview in an upcoming article.  While you may not use these apps on your Surface Pro 3 in desktop mode.   I think these apps will do great when the device is running in Tablet mode.  If you have been thinking about running Windows 10 on your device, be sure and check out my review on IT Unity.

Office Universal Apps for Windows 10 - Who needs a Save button?

$
0
0

Today, Microsoft released their Office Universal apps for Windows 10 Technical Preview.  That’s a long way of saying that touch-friendly Modern Applications (formerly known as Metro and Windows Store apps) finally exist for Windows tablets.  I’ve had the pleasure of using the apps throughout the day.  I wrote an entire technical specification in Word Preview today and things worked well.  However, the biggest change for me is the lack of the “Save” button.  It simply isn’t there. 

ExcelPreviewNoSaveButton

For those of you familiar with Office Online (formerly known as Office Web Apps), this paradigm is nothing new.  Saves just happen auto-magically.

ExcelOnlineNoSaveButton

I’ve found myself really having trouble adjusting to it.  I am used to typing a sentence or two and reaching for Ctrl+S to save my document.  That simply isn’t necessary any more.  Your changes will automatically be saved as you type.  Where you need to be careful is if you are editing a document directly from OneDrive and you are on a slow or latent connection.  Sometimes it takes a while for those updates to be pushed up to OneDrive.  This makes me fearful on what happens when you are offline or if you have network connectivity issues while you are working on a document.  This will require more testing on my part.

Another aspect I find a little bit difficult for the consumer to master is when creating new files.  Whenever you create a new document in Word, it will automatically name the document Document (1).  It automatically creates this file in your default save location.  It will increment the document number if you have already created a document already too.  That means whenever you start a new document, it creates a physical file somewhere even before you save.  This is different than Office for the desktop where the copy is held in a temporary location until you hit save for the first time.  To choose a filename for the document, you either need to choose Save as or you can click on the filename at the top of the app.

WordPreviewChangeFilename

I guess this works, but it’s definitely different than what we are used to.  If you are going to try out these preview Office apps, be sure and proceed with caution.  The last thing you want to do is lose half a document just because of some pre-release issue.

Using Office Preview for Windows 10 with Office 365

$
0
0

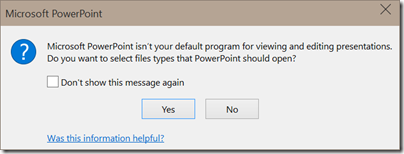
The new touch-friendly Office Preview apps for Windows 10 (aka Office Universal Apps for Windows 10) have native support for connecting to your personal OneDrive as well as Office 365.  When you first install the apps, they will take over your file associations.  When opening any of the desktop applications in Office 2013, you’ll see this right away as it prompts you to restore file associations.

PowerPointPreviewFileAssociationsWarning

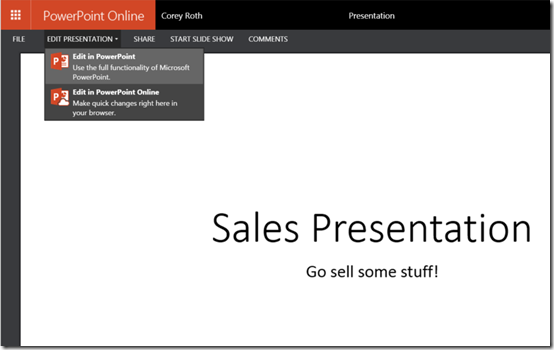
Since you can associate Office documents with the new Word Preview, Excel Preview, and PowerPoint Preview apps, that means we can use them to open documents in Office 365.  That means if you choose the option “Edit in PowerPoint” like in the example below, it will open with PowerPoint Preview.

PowerPointPreviewOWAOpenInPowerPoint

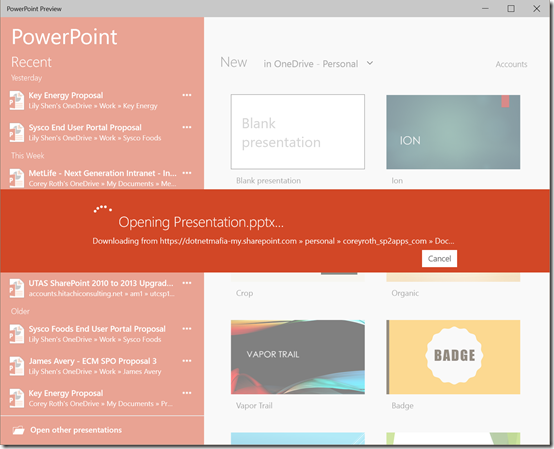
Windows 10 will open PowerPoint Preview for you and start opening the document from Office 365.

PowerPointPreviewOpenDocumentOneDriveForBusiness

Be warned, that opening documents from Office 365 takes a considerable amount of time.  This issue could be isolated to the tenant I was using though.

PowerPointPreviewOpenFromOffice365

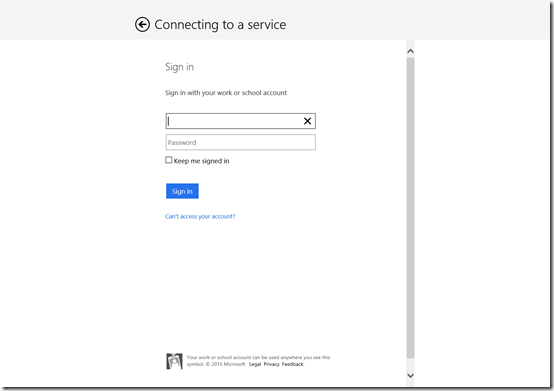
If you haven’t added your Office 365 account to the Office Preview Apps for Windows 10 yet, you will be prompted for credentials when you first connect.

PowerPointPreviewNoCredentials

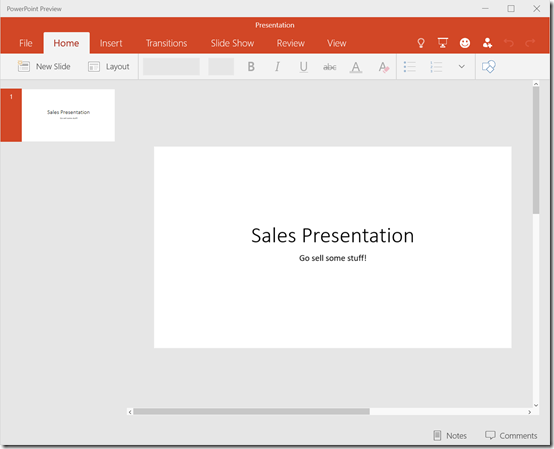
Now you can edit your document as normal.  Remember, that the Save button is gone now and your changes will be updated automatically as you type.

One thing I discovered in this process is that the apps do not support SharePoint 2007 (don’t ask me why I know).  I haven’t tried SharePoint 2010 yet, but I suspect it will work.  If you do try it, leave a comment and let us know how it went.

Troubleshooting errors with the client-side People Picker (SPClientPeoplePicker)

$
0
0

I’ve done quite a bit of work with the client-side People Picker in SharePoint-hosted apps lately.  I find that while it is relatively easy to get set up, I found it was quite easy to break.  I have found that it tended to work better in Office 365 than it does in on-premises SharePoint 2013.  I ran into two common issues. First, I found that after you did a query for users, you could not actually select the user.  The second related issue is that you could select the user, but the textbox would remain empty and not show the user’s name.

In my troubleshooting of the issue, I found that the behavior differed based on a variety of things including what user was using the page, how you authenticated, and which browser you were using.  When I was experiencing issues, I found that administrator users never had a problem.  That figures.  Low-privilege users would not be able to get the control to work.  Then I discovered that it would work for these users if they were not auto logged into the site with Internet Explorer.  Here, I am referring to the setting Automatic logon with current user name and password.  If the user typed in their credentials manually, it would actually work.  Quite strange.

After further investigation, I discovered that access to the spMgr object deep in clientpeoplepicker.js was coming back as undefined.  This turns out to be in a block of code that shows presence information for the user.  I found that if I disabled presence, it fixed the issue for users in Internet Explorer.  To disable presence, set ShowUserPresence to false on the SPClientPeoplePicker object.  Do this right before your call to SPClientPeoplePicker_InitStandaloneControlWrapper.

SPClientPeoplePicker.ShowUserPresence = false;

This resolved my issues in Internet Explorer.  However, Chrome was displaying some erratic behavior.  Sometimes the People Picker would work, but most of the time it still wouldn’t.  Although this technique worked for some browsers, I don’t think it was the final solution.  I found the final solution also in the debugger.  I reported the following error in clienttemplates.js:

Strings is not defined.

The odd thing is that the minified version of strings.js was actually included on the page automatically but it didn’t work for some reason.  Strings.js is the JavaScript file that contains all of the multilingual string resources for your current culture.  I included a hard reference to the US English version of the strings.js file in the 1033 folder. 

<scripttype="text/javascript"src="/_layouts/15/1033/strings.js"></script>

Once I did that, all of my People Picker issues were resolved.  You may want to correct culture code for the languages you use.

Creating an Azure Logic app that connects with SharePoint Online

$
0
0

Logic apps are a great new feature in Microsoft Azure that lets you connect to a variety of systems and create triggers and events.  This allows you to reproduce some interesting light workflow functionality in an easy manner.  It comes with connectors for common Microsoft products like SharePoint Online, Yammer, and BizTalk.  However, it also includes connects to services like Twitter, SalesForce, SAP, and Dropbox.  It even includes a connector for on-premises SharePoint 2013 servers although it requires some additional configuration.

As Logic apps are part of Azure, this is definitely a developer focused feature.  I don’t see end users working with these directly.

Today, we’re going to look at expanding the Twitter / Dropbox example and expand that for use into SharePoint.  That example stopped at only inserting the first tweet into a file on Dropbox.  This example, will insert all tweets that have been returned from a user’s Mention timeline into a list on SharePoint Online. 

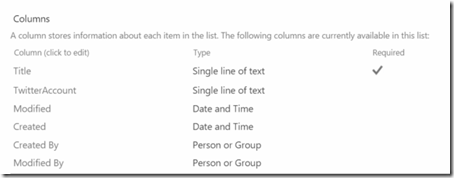
First, I started by creating a simple custom list on my SharePoint Online (Office 365) site.  I am just using the Title column as well as a custom column named TwitterAccount to capture who sent the tweet.

AzureLogicAppSharePointListColumns

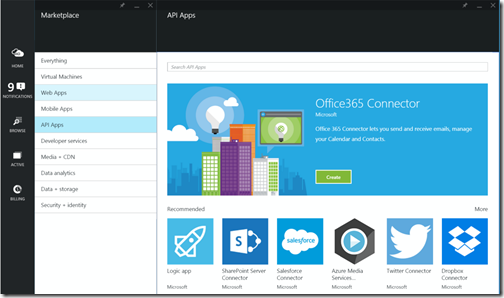
Like in the Twitter / Dropbox example, we need to create our connectors first.  We’ll create the Twitter Connector first. Start by logging into the new Azure portal at http://portal.azure.com.  Then click New, Developer Services, Azure Marketplace, API Apps.

AzureLogicAppNewConnector

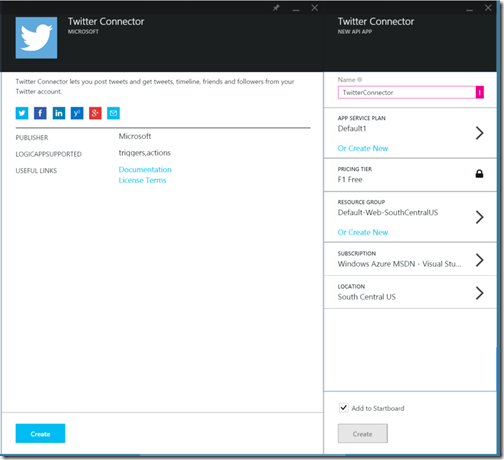
Select Twitter Service and then click Create.  Here you will be presented with some standard Azure settings that you will need to specify such as the App Service Plan, Resource Group, Subscription, and Location.

AzureLogicAppNewConnectorTwitterDetails

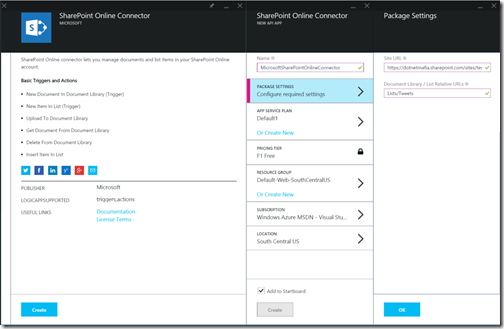
Now, we need to repeat the process for the SharePoint Online connector.  Select the SharePoint Online connector out of the API Services list.  Here you need to also specify the URL to your site as well as the relative URL to the list.  For example, for my Tweets list I created, I specified a relative URL of Lists/Tweets.

LogicAppsSPOConnector

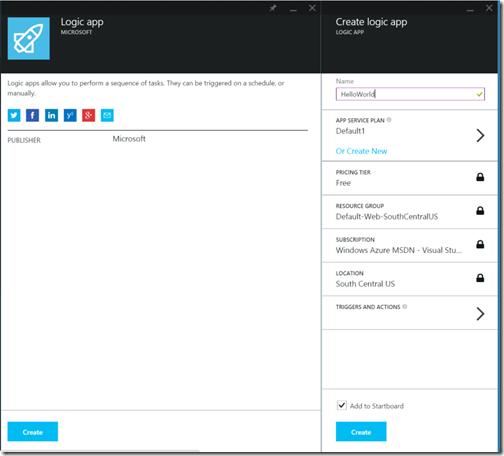
Now that we have created our connectors, we can get started with our Logic apps.  Create a new one by choosing Logic app under the API Services list.  If you can’t find any of these connectors or apps you can always just search for them.  After you click Create, you will be prompted for some settings.

AzureLogicAppNewWithSettings

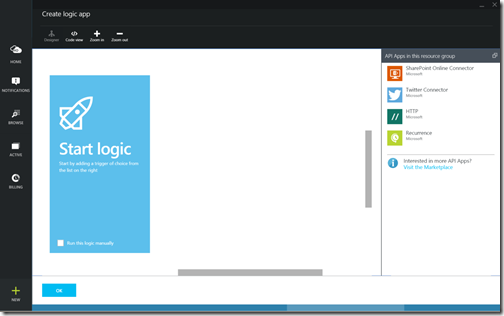
Give your app a name and then click Triggers and Actions to begin designing your app.  The canvas will appear and you can begin designing your app.

AzureLogicAppCanvas

To get started you simply click on the connectors you want to use.  The Twitter / Dropbox example starts with a recurrence connector to execute the task once an hour.  I didn’t want to accidently leave this app running so I checked the box Run this logic manually

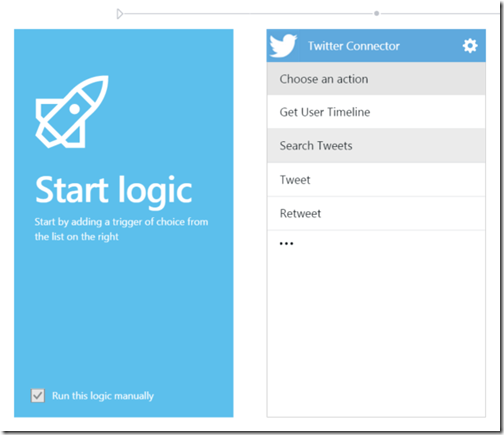
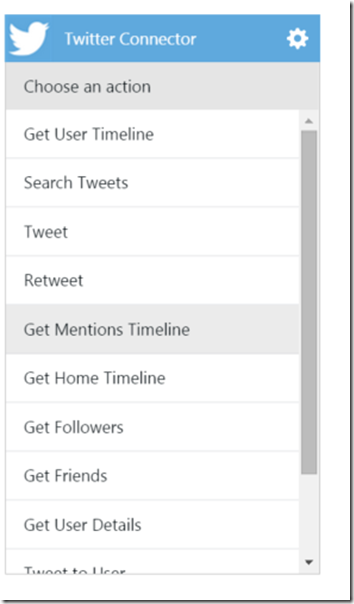
Now we’ll click on the Twitter connector to pull data out of Twitter.  The first time you do this you will be prompted for authentication by Twitter.  Once you login, it will show a list of common actions.  However, you can click the “…” to see more.

AzureLogicAppCanvasTwitterDefault

In our case, we want to select Get Mentions Timeline.

AzureLogicAppCanvasTwitterGetMentions

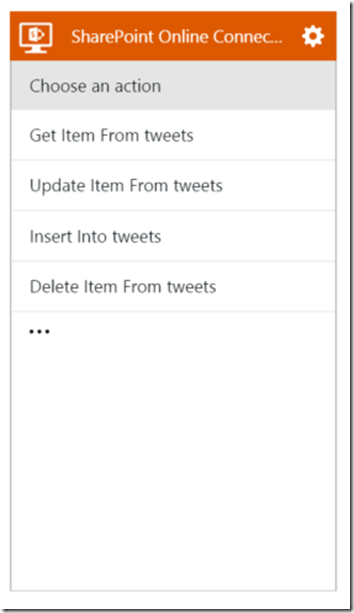
Now, we need to add our SharePoint Online Connector by clicking on it.  It will also prompt you for authentication as well.  It will then present you with common actions that you can preform on your list.  It will mention your list directly by name.  Choose Insert into <listname> to continue.

AzureLogicAppSharePointConnectorDefault

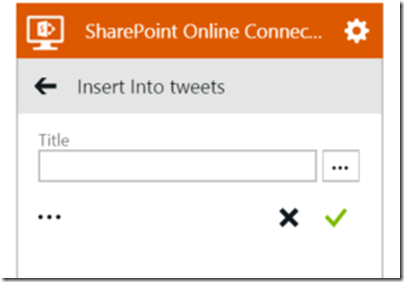
We’ll be able to start mapping our data to the columns in the SharePoint list.  You can find the other fields by clicking on the “…” button.

AzureLogicAppSharePointConnectorInsertItem

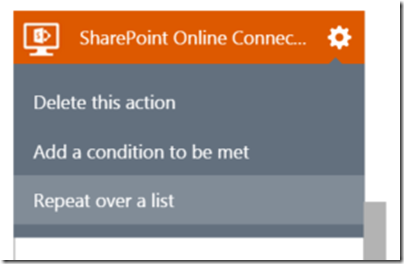
Don’t do the mapping yet though.  In the online example, it only inserted the first list item.  We’re going to implement repeating functionality to insert all of the list items.  Click on the cogwheel and choose Repeat over a list.

 AzureLogicAppSharePointConnectorRepeaterMenu

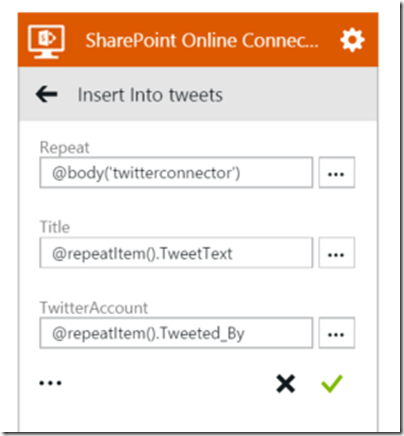
You can also specify conditions from this menu but we’ll cover that in the future.  Now we want to specify the fields to use in our repeater.  In the Repeat Field click the … icon next to it and choose Get Mentions Timeline.  This will add the text @body(‘twitterconnector’) which is an internal syntax used by Logic apps.  Now we want to write the Tweet Text to the Title field and the Tweeted By field to the TwitterAccount field.  You can look at the options specified in the “…” menu but they don’t quite work right for repeaters.  You can start by picking This Action but we still have a bit of work to do.  It will add @repeatItem() to the box when you click it.

AzureLogicAppSharePointConnectorRepeatItem

Now we need to specify the field name.  We can actually infer this by looking at the Twitter Connector or by looking at the syntax it uses when we select a field from the “…” icon.  Since this is a preview release, the selectors for these fields don’t always give the same results.  Sometime if you select a field name it will do it correctly.  Other times it gives us the syntax that only returns the value from the first item returned.  Ultimately, I want to end up with a value of @repeatItem().TweetText for the Title field and a value of @repeatItem().Tweeted_By for the TwitterAccount field.  Here’s what the final settings look like.

AzureLogicAppSharePointConnectorRepeatingSettings

Click the checkbox to accept the values and then click Save at the top.  Finally you want to click Create to begin creation of your Logic app.  If you are going to make a lot of triggers and actions, I recommend you click Create first before you create them.  This will allow you save your progress as you work on things.  Nothing will be saved until you have created the Logic app itself first.

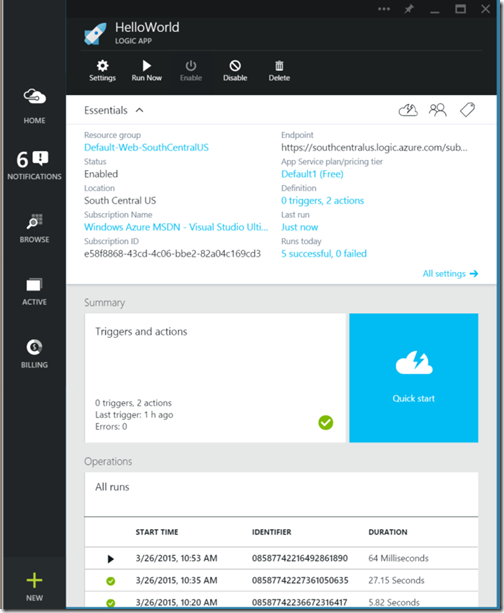
Now are ready to manually run the Logic app manually.  Click the Run Now button at the top to begin.  You’ll see the progress in the Operations section at the bottom.

AzureLogicAppSettings

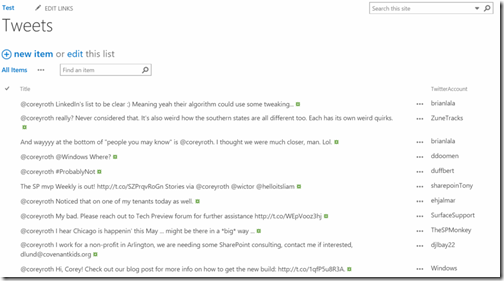
Go back to the list on your SharePoint site to verify that the functionality worked.  You can see the list of tweets that mentioned me have been populated. 

AzureLogicAppTweetList

I noticed they didn’t necessarily come in the right order so it might be a good idea to bring in the date column as well.  When I made a schema change to my list earlier I had to recreate the SharePoint Online Connector for it to show up.  There might be a way to refresh it though.

Logic Apps are an interesting technology with a lot of promise.  It makes some scenarios rather easy to implement in a short time.  I’ll continue to work with the technology to get a feel for what it can do and what the limitations are.  Try it out for yourself and see what you can do.


Reading your skin temperature using the Microsoft Band SDK Preview

$
0
0

Microsoft Band is packed with sensors that let it track your workouts.  However, one sensor you don’t hear about often is the Skin Temperature sensor.  This sensor allows you to read the temperature in Celsius of your skin where your Band is.  There aren’t any apps built-in to Microsoft Band that make use of it directly.  However, as a developer you can take readings from that sensor from an app on your phone using the Microsoft Band SDK Preview.  The SDK is very preliminary and you can only do a handful of functions from a phone including reading the sensors, creating tiles and sending notifications, and changing the theme and background image.  It has a direct dependency on the app you deploy to your phone.  You can’t actually build an app and deploy it so that it runs on Microsoft Band natively.  This limits you quite a bit, but you can still do a few cool things.

For my example, I worked off the Sensors example project for Windows Phone 8.1 and made some customizations.  The app consist of a simple button that initiates our connection to the Band and starts taking readings.  You can customize the Sensors project as well or you can grab my copy from GitHub.  You can get the SDK from nuget by using the following command.  This will add the necessary project references.

Install-Package Microsoft.Band -Pre

Start by editing the XML of the Package.appxmanifest file and add the DeviceCapability section for Microsoft Band inside the Capabilities element.

<DeviceCapabilityName="bluetooth.rfcomm"xmlns="http://schemas.microsoft.com/appx/2013/manifest">

  <DeviceId="any">

    <!-- Used by the Microsoft Band SDK Preview -->

    <FunctionType="serviceId:A502CA9A-2BA5-413C-A4E0-13804E47B38F" />

    <!-- Used by the Microsoft Band SDK Preview -->

    <FunctionType="serviceId:C742E1A2-6320-5ABC-9643-D206C677E580" />

  </Device>

</DeviceCapability>

You also need to add the Proximity capability as well but you can do that through the UI.

Now, we’ll work on adding some functionality to MainPage.xaml.  This consists mainly of a few TextBlocks and a Button.  Clicking the button will invoke our code to connect to Band and take a reading.  Create an event handling method for the button and mark it with async.  Now, we first need to get the paired Bands to the phone.  This assumes you have already paired your Band in the Bluetooth settings of the phone.

// Get the list of Microsoft Bands paired to the phone.

IBandInfo[] pairedBands = awaitBandClientManager.Instance.GetBandsAsync();

if (pairedBands.Length < 1)

{

    this.textBlock.Text = "Band not paired.";

    return;

}

To connect to Band we create an IBandClient in a using block.

using (IBandClient bandClient = awaitBandClientManager.Instance.ConnectAsync(pairedBands[0]))

{

}

Now we can read from the Skin Temperature sensor.  To do this, we bind an event handling method to the ReadingChanged event of the SkinTemperature class.  We’ll cover the event handling method just below.

bandClient.SensorManager.SkinTemperature.ReadingChanged += SkinTemperature_ReadingChanged;

Finally, we call StartReadingsAsync to start taking readings from Band.  We follow it with a delay of a minute before calling StopReadingsAsync to stop taking readings.

await bandClient.SensorManager.SkinTemperature.StartReadingsAsync();

awaitTask.Delay(TimeSpan.FromMinutes(1));

await bandClient.SensorManager.SkinTemperature.StopReadingsAsync();

In the event handling method, the value of e has a type of BandSensorReadingEventArgs<IBandSkinTemperatureReading>.  We can get the skin temperature in Celsius by using the SensorReading property.  For us Americans, we can convert that to Fahrenheit.  You know the formula right?  C * (9/5) + 32.  :).  Using the Dispatcher, we then write the value of the reading to the UI.

privateasyncvoid SkinTemperature_ReadingChanged(object sender, BandSensorReadingEventArgs<IBandSkinTemperatureReading> e)

{

    IBandSkinTemperatureReading temperatureReading = e.SensorReading;

    string text = string.Format("Temperature: {0}C", temperatureReading.Temperature);

    await Dispatcher.RunAsync(CoreDispatcherPriority.Normal, () => { this.textBlock.Text = text; }).AsTask(); 

}

Now you are ready to run the program on your Windows Phone and see how hot you are!  Plug your Windows Phone into your PC via the USB port and then debug the program and be sure you choose Device in the options.  You can’t do this with the emulator.

BandSkinTemperature

There you have it, my skin temperature was 30.69 Celsius (87.42 Fahrenheit).  Now you might be thinking now, “ok, neat, but how do I see that information on my Band”.  Well, you can push that information to your Band using a Tile.  In fact, I’ve included that code in my repo on GitHub.  However, you can only push information to your Band when the Windows Phone app is running.  That’s not all that useful.  I’ll cover tiles in a future post, but if you want to try it out for yourself, you can grab my code from GitHub.  I would have included it today but I found that adding tiles so far doesn’t always work as expected.  Maybe it will for you.

This example really has zero practical value but I expect that we’ll see more opened up in the API in future versions.  If you have been interested in seeing what you can do with it as a developer, it’s worth checking out though.  For more examples of working with Band across platforms, be sure and check out the published documentation.

Display scaling improvements come with Windows 10 Build 10074!

$
0
0

For those of you out there with a Surface Pro 3 connected to an external monitor, you know the pain of display scaling.  This typically caused a phenomenon where windows were sized normally on your Surface Pro 3 display while being massive on your external monitor.  Most users I have talked to found this absolutely frustrating.  The only real solution was to purchase an external monitor with an equally high DPI.  This meant purchasing a high dollar 4k monitor.  While those displays are nice, most people have plenty of good LCD displays in the 20” – 30” range which are working perfectly fine right now.

With Build 10074 of Windows 10 Insider Preview, some of this pain goes away.  That’s because of the new ability to set the DPI scaling to an independent setting for each connected display in the new Settings app.  Now, I can set the display scaling to 150% on my Surface Pro 3 display but have my external monitors set to 100%.  Windows is smart and even auto detects the right settings for each. 

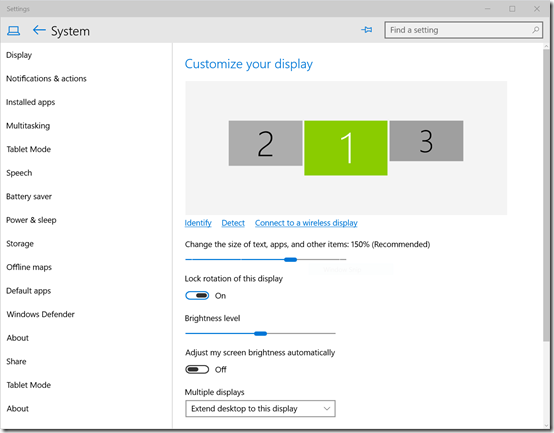
Let’s take a look at this new setting.  The setting Chagne the size of text, apps, and other items is set to 150% (Recommended) on my Surface Pro 3 display.

W10B10074DisplayScalingSurfacePro3

On my external monitor running a resolution of 1920x1080, the setting is set to 100%.

W10B10074DisplayScalingExternalMonitor

This is great, but how does it perform?  I found that this fixed the issue in a lot of programs including some of the Office suite.  Let’s look at some examples.

File Explorer on the Surface Pro 3 display:

W10B10074FileExplorerSurfacePro3

File explorer on an external display:

W10B10074FileExplorerExternalDisplay

Notice they are the same relative size!  You’ll actually see windows resize it as you move them as well.

Word 2016 Preview does pretty well too.  Here it is on the Surface Pro 3 display:

W10B10074FileExplorerExternalDisplay

Word 2016 on the external display:

W10B10074DisplayScalingExternalDisplay

File Upload dialogs used to be massive on external displays.  Now they are regular-sized.

W10B10074UploadDialog

Some programs handled this better than others.  However, PowerPoint and Skype for Business (aka Lync) still have issues.  A typical chat still takes up more a large part of the screen.  Notice the difference in ribbon sizes between Word and PowerPoint.

W10B10074PowerPoint

The new Microsoft Edge browser (still referred to as Project Spartan in this build) also has some issues as well.  For example, when you launch it on the Surface Pro 3 display, it will set the zoom level to 150%.  However, when you drag it to another monitor, it doesn’t adjust the zoom level automatically.

There has also been some improvements in other Windows Universal apps so that they scale better on external monitors.  It isn’t perfect yet either but the snapping has definitely improved.

Surface Pro 3 users have been crying out for improvements here and it’s nice to see that they are in the works.  I hope to see additional improvements as we see new builds.

Follow me on twitter: @coreyroth

Ignite Readiness Checklist

$
0
0

I started doing SharePoint Conference readiness checklists back at SPC11 and I wanted to continue the tradition with Ignite.   This list may look similar to previous lists, but I have made lots of updates and additions.

What to pack:

  • Chargers / Power Supplies – I remember when I went to PDC05, I forgot my laptop charger.  I was quite bummed.  Don’t forget the chargers to your laptop, netbook, Surface, phones, etc. I have gotten a few of these new emergency phone chargers at conferences lately and they are very handy here.  Especially when you have a Nokia Lumia 920 and the battery life is terrible.  Keep in mind your average day can be 16 – 18 hours plus and you don’t want to be left in the dark and miss that big gathering because your phone died.
  • Backup power – If any vendors are giving out backup power supplies, grab them!  You know the portable chargers that you can take with you.  We have several of them and they are a life saver.
  • Tablet / Laptop – You’ll want some kind of computer whether that’s a tablet, laptop, hybrid of whatever.  You want something with a keyboard.  This makes it easier to send e-mail or post tweets.  Besides, the more you are on this device, the less you have to rely on your phone and use its power. You also can use these to fill out session evaluations.  There are usually incentives for filling out evaluations so I try to complete each evaluation right before the end of the session so I don’t forget.
  • Bring your own Internet  – The wireless networks at conferences are rarely good.  They are jammed with geeks trying to post updates on Twitter and check out what’s happening on Facebook.  If you have access to a wireless AirCard, MiFi, tethring, etc, bring it.  See if your company has any that you can check out temporarily.  Conference organizers really don’t like you using these during keynotes because the more hotspots you create, the slower the Internet gets.  The slower the Internet gets, the more hotspots people turn on.  It’s a vicious cycle. I'd still bring your one if you can.
  • Cash – There are a lot of free events but you might go do something before or after the conference and I am not a fan of running tabs at busy restaurants and bars.   Don’t take it all with you every night.  Leave some in the hotel safe.
  • Snacks and Water– After a long night, you will want something to eat.  At the minimum, you might want something to eat in the morning.  The hotels will likely have stuff in your room, but it will cost you dearly.
  • Business Cards– Even if you are not in sales, bring twice as many as you think you will need.  You will go through them faster than you think.   It’s amazing how many people forget these at a conference.  Don’t be one of those people!
  • Bail Money – The Houston SharePoint Users Group has a running joke about always keeping a stash of bail money around when attending a #SharePint.  You never know what is going to happen.  0
  • Headset– If you think you are going to have to take any calls during the week, don’t forget your Bluetooth headset.  This will make it easier to do your calls for sure.
  • VPN Tokens - If your work network requires a VPN token or Smart Badge you might want to bring it if you think you might need to use it.  Otherwise, you might conveniently forget it, to ensure you can focus on the conference. :)

Before you go:

  • Arrive early– Come in early and have some fun in Chicago before you get into the conference grind.  Many of us will be arriving Friday or Saturday.  I tend to arrive on Saturdays while most of the foreign nationals I know, tend to arrive Friday or earlier.
  • Don’t leave early– Normally I say this, but they have extended the conference by a day.  Come Friday, I’ll be ready to be on the first plane out of Chicago.
  • Set your schedule on MyIgnite - This will make your Ignite organizers happy when it comes to capacity planning.  You aren’t required to go to that session you schedule, but it will help you pick from the 10+ sessions going on at any given time slot.  Go to MyMignite and set your schedule now.   Not sure about a session, watch the teaser video on YouTube.
  • Create your Bio on MyIgnite  – Whether you are an end user or a rock star, take a few minutes to write about yourself.  Include where you work if you want along with what you typically do with the Microsoft stack and what you want to get out of the conference.  Upload a picture of yourself to make things more personal.  Be sure and set the privacy settings as desired.  Set your MyIgnite bio now.  Be sure and edit your profile on Yammer too.
  • Connect on MyIgnite - If you go to the Communities tab, you can search for other attendees. 
  • Get on Yammer - The conversations have already begun about Ignite on Yammer.  This is a great way to find out what other people are doing, network with others, and talk with people with similar issues.  Most importantly, you can have a conversation about the sessions while they are occurring.  Speakers will be watching Yammer before, during, and after their sessions.   Be sure and follow others in Yammer to have more show up in your social feed.
  • Create a #msignite Search in Twitter – Twitter hasn't gone away by any means, so keep an eye on the activity of the #msignite hash tag.  However, this year, I think Yammer is where you are going to find the most info and conversations.  Twitter will still be good to find out about sessions, events, and it will generally give you an idea of what is happening at the conference.  Be sure and include the #msignite hash tag on anything you post and help get this conference trending!
  • Follow @MS_Ignite on Twitter – @ms_ignite is the official twitter account for Ignite.  This account often posts useful stuff about the conference.  I’ve also used it to ask questions or provide general feedback and I’ve had very good luck getting a response.  Keep in mind this twitter account is effectively manned by one person, so if you have an inquiry, take it to Yammer.
  • Download the Ignite Mobile App – Whether you use iOS, Android, or you are one of the last few Windows Phone users, be sure and download the Microsoft Ignite App before you go.  Download it now while you still have good Internet!
  • Reach out to your local User Group – Find out what your local User Group is doing while at Ignite.  Many of them are having meetings or socials. 
  • RSVP for Parties – Unfortunately, if you haven’t RSVPed for parties by now, you’re probably out of luck.  However, being persistent can get you in.  Talk to the vendors in the exhibit halls hosting the parties.  Sometimes you can just show up and talk your way in.  Check the Events at Ignite Yammer group.  Also check Vlad’s Ultimate Party List regularly.  Be sure and follow @SPCPartyPatrol to find out where the parties are too!
  • Arrange for Ground Transportation  - Don’t forget to arrange for ground transportation.  You really don’t need a car in Vegas, but you do need a way to get there.  Taking a Taxi usually isn’t too expensive and there are plenty of shuttle options as well.  This may be less of a concern on arrival but more for your departure.
  • Leave space in your bag– Between the conference materials and the vendors you are going to end up with a heap of product information, trinkets, and T-shirts.  Make sure you have room in your bag to bring them home.  Otherwise you’ll be hand carrying them on the plane or leaving things behind.
  • Update your devices - Now is a great time to make sure your devices are up to date with the latest security patches.  Make sure they are charged too!
  • Set your out-of-office - You're at this conference for a variety of reasons, you need to focus.  Try to stay out of Outlook and let people know that you will be slow to respond.  If you need to stay connected, I recommend picking one time of day, such as in the morning before sessions, to catch-up on what's happening back at home.

What to do at the conference:

  • What happens in Chicago, will not stay in Chicago – Nerds have gadgets and they like to take pictures.  Do something stupid and you can rest assure it will be on twitter within seconds. :)
  • Ask questions  - Don’t be afraid to walk up to the mic and ask a question.  That’s what you’re here for.  If you don’t want to ask it in front of everybody, wait in line and talk to the speaker at the podium just be mindful that the speaker has to clear out in a hurry.  Don’t be afraid to approach speakers outside the room either.  Most of them are friendly and are easily engaged using beer and cocktails. :)  It's not uncommon to find them at the official SharePint bar.
  • Make friends– You may run into lots of people you know, but many people aren’t active on twitter and aren’t familiar with the SharePoint community at all.  Find a friend if you didn’t come to the conference with any one.  It’s much more fun to go do all of the activities in a group rather than by yourself.  If you have coworkers there, feel free to hang out with them, but don't feel that you are obligated to.
  • Go to the evening events - I can't stress this enough.  Try to avoid team dinners that overlap with the events.  Get them rescheduled.  The evening events are where the real connections are made, friends are found, contracts are signed, and new jobs are discovered.  If you just go to the conference and nothing else, you are missing out on half the experience.
  • Remember to eat - This one sounds obvious but it’s not.  You may be going to lots of parties with nothing but light appetizers.  This does not give you a good base to work upon before embarking on a night of massive consumption. Pace yourself!
  • Don’t worry about writing everything down – Remember the slides and content will be on Yammer before the session.  Don’t stress out because you weren’t able to write down a URL or code snippet on a slide.   You can also take pictures of slides as well.
  • Visit the Exhibit Hall– The exhibit hall is a lot of fun.  Besides all of the SWAG and drawings, you are likely to find out about evening events that way. Make a point of going there every day.  I spend a good majority of my time there during the conference.  You'll never know who you run into.
  • Be on the lookout for the SharePoint Monkey – The word on the street is that the SharePoint Monkey will be making an appearance.  You'll never know what that silly monkey is going to be up to during the conference.  Be on the look out for him throughout the convention center.  Follow him on twitter @TheSPMonkey for clues!
  • Attend the sessions – Don’t skip out on the morning sessions.  If I have to get up early so do you. :)
  • Attend the Hands on Labs– If you haven’t had a chance to get your hands on the latest technology, get down to the HOL and check it out.  This is a great way to experience the product without having to take the time to install it.   It opens at 9:00 am on most days (after the keynote on Monday).
  • Take a test– Go roll the dice and find some time to take a test.
  • Don’t underestimate travel times– It’s a long bus ride to the convention center.  It can be between 15 and 30 minutes if not more.  Even within the convention center, there are long walks between sessions.  Plan accordingly.
  • Set your alarm before you go out for the night - Before you go out for the night, set your morning alarm on your phone.  You may not remember when you get back to your room.
  • Arrive early to sessions – Many sessions will fill up and entrance will be denied, especially futures sessions.  Don’t get left out by showing up late.
  • Don't be afraid to leave a session - If you decide in the middle of the session, that this one isn't for you, don't be afraid to quietly step out and go see something else.  A few speakers might call you out for it, but most won't. :)
  • Learn hash tags for the sessions you are attending– Every session you are attending has an associated hash tag that you can follow. 
  • Don’t wear your badge outside of the convention center – Nothing says you don’t have any game like walking out of the convention center with your badge on.  Take it off as you exit the area.  Don't lose it though as it may cost you a lot to replace it.
  • Don’t forget your badge (and lanyard) at the attendee party – You’ll need your badge everywhere you go.  Bring it and the lanyard. 
  • Keep your phone charged– The battery life on LTE phones is horrible and even worse when you are tweeting non-stop all day.  Keep an eye on your phone’s battery life and charge up throughout the day. 
  • Don’t be afraid to leave for lunch– I’m not a huge fan of conference food and it rarely gets along with my diet.  Usually by the second or third day I am grabbing anyone I can find and going off-site.  Find me at the conference and you can join me.
  • Fill out your evaluations– These really are important to the speakers.  Let them know they did a good job and take the time to leave actual text comments in them.
  • Establish rendez-vous points – Establish meeting spots in advance with your group and set a time to meet. 
  • Go to the attendee party – Go to the attendee party.  If you are expecting to meet people there, meet them before you leave the hotel.  If you don’t walk in with the people you want to see, you will likely not see them that night. 
  • Hydrate - Drink lots of water throughout the day.  This is especially important if you have had a lot of late nights.
  • Silence your phone during sessions, turn it on as loud as possible everywhere else - Don't be "that guy" who has your phone ringing in the middle of a session.  That's guaranteed embarrassment. When you're not in sessions, turn the volume up on it as you probably won't hear it go off otherwise when you get a message.

That’s my list.  I’m sure there are other things to remember.  Do you have anything else to add?  Leave a comment.  This probably goes without saying, but if you are not on Yammer and Twitter, now is the time to join.  It’s the best way to keep up with what’s happening at the conference.

I’m also presenting a session with Matt McDermott at this year’s conference and we would love for you to come see it.

  • #BRK4124Search Extensibility in SharePoint 2013 (Second Screen) (Thursday, May 7th, 5:00p) – Come on a tour of the common extensibility and development tasks needed to take advantage of the full power of SharePoint 2013 Search Service. Ingest content from external sources through the BCS. Enhance content prior to indexing via Content Enrichment. Pinpoint relevancy and enhance user queries through contextual targeting with Query Rules. Make the most of the new Keyword Query Language improvements. Finally, customize the end-user experience and make your search results shine!

Enough with the shameless plug. :)  Get ready and I’ll see you at the conference.

Follow me on twitter: @coreyroth.

Working with Office 365 Groups using PowerShell

$
0
0

New features are coming fast to Office 365 Groups.  As administrators we have been looking for ways to simplify the management of groups.  This includes functions like adding groups, deleting groups, and adding members to groups.  At Ignite last week in session BRK3114 they showed us some of the new PowerShell cmdlets available to make this happen.  There isn’t any documentation on this stuff at all yet, so I wanted to show you some of the stuff that was showed at the conference.

Establishing a connection to Exchange Online

Groups are ultimately powered by Exchange (and then SharePoint).  As a result, we make use of the Exchange Online cmdlets.  If you have never used these cmdlets before, we start by creating a session.  Start by opening a PowerShell window of your choice.  We’ll be following the steps provided by TechNet.

First, get your credentials in PowerShell and store them in a variable using Get-Credential.  A window will pop up prompting you for your credentials.   Use your Office 365 Global Administrator account.

$userCredential = Get-Credential

GroupsPowerShellSessionCredential

Now, we need to create a session with New-PSSession and pull down the Exchange Online cmdlets.  Executing this command will yield no output.

$session = New-PSSession -ConfigurationName Microsoft.Exchange -ConnectionUri https://outlook.office365.com/powershell-liveid/ -Credential $UserCredential -Authentication Basic -AllowRedirection

GroupsPowerShellSessionExchange

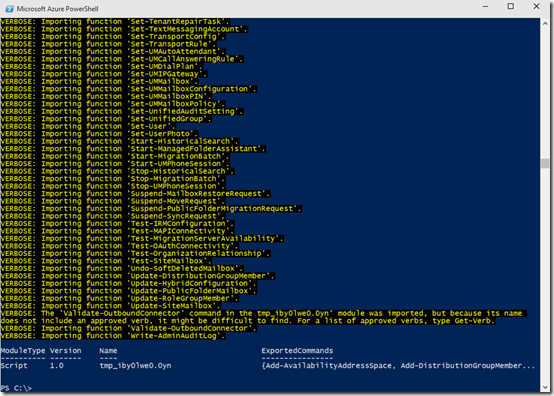
Finally, use Import-PSSession to make the connection.  This takes a few moments as it shows you all of the cmdlets it has loaded.

Import-PSSession $session

GroupsPowerShellSessionLoaded

If you examine the output closely you’ll see some cmdlets for groups in there.  Now we are ready to being working with groups on our tenant.

Getting a list of all groups

Let’s start by seeing what groups are present with Get-UnifiedGroup.  Type the following in PowerShell.

Get-UnifiedGroup

GroupsPowerShellGetUnifiedGroup

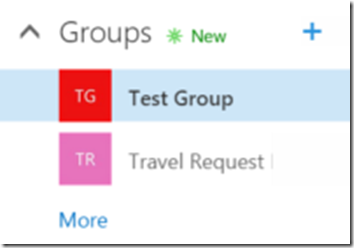
That’s odd.  It returned only one group and I have more than that on my tenant.

GroupsList2

This is because if you have existing groups, they are likely in a state of transition to a new type of object in Azure Active Directory that can be synchronized back to your on-premises Active Directory Domain Services.  This deployment is only temporary though and it may already be working on your tenant.  I created a new one through the user interface today and it showed up.  The one I created months ago did not.

Creating a new group

To create a new group with PowerShell, we use the New-UnifiedGroup cmdlet.   Here are the key parameters:

  • DisplayName– display name of the group
  • Alias– alias of the group if you want to override it.  If you omit the parameter, it will generate an alias for you.
  • AccessType– Public or Private
  • AutoSubscribeNewMembers – Add this parameter to auto subscribe new members to the group

The Members parameter which takes an array of Recipient Ids to add users to the group.  There is also a large number of other parameters that allow you to customize things even further.  I am pretty sure some of these parameters aren’t even configurable in the user interface yet.

To create a group with minimal parameters, just use the DisplayName parameter:

New-UnifiedGroup –DisplayName "PowerShell Group 1"

GroupsPowerShellNewUnifiedGroup

Unfortunately, since the cmdlets are still under development, this one doesn’t work right now.  However, it might work by the time you try it.

Adding users to a group

The cmdlet to add users to a group in PowerShell, Add-UnifiedGroupLinks, actually does work right now.  Here are some of the key parameters:

  • Identity– Alias of the group
  • Links– login or alias of the user being added
  • LinkType– Members, Owners, or Subscribers

To add a new user to the members group:

Add-UnifiedGroupLinks groupalias –Links user@domain.com –LinkType Member

GroupsPowerShellAddUnifiedGroupLink1

Successful execution will not yield any output.

To add a new user to the owners group, first add them as a member and then add them as an owner.

Add-UnifiedGroupLinks groupalias –Links user@domain.com –LinkType Member

Add-UnifiedGroupLinks groupalias –Links user@domain.com –LinkType Owner

GroupsPowerShellAddUnifiedGroupLinkOwner

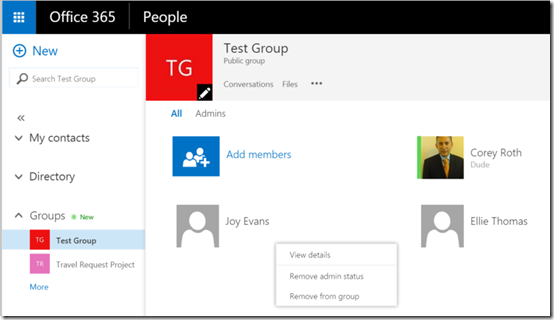
You can verify that your users are in the group through the Groups user interface.  Note that the user “Joy” is listed as an owner.

GroupsPowerShellMemberList

We can also verify the users are in the group via PowerShell.

Getting the members of a group

We can use PowerShell to view the members of an existing group with the Get-UnifiedGroupLinks cmdlet.  The key parameters for this cmdlet are:

  • Identity – the alias of the group
  • LinkType – Members, Owners, or Subscribers.  Required.

To see the members of a group with PowerShell, issue the following command:

Get-UnifiedGroupLinks –Identity groupalias –LinkType Members

GroupsPowerShellGetUnifiedGroupLinks

Removing a user from a group

You can remove a member from a group using Remove-UnifiedGroupLinks.  Here are the parameters:

  • Identity – alias of the group
  • Links– login or alias of the user to be removed
  • LinkType – Member, Owner, or Subscriber.  Required.

To remove a user as a member from the group, use the following command:

Remove-UnifiedGroupLinks groupalias –Links user@domain.com –LinkType Member

GroupsPowerShellRemoveUnifiedGroupLinks

To remove an owner from the group, you will first have to remove he or she from the LinkType Owner.

Remove-UnifiedGroupLinks groupalias –Links user@domain.com –LinkType Owner

Remove-UnifiedGroupLinks groupalias –Links user@domain.com –LinkType Member

Removing a group

As expected, the cmdlet to remove a group doesn’t function right now either.  We can still look at the syntax though.

Remove-UnifiedGroup groupalias

Getting help with the groups cmdlet

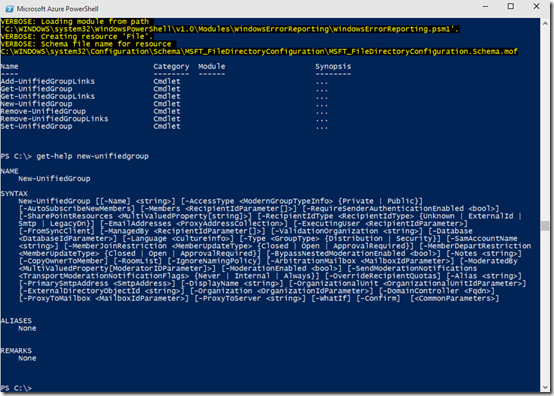
You can type help unifiedgroup to load the help modules for Groups.  When you do, you’ll again get a bunch of verbose information followed by the listing of cmdlets.  Unfortunately, they don’t provide any real documentation yet, but you can see a listing of parameters using get-help.

GroupsPowerShellHelp

Summary

This is truly a case where we are getting early access to PowerShell functionality.  While not all of the functionality is ready yet, it’s great to see that we can get started.  Just being able to easily add members to a group using a PowerShell script already is a huge win!  Remember that these cmdlets are highly subject to change right now before you invest a lot of time building scripts around them.  I’ll update this post when the cmdlets are finalized.

If you want to learn more about working with Groups, be sure and watch Ignite Session BRK3114 where they demonstrate some of these cmdlets in action.

Fixing Office 365 ProPlus Activation Prompts on Windows 10

$
0
0

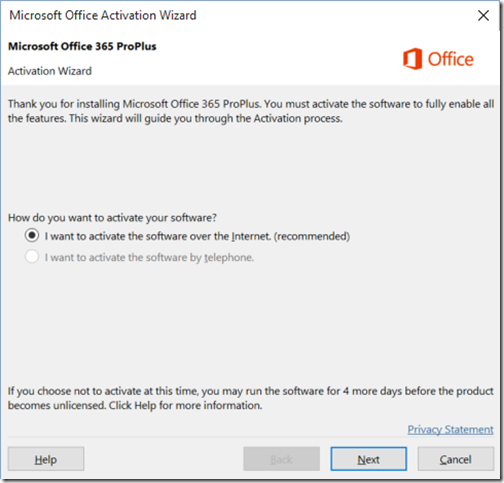
If you are using Office 365 to deploy Office 2016 Preview (Office 365 ProPlus) to your desktop, you may have found that you get hit with multiple prompts to activate the product even though it is already activated.  You can click Cancel on the Activation but it will prompt you again when you open up any other Office product.

W10B10162Office365Activation

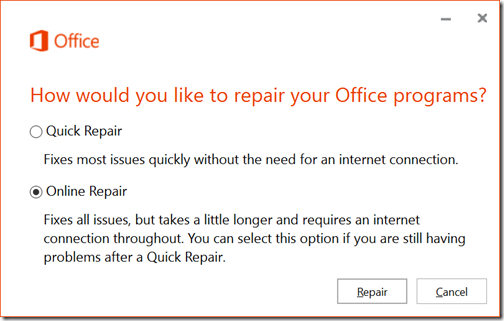
@MarioFulan on twitter mentioned that performing an Online Reset corrects this issue.  In Windows 10, you will need to go to the old control panel to launch the repair process (otherwise you’ll just uninstall the product).  Choose Online Repair.

W10B10162Office365OnlineRepair

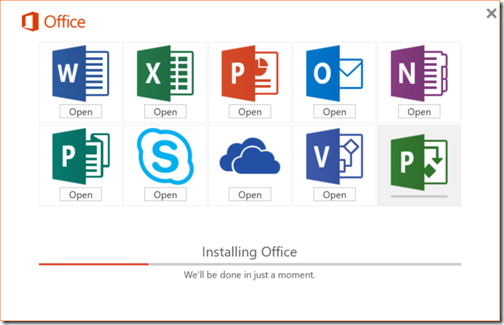
If you haven’t installed Office 365 ProPlus in a while, they have actually updated it for Windows 10.  When applications are available, you can click the Open button to start using them.

W10B10162Office365Install2016Open

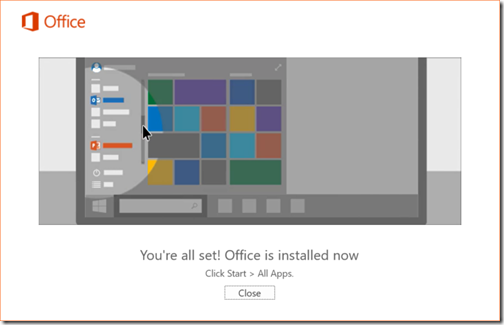
When the process is done, you’ll notice some new prompts showing you how to launch Office.  It will also pin many of the Office apps to your taskbar.

W10B10162Office365Install2016Complete

Once the process is complete, you shouldn’t be prompted with all of the activation prompts.

Moving the blog to Azure and the origin of DotNetMafia.com

$
0
0

When we built dotnetmafia.com, we used one of the most common blog engines around Community Server by Telligent.  At the time Telligent had a great blogging platform that they provided free to technical bloggers.  They really did a service to the community.  Then one day, they decided to drop the free product and start charging for new versions even for community bloggers.  Now, people barely even remember the name Telligent and for good reason.  Cloud offerings like wordpress.com with their freemium model moved in and took over.

Moving to Azure

That said, my blog has been running on a Windows Server 2003 virtual machine with only 2 GB of ram since 2006 or so.  As old as my version of Community Server is now, it still works pretty well.  It did come out before the days of mobile devices so the master page I have could use some work.  It’s been serving up blog posts for years though without issue.

The virtual machine was hosted with my old employer, Isocentric Networks.  Isocentric is a small data center based in Tulsa, OK.  I learned all about racking, networking, and hosting while I worked there.  They have been nice enough to let me host my blog there all of these years.  I am truly thankful.

With Window Server 2003 no longer being supported as of last month though, it was time for the blog to move.  I created a new Windows Server 2012 R2 virtual machine in Azure and copied the database and everything over.  I was a little fearful that I might not be able to get Community Server to work in the new environment, but everything worked just fine.  I just created a .NET Framework 2.0 application pool and configured a new web site in IIS and everything worked fine.

Now, I have pointed the DNS entry for the site over to the Azure Virtual Machine and things seem to be running great.  If you see an issue, feel free to ping me on twitter @coreyroth.

Why DotNetMafia?

Over the years, many people have asked why DotNetMafia?  Well as with a lot of great things in life, the concept started while a few of us were sitting around at the bar for happy hour one day.  We were telling stories about how there were some recruiters in town that were less than professional.  Back then it wasn’t uncommon for a recruiter to lie to your face, make you lie on your resume, or just sent it to a client without even talking to you first.  We wanted to build a web site where we could rate recruiters and people could go talk about the good and bad things recruiters did.  So Kyle Kelin (a.k.a. theGodfather), came up with the concept and name.  Like all of the billion dollar ideas, we came up with back then, we only got about as far as purchasing the domain name. 

A lot of us were changing jobs back then (hence the recruiter thing).  I actually started the blog internally when we were all working at Dollar Thrifty Automotive Group.  .NET Framework 2.0 was in beta and I started it to teach the development team I led about the new features that were coming.  Back then it was simply called Corey’s .NET Tip of the Day.  It really wasn’t a blog though, it was really just an announcements list in SharePoint 2003.  I wasn’t really working with SharePoint much back then, but I thought it was a good tool at the time for what we were trying to accomplish.

When I left Dollar Thrifty at the end of 2005, I wanted to keep the content going so I moved it to a virtual machine I had at Isocentric Networks and hosted it at dotnettipoftheday.com.  I actually exported the contents of my announcements list into Excel and then imported into a SQL Server database.  I wrote my own custom blogging engine at the time and I used it for a while.

Now a year or so later, a few of the other ex-employees of Dollar Thrifty wanted a place to blog too.  Tony Kilhoffer set up a SharePoint 2003 server and I tried to use the blog platform there.  Unfortunately, we couldn’t ever get the content quite right so we gave up. 

Then we ended up with Community Server.  The nice thing about Community Server was it had the ability to import content from an RSS feed.  This made bringing in all of my old content quite easy.  If you look around the blog, you’ll notice we host for six different people: Cory Robinson, Kyle Kelin, James Ashley, Tony Kilhoffer, Kevin Williams, and myself.  None of them really blog much any more, but their content is still there.  We had all of the bloggers, but what were we to call this new site?  DotNetMafia.com.  A cheesy name that has worked well for us.

Why not move to a new blogging platform?  I definitely want to but it is a bit of a challenge.  Moving the content to another platform isn’t that difficult.  However, maintaining the existing URLs when moving to a new platform is difficult.  If I don’t maintain them, I’ll break the SEO of the site.  My top post every month is years old and talks about using PowerShell with SharePoint 2010.  The SEO is important so before I migrate anywhere, I need to have a solid solution to maintain those links.

How to: Play an Office 365 Video from a Universal Windows App in Windows 10

$
0
0

I’ve had a personal interest in figuring out how to play videos from the Office 365 Video Portal in a Univeral Windows App (UWP) in Windows 10 since Microsoft Ignite.  In reality, the process isn’t that difficult, but there wasn’t a lot of details out there on how to put the pieces together until recently.  Today, I am going to walk you through how to retrieve the first video in a channel and play it using a MediaElement

Today, I combined elements I learned from Richard DiZerga’s Universal App blog post, Chakkradeep Chandran’s Ignite session, as well as Andrew Connell's MVC Sample.  Special thanks to all of them for having the pieces I needed to put all of this together.  Since this is a Universal app it should work across multiple devices in theory.

This app could easily be extended to create a nice interface to browse a channel and pick a video.  If you’re familiar with data binding in WPF though that shouldn’t be hard for you, so I won’t cover that today.  We’re simply going to look at the necessary API and REST calls to get the secure playback URL.  Once we have that URL, we can have the MediaElement start playing the video.

Getting started

First, you’ll need to have installed Windows 10 as well as the final version of Visual Studio 2015.  We’re also assuming you have an Office 365 tenant, the Video Portal turned on, and you have some videos uploaded.  If you have never created a Universal Windows App before you can find it under your favorite programming language –> Windows –> Universal –> Blank App (Universal Windows).

O365VideoVisualStudioNewUniveralProject

Playing a video from the Office 365 Video Portal involves several steps.  If you know some of the values already along the way (such as the Video Portal URL), you can skip some steps.  I am going to include all of them (which means this blog post is going to be long).  The steps we need to go through are:

  1. Authenticate with Azure Active Directory / Office 365
  2. Access the Discovery Service to get the RootSite ServiceResourceId
  3. Determine the Video Portal Hub Url (i.e.: https://mytenant.sharepoint.com/hub)
  4. Get the list of channels
  5. Get the videos inside a channel
  6. Get the video playback URL

As you can see, that’s a lot of service calls.  Caching is a good thing.

Connecting to Office 365

There are no shortage of ways to authenticate with Office 365 and Azure Active Directory.  Windows 10 introduces a new way called the Web Account Provider.  This will provide us our token that we can pass to the Discovery Service as well as give us tokens to other services such as SharePoint or Outlook.  It will prompt the user to enter his or her credentials if we don’t have a token yet as well.

To connect to Office 365 bring up the context menu on the project in Solution Explorer and choose Add –> Connected Service.  Select Office 365 APIs and then click Configure.

O365VideoConnectedServiceOffice365API

The nice thing about the Connected Service dialog in Visual Studio 2015 now is that it takes care of all of the manual Azure Active Directory application setup.  You don’t need to go manually copy a ClientId, secret, permissions, or anything.  This makes the new developer experience much better.

Now, you need to specify the domain of your tenant (i.e.: mytenant.onmicrosoft.com).

O365VideoConnectedServiceDomain

Clicking Next will prompt you for authentication.  Enter your Office 365 credentials and then you can proceed to the next step.

O365VideoLogin

Now, we need to tell Visual Studio to Create a new Azure AD application to access Office 365 API services.  This will register the new application in Azure AD and then we can request permissions.

O365VideoConnectedServiceNewApplication

On the next six steps of the Wizard, we set the permissions that the app requires.  For the purpose of playing a video, we don’t need access to Calendar, Contacts, Mail, or My Files.  For Sites, we need the following permissions:

  • Read and write items and lists in all site collections
  • Read and write items in all site collections
  • Read items in all site collections

O365VideoConnectedServiceSites

For Users and Groups, select the following permissions:

  • Sign you in and read your profile

O365VideoConnectedServiceUserGroups

Finally, hit Finish and Visual Studio will add the connected service to your project.

Designing the Page Layout

Now we’ll edit MainPage.xaml and add our controls to it.  I kept this simple by just adding a Button control and a MediaElement.  You can arrange them as you like.

O365VideoMainPageXaml

Authenticating with Web Account Manager

Before we get too far, I am going to create a folder for the Models.  I am going to skip a formal Controller class today since we’re not doing any real data binding.  Normally you would have multiple controllers to pull up a list of channels, videos, etc.  We’ll use a repository class, VideoRepository, that will connect to Office 365 and retrieve our data and our models we’ll use to deserialize the jSon that comes back from the REST API. 

The VideoRepository class will also handle authentication.  We’ll add the following using statements.

using System.Net.Http;

using System.Net.Http.Headers;

using Microsoft.Office365.Discovery;

using Microsoft.Office365.SharePoint.CoreServices;

using Windows.Security.Authentication.Web.Core;

using Windows.Security.Credentials;

using Newtonsoft.Json;

The first method we will create is GetAccessTokenForResource.  If you have looked at other Universal App Samples, this should look fairly similar.  The purpose of this method is to attempt to get a token silently (without prompting the user).  If it can’t, then it it will show the the Office 365 login and the user can login which will provide the token. 

publicasync Task<string> GetAccessTokenForResource(string resource)

{

    string token = null;


    //first try to get the token silently

    WebAccountProvider aadAccountProvider

        = await WebAuthenticationCoreManager.FindAccountProviderAsync("https://login.windows.net");

    WebTokenRequest webTokenRequest

        = new WebTokenRequest(aadAccountProvider, String.Empty, App.Current.Resources["ida:ClientID"].ToString(), WebTokenRequestPromptType.Default);

    webTokenRequest.Properties.Add("authority", "https://login.windows.net");

    webTokenRequest.Properties.Add("resource", resource);

    WebTokenRequestResult webTokenRequestResult

        = await WebAuthenticationCoreManager.GetTokenSilentlyAsync(webTokenRequest);

    if (webTokenRequestResult.ResponseStatus == WebTokenRequestStatus.Success)

    {

        WebTokenResponse webTokenResponse = webTokenRequestResult.ResponseData[0];

        token = webTokenResponse.Token;

    }

    elseif (webTokenRequestResult.ResponseStatus == WebTokenRequestStatus.UserInteractionRequired)

    {

        //get token through prompt

        webTokenRequest

            = new WebTokenRequest(aadAccountProvider, String.Empty, App.Current.Resources["ida:ClientID"].ToString(), WebTokenRequestPromptType.ForceAuthentication);

        webTokenRequest.Properties.Add("authority", "https://login.windows.net");

        webTokenRequest.Properties.Add("resource", resource);

        webTokenRequestResult

            = await WebAuthenticationCoreManager.RequestTokenAsync(webTokenRequest);

        if (webTokenRequestResult.ResponseStatus == WebTokenRequestStatus.Success)

        {

            WebTokenResponse webTokenResponse = webTokenRequestResult.ResponseData[0];

            token = webTokenResponse.Token;

        }

    }


    return token;

}

Let’s look at some of the highlights.  First we get our aadAccountProvider by calling WebAuthenticationCoreManager.FindAccountProviderAync().  This is the call into the Web Account Manager that I have been talking about.  You always pass it the https://login.windows.net (at least for this exercise).  We then need a WebTokenRequest.  This is where the ClientId of the application comes in.  Remember Visual Studio created this for us when it registered our app with Azure Active Directory.  The resource property is where we pass in the Uri to the service we want to access.  On our first call this will be the Uri of the discovery service.  On subsequent calls it will be the Uri we get for accessing things in SharePoint.

Next, the method tries to silently authenticate the user.  This method would return with a Success result if the user has authenticated inside this application before. 

WebTokenRequestResult webTokenRequestResult

    = await WebAuthenticationCoreManager.GetTokenSilentlyAsync(webTokenRequest);

If the user already has a token, then we are done.  Otherwise user interaction is required. The RequestTokenAsync call on the WebAuthenticationCoreManager is what actually prompts the user for credentials.  Ultimately, this method returns a token for the resource you asked for.  When we run the application and click the Play button, it will prompt us for credentials.

O365VideoCredentialPrompt

After you authenticate, you will get prompted to grant permissions to the app.  These will match the ones we specified earlier when adding the Connected Service.

O365VideoCredentialPrompt

Calling the Discovery Service

We’re going to call the Discovery Service to determine the ServiceEndpointUri for the RootSite capability. We’ll do this in a new method called GetSharePointServiceEndpointUri. We do this by accessing for an access token from our GetAccessTokenForResource passing the URL https://api.office.com/discovery

string accessToken

    = await GetAccessTokenForResource("https://api.office.com/discovery/");

DiscoveryClient discoveryClient = new DiscoveryClient(() =>

{

    return accessToken;

});

After we get a DiscoveryClient, we can call DiscoverCapabilityAsync.  This method also stores the access token used for accessing resources in the variable sharePointAccessToken.  It also stores the ServiceEndpointUri in the variable sharePointServiceEndpointUri.  We’ll use this URI for the subsequent REST calls.

CapabilityDiscoveryResult result = await discoveryClient.DiscoverCapabilityAsync("RootSite");

sharePointAccessToken = await GetAccessTokenForResource(result.ServiceResourceId);

sharePointServiceEndpointUri = result.ServiceEndpointUri.ToString();


return sharePointServiceEndpointUri;

Remember, the full source code is available in GitHub.

Get the Video Portal Hub URL

If you have worked with Office 365, you probably know that it’s pretty easy to guess what the URL to the Video Portal Hub will be (the hub is the root site collection of the Video Portal).  Since we want to do things right though, we’ll go through the Video Service’s Discover endpoint to determine the URL.  In fact, once we construct these next two methods, the rest will be very similar.

We’ll create a new method called GetVideoPortalHubUrl.  The first thing we’ll do is call GetSharePointServiceEndpointUri to authenticate and return us the endpoint for working with SharePoint.  We append VideoService.Discover to the Uri returned by our method.  How did we know this was the URL, it’s in the Video REST API reference (still in preview).

var requestUrl = String.Format("{0}/VideoService.Discover", await GetSharePointServiceEndpointUri());

We then, create a function that returns an HttpRequestMessage using the requestUrl.

Func<HttpRequestMessage> requestCreator = () =>

{

    HttpRequestMessage request = new HttpRequestMessage(HttpMethod.Get, requestUrl);

    request.Headers.Add("Accept", "application/json;odata=verbose");

    return request;

};

Then, we create a new httpClient and pass it, our access token, the HttpClient, and the RequestMessage to a custom method we will build named SendRequestAsync.   This piece is based upon other’s code so I didn’t really tweak it since it works.  After our call to that method, we’ll deserialize the jSon that comes back.  I borrowed several of AC’s helper classes from his MVP example here.

Let’s take a look at SendRequestAsync.  We’ll start with a using blog to get our HttpRequestMessage

using (var request = requestCreator.Invoke())

We’ll then need to add the necessary headers.  First, we add an AuthenticationHeaderValue with the sharePointAccessToken we got earlier.  We also add another header, X-ClientService-ClientTag.  I don’t know if this is required but Chaks included it in his examples.  I updated the version to match the current version reported in the Connected Service wizard.

request.Headers.Authorization = new AuthenticationHeaderValue("Bearer", accessToken);

request.Headers.Add("X-ClientService-ClientTag", "Office 365 API Tools 1.5");

Then we invoke the request using httpClient.

var response = await httpClient.SendAsync(request);

The method then returns the response assuming it’s successful.  The example that Chaks provided will actually make a second attempt to call the service if the user isn’t authorized.  You can optionally include that if you like.

Now going back to our GetVideoHubUrl method after we successfully got a response back.  We now need to parse the JSON that came back into a usable object.  This is where Newtonsoft.Json comes in.  We use the models that AC provided in the MVC project. In this case we serialize the responseString into an object of VideoServiceDiscovery.  Now, we can get the VideoPortalUrl for our subsequent REST calls.

string responseString = await response.Content.ReadAsStringAsync();

var jsonResponse = JsonConvert.DeserializeObject<VideoServiceDiscovery>(responseString);

videoPortalUrl = jsonResponse.Data.VideoPortalUrl;

Get the video portal channels

Now that we have our Video Portal Hub URL, we can retrieve the list of channels.  The Video REST API Reference tells us we need to append /_api/VideoService/Channels to the Video Portal Hub URL which we just retrieved.  We’ll create a new method called GetVideoChannels which will look similar to GetVideoPortalHubUrl expect the requestUrl used and the JSON serialization.

var requestUrl = string.Format("{0}/_api/VideoService/Channels", videoPortalUrl);

Since we return multiple channels, we loop through the results and add new VideoChannel objects to the list. 

string responseString = await response.Content.ReadAsStringAsync();

var jsonResponse = JsonConvert.DeserializeObject<VideoChannelCollection>(responseString);


var channels = newList<VideoChannel>();


foreach (var videoChannel in jsonResponse.Data.Results)

{

    var channel = new VideoChannel

    {

        Id = videoChannel.Id,

        HtmlColor = videoChannel.TileHtmlColor,

        Title = videoChannel.Title,

        Description = videoChannel.Description,

        ServerRelativeUrl = videoChannel.ServerRelativeUrl

    };

    channels.Add(channel);

}

At this point, you have enough data you can start doing some data binding.  As I mentioned earlier, I am skipping that since data binding in a Universal Windows App for Windows 10 is quite similar to what was there in Windows 8.1  For our example, I am simply going to pass the Channel Id into our next method to retrieve a list of videos.

Getting the list of videos in a channel

Now that we have a list of Channels, we can make another Video REST API call to get a list of videos in our new method GetVideos.  We build our requestUrl by appending /_api/VideoService/Channels(‘<channelid>’)/Videos.  Remember we got the Channel Id from our last API call.  Now this simply returns the metadata about the video.  After this, we still have one more call to get the Playback URL.

var requestUrl = string.Format("{0}/_api/VideoService/Channels('{1}')/Videos", videoPortalHubUrl, channelId);

The rest of the method is similar to GetVideoChannels

Get the video playback URL

For the purpose of our example, we’re also going to simply play the first Video in the Channel.  To get the Playback URL, we’ll need the Video Id as well as the Channel Id we retrieved earlier.  When it comes to streaming, we have a choice of either Smooth Streaming or HLS Streaming by specifying the streamingFormatType parameter on the Video REST API call.  HLS streaming requires one fewer API call so we are going to use that for the example today.  You may want to use Smooth Streaming for your application.  To use HLS Streaming, specify a value of 0.

var requestUrl = string.Format("{0}/_api/VideoService/Channels('{1}')/Videos('{2}')/GetPlaybackUrl('{3}')",

    newstring[] { videoPortalHubUrl, channelId, videoId, streamingFormatType.ToString() });

The REST call will return a playback URL which we can then assign to the MediaElement

Playing the video

On the click handler of the Play button we added in the beginning, we make our calls into the VideoRepository class.  Once we get the Playback URL we binding it to the MediaElement and the video will start playing.  I also set a few parameters to turn on the transport controls and enable full screen mode.  You can set those as you like.

private async void button_Click(object sender, RoutedEventArgs e)

{

    VideoRepository videoRepository = new VideoRepository();

    string videoPortalUrl = await videoRepository.GetVideoPortalHubUrl();

    var videoChannels = await videoRepository.GetVideoChannels();

    string channelId = videoChannels[0].Id;

    var videos = await videoRepository.GetVideos(channelId);

    string videoId = videos[0].VideoId;

    var videoPlayback = await videoRepository.GetVideoPlayback(channelId, videoId, 0);


    mediaElement.Volume = 0;

    mediaElement.AreTransportControlsEnabled = true;

    mediaElement.IsFullWindow = true;

    mediaElement.Source = new Uri(videoPlayback.Value);

}

There you have it a (somewhat) quick and dirty way to play a video from the Office 365 Video Portal in Windows 10.  This should work on Windows 10 Mobile as well.  Here is what our app looks like when playing a video.

O365VideoAppPlayback

Source Code

As promised the source code is available on GitHub.  I may extend it in the future to include all of the data binding and improve the look.  Feel free to contribute to the repo as well.  If you make use of any of the code, you’ll want to add error handling of course.

Feel free to ask me any questions by leaving a comment.

Source code on GitHub

Follow me on twitter: @coreyroth


SharePoint 2016 installation first look

$
0
0

Today Microsoft released the IT Preview of SharePoint 2016.  We’re going to look at the install process today and point out any differences between previous versions of SharePoint.  You can find out more about SharePoint 2016 from the Office blog post.

Installation

I created a new virtual machine running on Windows 10 Hyper-V.  This virtual machine is running Windows Server 2016 Technical Preview 3.  On this server, I have promoted it to a domain controller using Active Directory Directory Services.  I have also installed SQL Server 2014 R2.

Installation of SharePoint 2016 IT Preview looks similar to previous SharePoint installations.  When you mount the ISO, you will see a familiar splash screen.

SP2016P1Splash

Installing the prerequisites

The prerequisite installer looks similar to previous versions.  Click Next to continue.

SP2016P1Prerequisites1

Accept the license terms.

SP2016PrerequisitesLicenseTerms2

Wait and home it finishes successfully.

SP2016P1PrerequisitesProgress3

Installation of the SharePoint 2016 IT Preview prerequisites is just as troublesome as previous versions.  I managed to generate a few errors and never did get it to agree the role was successfully installed.  I had to install the Visual Studio 2013 Redistributable myself.  There is a work-around for getting around the IIS role configuration step on the Known Issues in SharePoint Server 2016 Preview page.

SP2016P1PrerequisitesError4

SharePoint 2016 Installation

The installation is quick and easy.  It also looks similar to other versions.  Start by entering the product key.  Remember this was found on the SharePoint 2016 download page.

Sp2016P1InstallProductKey1

Next, accept some more license terms.

SP2016P1LicenseTerms2

Specify the install location for your search index.  You can just use the defaults for this preview installation.

SP2016P1InstallFileLocations3

Wait for the installation to complete.

SP2016P1InstallProgress4

When installation completes, you will be prompted to run the Configuration Wizard.

SP2016P1InstallCompleteRunWizard5

Running the Configuration Wizard

The Configuration Wizard also looks similar but has a few changes.  Click Next to proceed.

Sp2016P1ConfigStart1

Now, create a new farm.

SP2016P1ConfigNewFarm2

Then, specify your farm passphrase.

SP2016P1ConfigPassphrase

Specify your farm account, SQL Server name and database.

SP2016P1COnfigDatabase3

This new screen allows you use the new MinRole feature. MinRole simplifies the server architecture of SharePoint 2016.  In this case, we are going to use a Single Server Farm (which shouldn’t be as bad as previous versions).

Sp2016P1ConfigRole4

Specify the details for Central Administration.

SP2016P1ConfigCA5

Confirm your settings.

Sp2016P1ConfigConfirmation6

When it finishes, you are ready to try out Central Administration.

Sp2016P1ConfigComplete6

Now, we can start our configuration.

SP2016P1CAOptIn

That’s a quick look at the installation process of SharePoint 2016 IT Preview.  Be on the look out for my next posts covering changes in Central Administration and the UI.

Follow me on twitter: @coreyroth

Drag and Drop into Office 365 comes to Edge on Windows 10

$
0
0

Looking back to the SharePoint 2013 launch, drag and drop into a document library was one of the hit features.  As many of us have transitioned to Office 365, it’s a feature we expect to be there in our document libraries and OneDrive.  However, when Windows 10 was released at the end of July, the feature was noticeably missing from Microsoft’s newest browser, Edge.  Drag and drop support didn’t work in Office 365, OneDrive, or anywhere else for that matter.

With the Threshold 2 (TH2) fall update for Windows 10 last week, we now have drag and drop support.  For Windows Insiders, this support has been there in preview builds for a while but it hasn’t been talked about much.

W10TH2EdgeDragDrop

Say what you want about Edge, I have had pretty good luck with it.  Some people act like it is completely unusable, but I can get most of my day to day tasks done with it.  I’ve used it to replace Google Chrome for almost all of my tasks.  Does it still have issues and does it still need more features?  Absolutely, but it gets the job done for the most part.  If you have discounted it before, give it another try.  It’s constantly being updated.

One cool feature that came with the fall update is the ability to cast media to a device directly from Edge.  What this means is that when you visit a page with a video on it, you can select cast to device in the menu and choose any Miracast or DLNA supported device to view that content on the remote screen. 

If you’re not familiar with Miracast, it lets your wireless transmit what’s on your screen to a TV or monitor.  This is included in a lot of devices now such as the Roku.  You can also pick up a Microsoft Wireless Display Adapter as well.  What’s nice is that you can cast a video to a TV from your Windows 10 device and you can still use it while the video is showing.  With Miracast support before, you had to project your entire desktop or extend it just like you did with an external monitor.

W10TH2EdgeCastToDevice

I think it’s a useful feature.  Similar to what Chromecast has been doing for some time now.  However, Miracast is a more open standard and supported across a variety of devices.  The nice thing is that it doesn’t require any additional drivers, plugins, or software to make it work.

Stalking your favorite celebrities with Office 365 Connectors for Groups

$
0
0

Office 365 Connectors are a new extensibility point for Groups.  They provide a way to pull in information from various sources such as Twitter, Bing News, and Trello.  The information they provide will be dumped right into your group’s inbox.

Office 365 Connectors for Groups are new.  Really new.  So new in fact that you have to enable them with a special query string parameter, EnableConnectorDevPreview=true.  The easiest way to enable them is to go the URL below.

https://outlook.office.com/owa/#path=/mail&EnableConnectorDevPreview=true

When you go to the URL below, you’ll see a new option for Connectors under the … menu of your group.

GroupsConnectorsMenu

There, you will see a list of all connectors currently available.  This includes things like Bing News, Twitter, JIRA, RSS, Trello, Github, and a few others.

GroupsConnectorList

Since we are looking to stalk celebrities, we’ll make use of the Twitter and Bing News connectors.  I want to know any time, the celebrities I am stalking send a tweet out.  When they do tweet something, what they say will automatically be delivered to my Group’s inbox.  If you are subscribed to the Group the will end up in your inbox as well.

Let’s add the Twitter connector.  The first thing you will need to do is add an account if you haven’t provided one yet.  Sign-in with your credentials to proceed.

GroupsConnectorTwitterLogin

Now, let’s configure the celebrities we want to stalk.  By adding their twitter handles (minus the @) separated by commas.  You can only enter up to 50 characters in the box, so if you have lots of people to stalk, you can just add another instance of the Twitter connector.

GroupsConnectorTwitterAdd

You can also Track hashtags this way as well as mentions and retweets.  It’s fairly versatile.  When you are done, click the Save button.  When you click it, it will give you no response and just wait there for a few seconds.  Remember this is a developer preview.  If you click it multiple times, you will end up getting multiple connectors, so just be patient. 

Now, I want to see whatever they say in the news about my celebrities so I am going to add a Bing News Connector.  This will give you a digest once a day of whatever terms you ask it to search on.  Here I have used the Bing News Connector to send me the latest on Neil Patrick Harris.

GroupsConnectorBingAdd

Once you are done adding connectors, you can see the ones you added on the Connectors page.  You can reconfigure them here as needed as well. 

GroupsConnectorsConfigured

When you return to your group inbox, there will be notifications that your connectors are active.

GroupsConnectorConfigured

Now, you just wait until your celebrities make their move (and for the connectors to fire).  When I first configured them last week, they didn’t work.  Remember, we are in a developer preview.  They are started working yesterday and the data started coming in bulk (and so did the notifications).  In my experience today, the twitter connector usually delivers tweets within 5 minutes of when it occurred.  The Bing News connector delivers a digest whenever it feels like.  I’m not really sure what time zone it is executing in but I assume it’s the local one.

After your connectors have started providing data, here is what it looks like.  For example, here is the twitter connector providing Wil Wheaton’s latest tweet.  You’ll get one entry in the inbox for each tweet.  The formatting of URLs, usernames, and hashtags could use some improvement, but all of the information is there.

GroupsConnectorTwitterResult

Here is what the results look like in Outlook 2016.

GroupsConnectorResultOutlook

It’s up to the connector to provide the formatting, so you can see the results from Bing look a bit different.

GroupsConnectorResultBing

All kidding aside, I hope you can see the power of Office 365 Connectors.  Instead of stalking celebrities, you could use this same technique to quickly provide information about company’s competitors right to your inbox.  There is also a developer story using Webhooks.  The last I checked the URL it provided me didn’t work yet, but we can expect it is coming soon.  Office 365 Connectors are powerful and I am looking forward to using them more.

I hope you found this look at Office 365 Connectors useful.  Happy stalking!

Stalk me on twitter: @coreyroth.

10 tips a consultant can give to a company issuing an RFP

$
0
0

In my days, I have seen a lot of RFPs, RFIs, and RFQs.  I’ve seen RFPs that are simple, complex, small, large, strict, well-executed, and no-so-well-executed. In my experience, there are a lot of things you can do to ensure you get the best possible response.  If you are considering issuing a Request for Proposal (RFP) for your next project, consider the following before issuing your next one.

1) Set realistic dates

When you issue an RFP, it takes a heap of time for a consulting firm to mobilize a team, get the right people on the call, and prepare a response.  The more complicated your RFP response requirements are the longer it takes to prepare a response.  I’ve received RFPs which want a turn-around in less than a week.  When this happens, often one or more of the bidding firms will push back on you or simply decline to respond.  This often causes multiple extensions to the RFP deadline which honestly doesn’t make your company look good.  When your RFP process is not organized, it makes me question whether we want to do business with your company.  If you can’t run an RFP without a lot of issues, you may not be able to successfully run a project initiative or pay your invoices on time.

Also pay attention to the dates you set.  Setting an RFP to be due the day after Christmas or during the Thanksgiving break is not cool.  You don’t want to work on the holidays. Your respondants don’t either.

2) Don’t ask for references in your RFP response

When applying for a job, I am not going to give you a list of references before I have even talked to someone at your company.  When responding to an RFP, it’s not any different.  It’s not that we don’t want you to vet us out and know our qualifications.  You have to understand references are difficult.  You are asking for us to ask our previous clients to take time out of their day and talk to you about a project on our behalf.  Chances are you aren’t the only RFP we are responding to at a given time either.  That means that client could be receiving multiple calls.  Think about it.  If you select my firm and we successfully implement your project, are you willing to be a reference for any number of random callers?  I doubt it.  Reference calls need to be scheduled and prepared for in advance.  I can’t just have you calling them blindly.

Instead of asking for references, ask for qualifications.  If you have questions about the qualification ask the respondant to talk about it when you down-select vendors and go to orals.  At that point, it might be acceptable to ask to set up a reference call.

3) Don’t require answers to questions that aren’t relevant

You know what makes vendors question if they even want to respond to your RFP?  Required responses to a bunch of questions that aren’t relevant.  I once had an RFP for an Office 365 implementation ask questions such as “Does your product included printed manuals?”.  My response: “We plan on documenting your implementation.  We can print if off for you if you would like.” In the question period, I even asked about these irrelevant questions and the company insisted they all should be completed.  Make sure you are asking the right questions.

Don’t ask too many questions either.  Keep in mind, that every vendor you pull in is going to mobilize a team of people to put together a response.  This likely includes time from the account manager, a vice president or two, an architect, and maybe an offshore team.  It’s not uncommon for the team to spend several hundred hours combined in their response.  For smaller companies that often means using resources such as the architect that are billable.  For that person they either are billing less or working overtime

4) Respond to questions in a timely manner

Potential vendors ask you questions to clarify their understanding of your needs.  Your answers are often crtiical to building their response.  If you don’t reply to answers until two days before the RFP is due, that is going to strain the respondants.  It also means you might not be getting the best response possible out of your bidders because they didn’t have adequate time to prepare it.  Try to get your responses back at leaast a week before the RFP is due.

5) Stop asking for fixed-bid

So the project you are working on is risky with a lot of unknowns?  Great, let’s slap a fixed-bid requirements on to the RFP.  That way if there is an issue, you can blame the consultants! 

Do you not realize what happens when you do this?  You are automatically paying 20% more at the minimum.  The winning firm is going to do everything they can to lock in scope and assumptions so they don’t end up losing money on the deal.  Not to mention, that there is rarely enough detail in terms of requirements in the RFP itself to make an accurate estimation.

If for whatever reason the consultant can deliver on the fixed bid, eventually you are going to hit a point where you are straining the relationship with your consulting firm.  This is when talks of lawyers come in and then neither of you want to do business with each other ever again.

Your best bet is to fixed bid a scoping engagement to properly map out the requirements and technical design.  From there, you can get a more accurate estimate on the implementation and you will likely end up paying less.

6) Don’t include too many vendors

Keep the number of vendors down to a minimum.  Keep in mind, you are asking a lot of people to jump through a lot of hoops at every firm you contact.  You’re just creating more responses that your RFP team has to read through and rank.  They will all start to look the same after a while too.  Definitely, don’t let one more vendor in because some sales rep got wind late in the process that you were having an RFP.

7) Stop asking for active and past litigation

Are the lawyers at your company going to provide a list of all law suits you have ever been involved in to someone random?  Why do you expect us to?  Companies get sued all the time, especially the larger ones.  I don’t see many firms providing you this information.  If you really want the details, you can go dig it up.

8) Don’t be so picky about the response format

I think it’s ok to ask respondants to limit the length of their respose to X amount of pages.  It’s not cool to have phrases like “adding a column to this spreadsheet is grounds for being kicked out of the RFP process”.  I understand you have to review multiple RFPs and you are trying to keep things consistent but specifying which font or a maximum file size of an exhibit is just silly. 

9) Don’t ask for hard copies

I’m looking at you government and health care companies.  In this day and age asking for a hard copy to be delivered in person or by courier is just silly.  Why don’t you just have us chisel it out the response in stone tablets?  Let us deliver the response electronically via e-mail or through and RFP response portal.  If you just want to print it out because you want to scribble notes on the paper, may I introudce you to the Surface Pro 4.  You can use digital ink to mark up or highlight the response as needed.  If you really do need paper copies, print it out yourself as needed.  Are you just trying to save on printing costs?  If you are that might be a bad sign you don’t need to do this project. 

10) Don’t issue an RFP if you are just going to pick the encombant

Again, be mindful of all of the time you are using of people.  RFPs often require sizable teams and late hours to meet the deadline.  If you know you are going to pick the encombant before even starting the RFP process, that is absolutely bad form.  There is a special place in hell for companies that issue an RFP and then just pick the vendor they already had.  Work out whatever issue you had with your vendor and just go with them and skip the RFP process.  If it is procurement pushing you to issue an RFP so that you will get the “best deal”, time to get a new procurement department. :)  At least, let the respondants know that there is an encombant at play.

Bonus Tip – Don’t ask for names of resources

Don’t ask for the names of resources that will be staffed in your RFP response.  Do you really think we have an entire project team sitting around on the bench just waiting to be staffed on your project if we happen to win it?  Our company wouldn’t be in business long if we did.  Keep in mind you aren’t the only RFP we are responding to at a given time.  If you really thought we had resoures lying around at all times multiply that by the number of active RFPs and that’s a lot of people not bringing in revenue.  Nothing shows that your company has no idea how the consulting industry works more by asking for the names of resources in an RFP response.  I can almost assure you that whomever we list as a name won’t be the person you get at the start of an engagement.  If you want to know the background of the people you are staffing wait until you select a vendor and then ask for a profile.

Do you really need to do an RFP?

You have smart people at your company, but maybe you just don’t have enough of them.  That’s why you are issuing an RFP right?  Maybe you are looking for a certain skillset you don’t currently have?  Before opening up an RFP for your next project, ask if you really should.  Your smart people should already have established relationships with a handful of vendors.  Call some of them, tell them what you are trying to accomplish and just ask for a proposal.  Setting up an entire RFP process is long and overly complicated.  If you already have an established relationship with a few vendors, why shop it out?  If they have done good work in the past, they probably will in the future as well.  If anything you know what you are dealing with.  Do you really want to go with a different vendor for every project just so you can ensure you get the best price?  I understand there are other reasonse to issue an RFP, but you really have to ask yourselfif it’s really worth it?

Complete list of Office 365 Connectors for Groups

$
0
0

Office 365 Connectors for Groups provide a way to pull in information from various sources such as Twitter, GitHub, UserVoice, and Trello.  Office 365 Connectors deliver external content straight to the inbox of your Office 365 Group.  Last fall, I talked about how to use Office 365 Connectors while they were in preview.  However, now they are available for customers with tenants in First Release. 

Now, there are over 50 Office 365 Connectors available.  Many for services I have never heard of (maybe you have).  Here is the complete list (as of now):

  • Aha!– Manage work with a visual roadmap.
  • Airbrake– Captures errors and aggregates the results for developer review.
  • Alerts by MarketSpace– Company monitoring for marketing, PR, development and investment teams.
  • AppSignal– Track throughput, response times, and error rates in your apps.
  • Asana– Task and Project Management.
  • BeanStalk– A code hosting workflow
  • Bing News– Search news for your work and personalize email update.
  • BitBucket– Manage and collaborate on your code projects.
  • Biztera– Biztera simplifies decision-making with cloud software that streamlines approval workflows
  • BMC TrueSight Pulse (Boundary) – Monitor cloud and server infrastructure with real-time visibility.
  • Brandfolder– Gain great controls of your brand assets, all from Office 365.
  • Bugsnap– Track issues for your web and mobile apps.
  • Buildkite– Smart automation for your software development processes
  • Caller Zen– Create an SMS call center in seconds.
  • Chatra– Modern Live Chat Software.
  • CircleCl– Build, test, and deploy software continuously.
  • Clearlogin– Integrate Clearlogin with your GroupMail to receive real time notifications about use activity.
  • Cloud 66– Build, deploy, and manage applications.
  • Codeship– Automate the workflow for development and deployment.
  • Crashlytics– Track errors in mobile apps.
  • Datadog– for Dynamics CRM
  • Delighted– The fastest way to gather actionable feedback from your customers.
  • Dynamics CRM Online– Manager your customer sales, marketing, and service relationships.
  • Enchant– Provide customer support with chat and email.
  • Envoy– The new standard for visitor registration
  • GhostInspector– Build or record automated testes for your web site.
  • GitHub– Manage and collaborate on code projects.
  • GoSquared– Simple, yet powerful analytics for your online business
  • Groove– Provide customer support with tem collaboration.
  • HelpScout– Provide customer support through email messages.
  • Heroku – Build and run applications in the cloud.
  • HoneyBadger– Exception and uptime monitoring for your web apps
  • Incoming Webhook– Send data from a service to your Office 365 group in real time (this is how you can bring in your own data to Office 365 groups)
  • IQBoxy– Intelligent Expense Management with Real-Time Receipt Processing and Expense Reports
  • JIRA– Gather, organize, and assign issues detected in your software.
  • JustReply– Simple time tracking for teams.
  • Librato– Real-Time Cloud Monitoring
  • Logentries– Search and monitor log data from any environment.
  • Magnum Cl– Build, test, and deploy software continuously.
  • MailChimp– Email marketing service
  • MeisterTask– An intuitive task management and collaboration tool for agile projects
  • OpsGenie– Alert and Notification solution
  • PagerDuty– Track and manage incidents, and define escalation policies.
  • Papertrail– Track and manage incidents and downtime issues.
  • Pingdom– Track uptime/downtime and performance of web sites.
  • Pivotal Tracker– Track progress in agile projects.
  • Raygun– Monitor crashes in web and mobile apps.
  • RSS– Get RSS feeds for your group.
  • Runscope– Log, monitor, and measure your API usage.
  • Salesforce– Manage sales opportunities
  • Sentry– Capture and aggregate exceptions in code.
  • Stack Overflow– Follow tagged questions and provide answers.
  • StatusPage.io– Statues page for App or Website
  • Subversion– An open-source revision control system
  • TestFairy– Test mobile apps and retrace events that precipitate errors.
  • Travis Cl– Run tests and deploy apps.
  • Trello– Manage to-do lists and tasks all in one place.
  • Twitter– Received messages called Tweets.
  • UserLike– Provide live chat support for web sites and mobile apps.
  • UserVoice– Product management and customer support tool.
  • WakaTime– Get updates about your team’s daily coding activity from GitHub, GitLab, or Bitbucket.
  • Wunderlist– Organize and share your to-do lists.
  • Yo– Communicate with others in simple fashion.
  • Zendesk– Zendesk brings companies and their customers closer together.
  • ZootRock– Curated Content in your niche to share to your Groups.

As you can see that is quite a list of Office 365 Connectors.  Are there any in that list that you will find useful?  Is there anything you wish was on the list?

Viewing all 161 articles
Browse latest View live


Latest Images